Step By Step Faux Granite Countertops (WITH EDITS AND ADDITIONAL INFO)

Shannon Tipton
by Shannon Tipton
7 Materials
I have seen so many pictures and posts where a homeowner paints a "faux" granite countertop. So of course I wanted to try it! Luckily we have a guest house on our property to try it on. I wasn't nervous about trying it, only because my husband and I were talking about adding granite in the guest house in the future anyways! So I gathered up paper plates, paper towels, sponges, tape, craft paints (I already had from Hobby Lobby), my Dr. Pepper and BIG hopes that I could conquer this challenge I'd given myself !!
READY *SET *GO !
(I HAVE EDITED THIS POST DUE TO THE QUESTIONS/COMMENTS I WAS GETTING AND WANTED TO GIVE AS MUCH DETAIL AS POSSIBLE FOR YOU TO BE HAPPY WITH YOUR PROJECT AS WELL AS I WAS WITH MINE)
PLEASE EXCUSE ANY TYPOS OR INCORRECT SPELLING!
(You do not need to be an English Major to pick up a paint brush, right?)
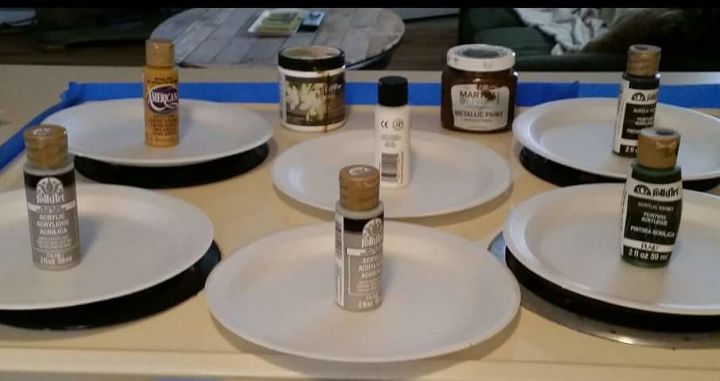
In the pic above shows the colors I used.


Tan, butter yellow, grey, green and bronze (because these are the colors in the decor}


(you probably can see that there is a bottle of white and black paint also) But please note that I used the black at the very beginning, as seen in the third picture below. Once I started to blend with the other the colors, the black pretty much faded away. (I love black, but it was not going to flow with anything in this space) I had NO clue really where I was going with this. But as I was applying the paint colors, I would step back, look at it, then decide "what color was needed to continue to get the tones I was reaching for".The white was used towards the end while I was blending and trying to lighten up the over all area that I thought needed it.


Note that I also had (at some times) TWO dampened sponges, both with different colors to apply on the counters. BUT at NO time EVER did I only work in ONE area only. I would continue the entire space before adding what ever color(s) I thought was needed next. The entire project is completely a "judgment" call on your part.
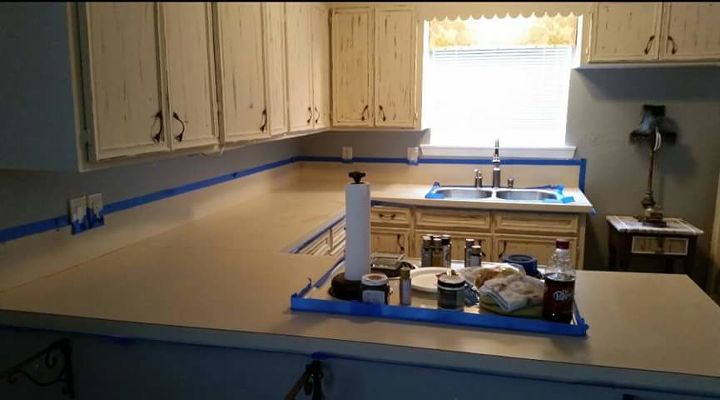
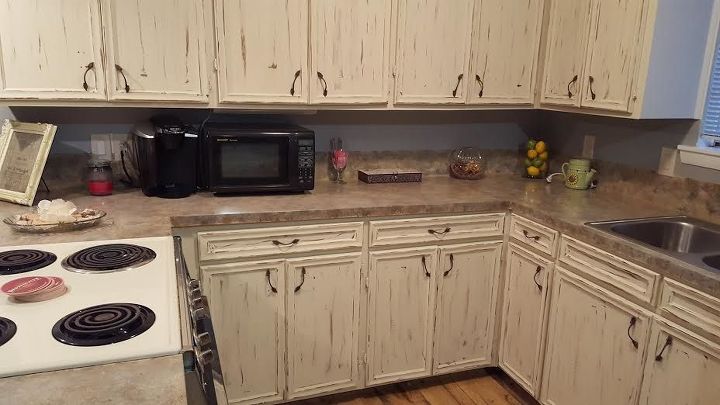
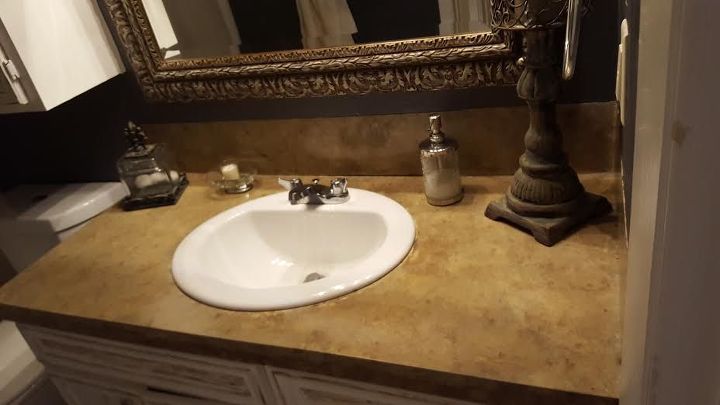
The above photo shows the formica countertops I had to work with


The photo below shows the first few colors sponged on...


Please note that I DID do a "test" area. Just a small area with some paint, to see how the formica would take it. It painted on very smoothly and nice. BUT I then sprayed Windex to remove it so I could start the process. Yes! The Windex took it right off. So...


note that the paint WILL scrub off with a cleanser until you seal it. Which I will talk about below.


The following picture shows my first 2 colors I applied (grey and yellow)
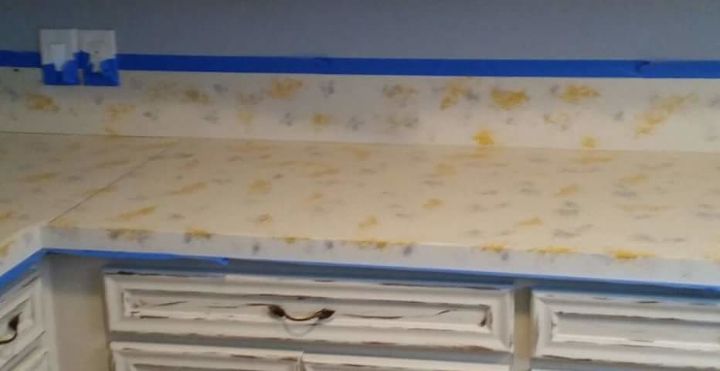
The below picture will hurt your eyes, for sure! This is the point where I was thinking...


"Oh sh!t my husband is gonna kill me"!


So...the ONLY options I had at this point was to either keep going or STOP before any more damage was done!
Well, I am not a quitter and I have done so many projects that I was very pleased with. So PLEASE (anyone out there who has wanted to tackle this project) let me save you from some heartache, frustrations, or when you're on that fence of


"quitting" or "keeping at it"... KEEP AT IT !


I did NOT take pictures during this process, to be completely honest at this stage I was in "freak out" mode. I wasn't even thinking about pictures during this process. I was solely concentrating on blending this mess I have created!


Well below is the final paint job, I am so glad I did not give up!
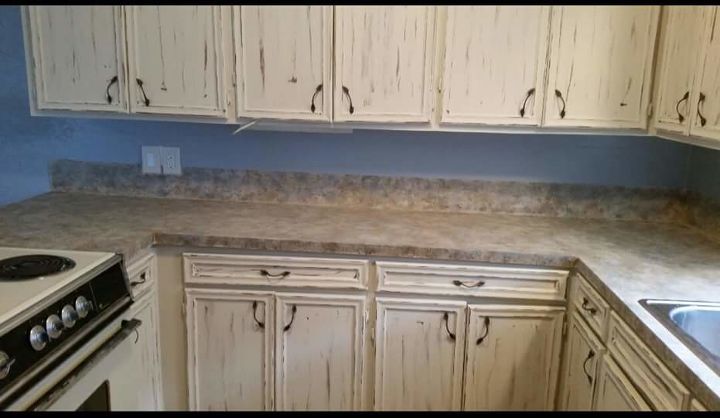
I can't stress enough on the blending and the damp sponges (the sponges were small, medium, and large) just randomly (sp?) using different sizes to try and get a result I was pleased with. There was no method to this madness!


Keep at it, and keep blending and blending and blending with what ever color you are working with or adding. I can not stress enough how important it was to keep my sponges wet (not dripping wet but BARELY dabbing it on the paper towels) The dryer the sponge was the less it would blend for me (probably due to the fact that it was not glaze) So as I was making my rounds to the entire counter space I would dampen and dab in the paint as I was going (trying my best to keep the same consistency through out the process)


ALSO I put on about 5-6 coats of polycrylic for protection which has been wonderful since we use this house for guests A LOT but we have NOT ever cooked in there so needless to say the counters have not been exposed to heat or knives. My husband always cooks for our guests, so we do this either in the dining room (as seen in my post "An Old House with a Hidden Gem!"), man cave (as seen in my posts, Part 1 & 2 of "My Husband's Man Cave Where Everyone is Welcome!" or in the outdoor kitchen.
I let the Polycrylic dry for about 3 days before I put anything back on the counters. I had a reader share that there is a "marine grade" sealer that is also "heat" resistant. I am not familiar with this product, so maybe you can


Google it and check it out. I thought that was good information, so I wanted to pass that along! Just be sure that what ever sealer you use, make sure it doesn't "yellow" over time.
By the way...my husband's reaction???


He loved it and was impressed! Yay!!!!


So there was no doubt in my mind about doing the same thing in the guest house bathroom!


This is only my 3rd blog (I have done so many projects and thought that maybe I should share with other people that LOVE to decorate, design and refurbish.


Thanks for reading and looking forward to posting all my projects I have done recently


Since I have always taken before & after pics anyways!
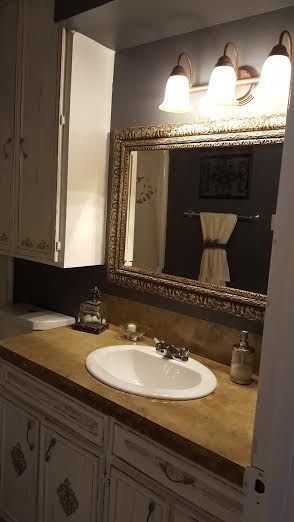
The above pic is the bathroom "before"


and below are the pics of "after"
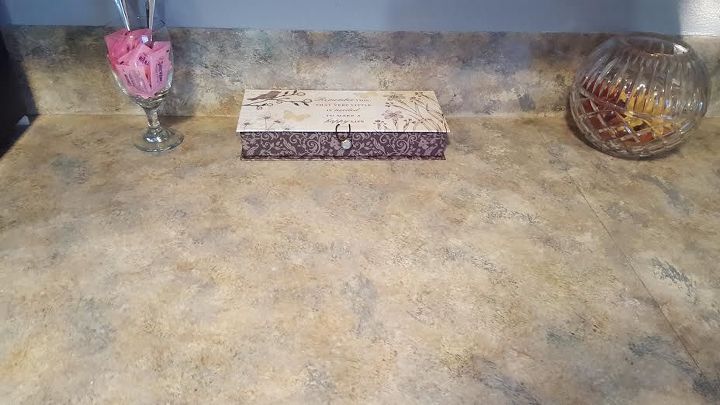
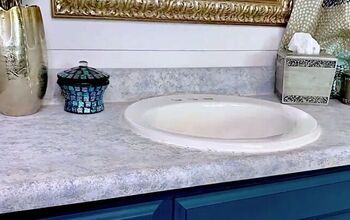
Thank you for reading, good luck, and GO FOR IT! I am a true believer that you really can not mess this up, do to the fact that either you can #1 scrub it off with Windex or


#2 keep at it with what ever color of paint you think it needs. There was NO glaze used what so ever, only water, sponges and paint.


So I was able to have "Granite" in the kitchen AND bathroom for probably under $15...score!!!


Have a productive day!


And best of luck!!!
Frequently asked questions
Have a question about this project?
3 of 60 questions
  • Peg Hoffman Peg Hoffman on Jan 23, 2019

    I have old butcher block counters in kitchen- what can I do with those - my cabinets are white and white tile flooring with grays / black small tile backsplash

  • Tracy Easton Tracy Easton on Jan 26, 2019

    Do you have to remove the sink first? That’s what always keeps me from trying this.

  • Kimberly Urban Kimberly Urban on Feb 07, 2019

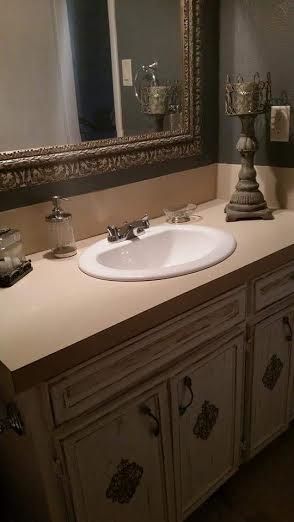
    Like the bathroom counter top...what colors did you use?

Comments
Join the conversation
2 of 231 comments
  • Dorothy swann Dorothy swann on Jan 08, 2019

    Good going! Looks good and MOST importantly you didn't destroy the environment by taking granite from the mountains.

  • Susan Sutton Susan Sutton on Jan 30, 2019

    This looks awesome! I have been wanting to do this for some time but have been terrified of trying it! Thank you for making it seem so much more simple than I thought it could be! I’m definitely going to try it!

Next