Recycled Decoupaged Paper Mache Bunny

I discovered the most adorable decoupage bunnies on a popular retail site and knew immediately my next project would be inspired by these cuties. Unfortunately, I couldn't find paper mache bunnies similar in size and shape so I had to create my own.
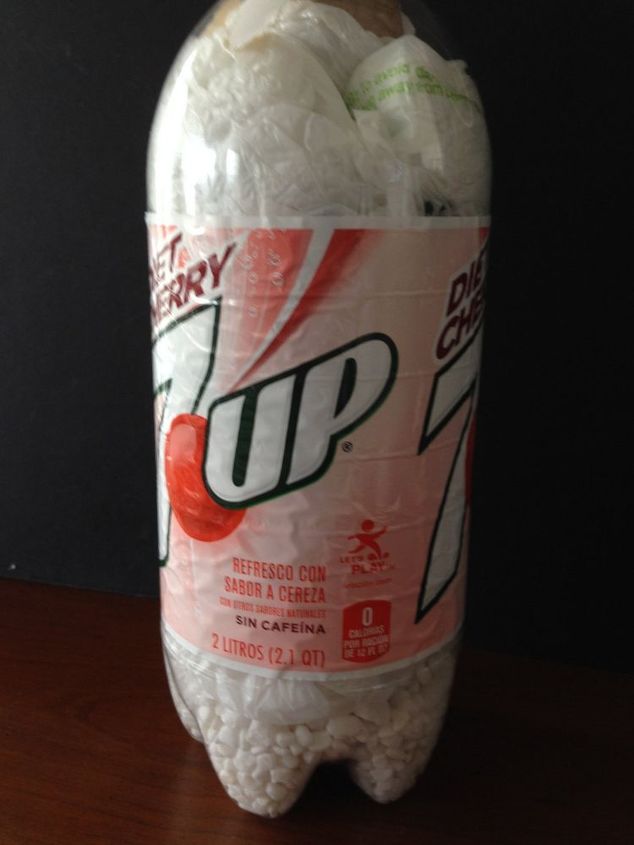
To begin, clean a 2.1 qt. soda bottle and cut off the top opening. Add small rocks and pebbles to the bottom to give weight and then stuffed the cavity with plastic bags so that the sides won't cave in.
With a picture of the original bunnies to look at, begin shaping the structure with masking tape, using a paper mache egg for the head (wrapped in a plastic bag), and clothes hanger wire for the ears. Use a portion of a toilet paper tube to extend the neck and fold paper towels to shape the bunny legs and feet. Add additional paper towels to increase the bottom area of the bunny and to cover the ears.
Once satisfied with the bunny's shape and foundation, mix a paper mache paste - one part water, one part flour and a pinch of salt. A large roll of white drawing paper was torn into small strips and used to glue on for the body.
After the first layer of paper is glued on, place the bunny in a 200 degree oven to dry.
Laying the bunny down in the oven flatten the backside so for the next two layers a blow dryer was used instead and then allowed to dry overnight for each layer. *If the paper mache layers aren't completely dry, there's a chance for mold and deterioration from the inside out. Brush on a coat of mod podge after the bunny is completely dry.
To decoupage the bunny, begin my removing the two layers of backing of the napkins to expose the single printed side.
Tear out the portion of pattern you want to use making sure there are no hard lines or straight edges. Using a sponge brush, apply mod podge to the paper mache area and then lay the napkin piece on top, smoothing it out with the brush. Use plastic wrap to gently smooth out any additional wrinkles.
Continue applying the napkins in this manner, slightly overlapping each piece as you continue to cover the bunny.
Allow to dry once the bunny is completely covered with the napkins. And finally, seal the dried bunny with a brush on clear varnish or sealant. For a complete step by step tutorial visit by blog, Purple Hues and Me at http://www.plumperfectandme.com/2016/02/recycled-decoupaged-paper-mache-bunny.html
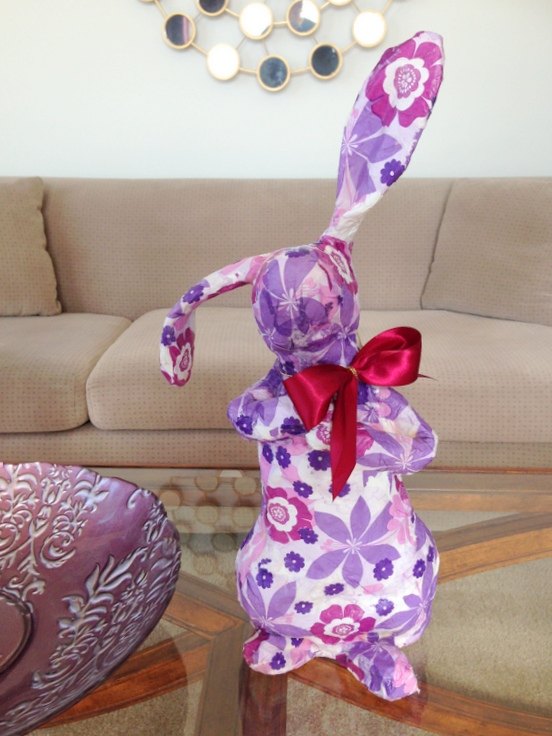
Wait! I found napkins in a purple print that goes with my décor much better, so I covered the bunny with a white acrylic primer and decoupage the new napkins on. Doesn't he look so much better?
DIY home decor using recycled paper
Enjoyed the project?
Suggested materials:
- Empty 2.5 liter soda bottle
- Rocks and pebbles for weight
- Masking Tape
- Mod podge/glue
- Decorative printed napkins

Comments
Join the conversation
-
So adorable! It made me smile!
 Jeannie Carle
on Feb 11, 2017
-
Thanks, Jeannie! That's how I felt too!
 Gail@Purple Hues and Me
on Feb 11, 2017
-
-
-
 Linda McDowell
on Mar 15, 2017
Made the precious bunny and I'm so so please with how it turned out. I names her Flower as she is decoupage in tiny flower pattern napkins. Thanks for such great instructions!
-
Flowers sounds beautiful! Would love to see a picture!
 Gail@Purple Hues and Me
on Mar 15, 2017
-
-








Frequently asked questions
Have a question about this project?