Asked on May 22, 2016
Peel and stick bathroom tile problems

by
Michelle
+13
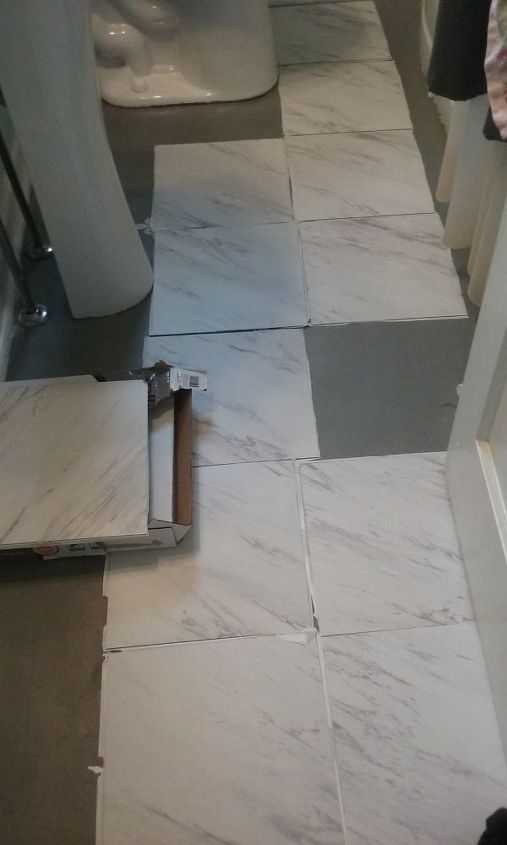
So the bathroom is tiny 29 sq feet. We got some peel and stick tile to put on the floor for now, remodel is scheduled in two years. I discovered the floor is not even so there is a sliver of a gap in places there was no way that the seams where going match up. I am frustrated, I don't think it looks good. Should a paint and poly a border around the room? The curves are on both ends so I can't tile to line up.
9 answers
-
Idea might be to create 'grout lines' ,painting lines and as long as they are uniform,size of tiles wont matter as you will have a rustic look.maybe age tiles too,painting them faux slate,granite etc???
 Marc G Denning
on May 22, 2016
Marc G Denning
on May 22, 2016
-
I think I'd try painting a "rug" or design on the floor. Good luck!
 Jacalyn
on May 22, 2016
Jacalyn
on May 22, 2016
- See 1 previous
-
If I'm seeing the picture correctly, you're "assuming" the seams will show because they show when you lay them down with the paper backing still attached??? I put a similar tile in my bathroom and when you butt them up correctly as you lay them, the seams are barely visible and nothing shows between them. This was laid on old ceramic tile with no leveler. Put a couple down (you can pull them up with a hair dryer) walk over them for a few days and see how they look.
 Linda Santo
on May 22, 2016
Linda Santo
on May 22, 2016
-
Linda Santo is correct! Your layout photo shows the paper still on the tiles causing the gaps. Once you butt the tiles to each other the seams will barely show. I assume by the photo your tub is on the right. I would start laying the tile from the tub, making sure they are in a straight line, to the opposite wall. Make cardboard templates around the toilet and sink pedestal, trimming them to fit tight. Use the templates to cut the tiles to fit. Once the tiles are down you can caulk around the toilet, pedestal, and tub to cover small gaps. You always want full tiles where they will be most visible. Optimally, the sink and toilet should be removed before tiling, but that is extra work. Plumbing, removing, resetting, connecting plumbing. Pedestal sinks are not easy to work with. Since you plan to do a remodel in the future this should work for you.
 William
on May 23, 2016
William
on May 23, 2016
-
Use a staggered pattern. Place the first tile and the next on will be put half way down the first tile, etc. Wish I could draw the pattern for you.
 Roxann Suits
on May 23, 2016
Roxann Suits
on May 23, 2016
-
Home Depot sells a groutable vinyl tile. This will allow more "forgiving" for any roll on the floor (as long as the subfloor has enough "grab" for a vinyl tile). Also consider a different pattern of layout of the tile on the floor (diagonal, offset 1/2 tile,...etc). 😊
 CrowEyes
on May 23, 2016
CrowEyes
on May 23, 2016
- See 1 previous
-
Thanks good advice , now that I had sleep I am ready to finish up the floor again thanks for the input fro everyone.
 Michelle
on May 23, 2016
Michelle
on May 23, 2016
-
Can you show us an update when you do the job with photos?!
William
on May 23, 2016
-
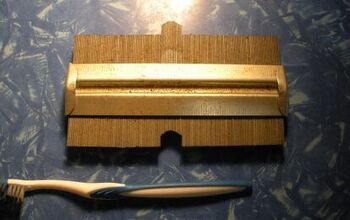
My Dad had a tool that would be useful to you. I'm attaching a photo. It has all these metal pins, held all side-by-side, and if you push them against a shape, and then pull them away, it keeps the shape of the object. In the photo, I pushed it against the handle of the toothbrush below the tool. I'm sorry I don't know what it's called, but when I found it among his tools, I said "Man! I wish I'd had that when I put in that tile!". The most important thing is to find a wall that is really STRAIGHT, and start there. If you actually have 2 straight walls that form a 90 degree angle, you've got it made!
 Jennie Lee
on Jun 18, 2016
Jennie Lee
on Jun 18, 2016
Sign Up to Answer