Asked on Jul 05, 2013
Disaster Shower Job

+61
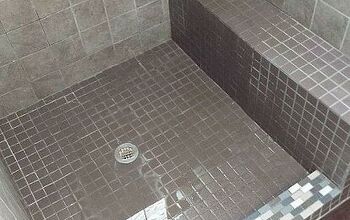
I recently got taken by a person that was recommended to do a complete shower install. He seemed knowledgable due to the fact that I had never installed a shower from the ground up without using a pre-fab kit. To make a long story short. He tore my walls down to the studs. He installed the green sheet rock and then directly on that the cement backing. He then used thin set on the concrete foundations to make a shower base. He went directly onto that with the tile. Well once he was done, I noticed the shower floor was not sloping correctly and told him to fix it. He continued working on putting the wall tile in directly onto the cement board. I questioned him about him not putting a protective coating and he said it wasn't necessary. I am not even sure if he sealed the seams with some kind of sealer. His second attempt to fix the uneven floor failed. I had enough and sent him marching, which I should have done long before. Now I am told I have to rip the entire shower walls down, trash all my tile and start from scratch. I probably should have done more research for step by step installation before and then do it myself, but it is now water under the bridge. So...have i just lost several thousands of dollars or is there some light at the end of my tunnel?

64 answers
-
My understanding is there is no reason to using the green sheet rock and the cement board although I don't know if it actually hurts anything. Put the vapor barrier behind the cement board and then tile on top. Or you can use a membrane on top of the cement board instead of the vapor barrier, just not both. Do you know if he even installed a vapor barrier?? If your contractor did such a horrible job on the floor, I wouldn't trust the rest of the shower is done right. I think you have to start over. Where water is concerned, I would feel much more comfortable knowing it was done right instead of repairing water damage later. So sorry!!
 Thegreenworkbench
on Jul 05, 2013
Thegreenworkbench
on Jul 05, 2013
-
You need to tear it all out and start once again. Schluter systems make great shower systems that work great for exactly what your looking to do. http://www.schluter.com/143.aspx Another method is to use green board, but cover it with schluter waterproofing membrane. This product goes up like wallpaper, but thin set cement is used instead of paste. This product is a waterproofing membrane that has a felt like surface but with a plastic membrane that prevents water leakage. Once that is up on the walls, you simply tile over it. Using a pre-fab type of flooring system with drain and correct pitch already built into the floor make that part easy. The floor becomes part of the wall system when you wrap the membrane into the floor system. Once the floor is done you then tile the floor first then work up the walls. Once tiled and grouted you use a good quality grout sealer and you have a long lasting shower and wall assembly that will not leak or cause mold issues.
 Woodbridge Environmental Tiptophouse.com
on Jul 05, 2013
Woodbridge Environmental Tiptophouse.com
on Jul 05, 2013
-
well I don't see a shower pan installed or the proper 2" shower drain to attach the pan too , so yes to have this shower working and not leak into your walks it will need to removed and done by a lic, contractor .. Some times saving $ is doing it right the 1st time
 New England Plumbing
on Jul 06, 2013
New England Plumbing
on Jul 06, 2013
-
Rip the floor up, the bottom wall tiles and threshold of the shower unit to the wood framing. Purchase a shower floor kit or have an experienced tileman or plumber to install your floor. I don't believe that the entire shower tiling needs to be removed. A true craftsman comes in ALL walks of life.
 Darryl & co
on Jul 06, 2013
Darryl & co
on Jul 06, 2013
-
Brenda..it isn't what you want to hear but tear it out and start over. It will be worth it in the long run to do it right.
 Hewitt Remodeling Services LLC
on Jul 06, 2013
Hewitt Remodeling Services LLC
on Jul 06, 2013
-
this is good in info from everyone, and a need to know. i just went through a situation with an electrician did a bad job took money didn't finish and disappeared..thanks for posting, it's really a shame when people take advantage of people
 Lynne
on Jul 06, 2013
Lynne
on Jul 06, 2013
-
Having completed my sixth bath remodel this year, I think we have this process down pretty good. (I'm being modest here...) Yes green board should be used in any areas that have the potential for water penetration, and a concrete backing should be used. (Durarock or Hardie). But those seams should be sealed. IT is imperative that a proper shower pan liner on a pitched pan is installed, per code. We now use a kerdi product that seals all seams/corners. This stuff is very hard to work with, but we feel this is the best water penetration protection there is. Once this is applied, a two coat waterproof membrane is applied. (We apply the paint type version) Two coats in opposite directions is necessary to insure a waterproof coat. Now your tile can be installed. The final step (which is the most important) is that depending on what type of tile is used, all grout lines (and in the case of porous tile, the tiles themselves) have to be sealed. We use a product that is at a cost of 35.00 a pint. This process should be completed every 12 - 18 months. (The more the shower is used, the sooner to reapply the sealant). Lastly, hire someone who would use a very similar system to this one. A contractor may have brands they like more than others, but all of these steps are needed to insure a waterproof shower for years to come. And in closing, the pitch of the floor is very important for proper drainage of water. A licensed tile installer will know this and insure it is a part of your new shower. I am sorry you had to go through this experience. If anyone else can learn from this, (and I say it over and over..) get references when having work done in your home.
 Straight Nails Construction
on Jul 06, 2013
Straight Nails Construction
on Jul 06, 2013
-
Brenda, there is light at the end of the tunnel. As Darryl & Co. has stated. Remove the tile at the shower floor, the threshold and no more than two rows of tile starting at he shower base. This time around make sure a pvc membrane is used. Double check for a 1/4" per foot in slope for proper drainage when setting your mud pan.
 A-Pro Renovation
on Jul 06, 2013
A-Pro Renovation
on Jul 06, 2013
-
I can't add much to these great answers...but I can offer my sympathy. One shower pan system I have used is one from "tile-redi" https://www.tileredi.com/
 KMS Woodworks
on Jul 06, 2013
KMS Woodworks
on Jul 06, 2013
-
Thank you for all the suggestions. Yes I cringed at the thought of having to tear it all down. I have removed the floor tile and working on the first row of tiles that are 13". I want to see if he at least sealed the corners and seams of the cement board. If he did, can I just do the bottom part of the walls and floor with the products you'll recommended? I am out of $3500.00 out with labor and supplies. I don't have another $3500.00 to put out right now. OHHHH! it makes me angry at myself. Shoulda coulda woulda won't fix it. Thanks again...I think I will come to this for advise for my next project.
 Brenda Frisard
on Jul 06, 2013
Brenda Frisard
on Jul 06, 2013
-
Take out the lower 1' so that you can properly install a pan. Replace the wall tiles. Silicone the corners and live with the fact that you had a "tile guy do a shower pan" which should be left to someone multi skilled that can do cement finishing, plumbing, and tile. Unfortunately tiled shower pans are skilled type work that a ton of us say we can do but lets face it, I rip most of the competitions out do to leaks. If you need any advice on shower pans let email me citywidetile@yahoo.com I install at least 1 a week.. www.cwremodelcontractor.com/shower-pan.html
 Renovation by Design
on Jul 06, 2013
Renovation by Design
on Jul 06, 2013
-
Hi Brenda,sorry to see that another customer has been a victim of bad work how ever there is a way you can water proof your shower with out tearing the whole thing down you will have to purchase more tile. It is a tile over tile application using the Schluter system It will save you time money and frustration. I would recommend using licensed contractors in the future.
 Joe195884
on Jul 07, 2013
Joe195884
on Jul 07, 2013
-
Thank you. I have learned so much from this expierence I could do it myself. Just kidding. Going to hire a professional.
Brenda Frisard
on Jul 07, 2013
-
Just curious....was the first guy licensed and insured? A quick search on your State's Contractor Licensing website may tell you that. If he is licensed: (1) file a complaint with the Contractor's Licensing Board, and include photos, your story and even a statement from another licensed contractor, explaining what was done wrong. (2) If you can find out who his insurance company is (General Liability), you may also be able to file against that (although he most likely has a $5000 deductible, they may still pay the claim and charge him the money). (3) Ask about his bond and whether it is a payment or performance bond. If performance, file a claim against that. You may be able to recoup some of your money. If he isn't licensed, but has a business registered with the state (your Secretary of State's office will be able to tell you), (1) ask the state licensing board what you can do to help assure this doesn't happen to another person. He may be fined for working without a license, or (2) you may be able to file a civil case in court to recoup some of your money. I really hope you go after this guy. A person doing work without proper knowledge can cause so much more damage than most people realize. At least you caught this before you experienced major water damage and/or mold problems. Best of luck to you!
 Leslie D
on Jul 07, 2013
Leslie D
on Jul 07, 2013
-
I want to add one thing about my comment about removal of everything to start over. While many others have suggested that just the bottom be removed, which will work, my experience tells me that if they did this wrong, what is the rest of the walls hiding? It would be a shame to go through all of the hard work tearing out the base and the first one or two courses of tile to have later on failure of the bench seat, or other wall tiles cracking or coming loose. As a professional I would NEVER warrant a job unless the owner allowed me to do the whole thing over again.
Woodbridge Environmental Tiptophouse.com
on Jul 07, 2013
-
Woodbridge is absolutely correct. You will probably not be able to find a reputable, licensed person who will "patchwork" the job. There is just too much liability for that person's license and insurance to determine what may be his problem vs. existing problem if anything goes bad in the future with the overall work. If you find someone willing to do the patch work, they may not be the best choice, either.
Leslie D
on Jul 07, 2013
-
Green board in a wet area? Not anymore, don't trust anything someone says if it includes green board. Period.
 Hands On Home Improvements
on Jul 07, 2013
Hands On Home Improvements
on Jul 07, 2013
-
Because he didn't seem to know plumbing codes, no permit pulled, or tested. It seems like you hired a tile setter and not a plumber then a tile setter. Take a sledge hammer and start busting it up to start over. Sorry.
 David Favara
on Jul 07, 2013
David Favara
on Jul 07, 2013
-
I feel your pain. Had a similar experience before I got smart an learned to check for Lic and Ins on the people working on my house. You could try to save the tiles that come off whole and reuse them if you are not changing tile types. The broken pieces would also be very much appreciated by crafters. Just put up a post on FREECYCLE or craigslist and they will cart away the tiles, saves you from having to fill your trash cans if you are even allowed to in your area. Good luck.
 Denise Rankin
on Jul 07, 2013
Denise Rankin
on Jul 07, 2013
-
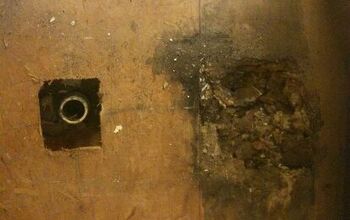
He was not licensed. Poor choice on my part. I have more problems. He cemented the drain in. I am not sure if this a big problem.
Brenda Frisard
on Jul 07, 2013
-
It will be more difficult to remove, but it can typically be removed without damage, by using some care and taking time to chip away at the cement a little at a time, taking care not to drop debris into the drain. A bigger concern would be if he got concrete into the drain. http://www.ehow.com/how_12104753_remove-shower-drain-grate-cemented.html
Leslie D
on Jul 07, 2013
-
Since I am super thrifty, I would attempt to salvage the job. If the wall tile is sticking well, I would seal the grout with an inexpensive grout sealer. Then I would remove the floor tiles and use a self leveling concrete compound that you can mix yourself. It's specifically for floors, try to slope the floor so the water will drain properly. I think you can also tile over this compound if you don't like the look of the concrete. It will also need sealing. Tile should be installed on the cement board, but your guy also used regular drywall that holds moisture. Not good. This repair job may not be a permanent fix, but then you will have time to find some one reputable to redo the entire job, plus it will give you some time to save money. Best of luck!
 Jessica C
on Jul 07, 2013
Jessica C
on Jul 07, 2013
-
I mentioned a maximum of two rows because you need at least 24 inches high of the membrane as your wrapping. Your bench is right below the 2' mark. You'll then be positioned to inspect the installation of the bench at that time. As for the green board and cement backing green board is not to be installed in areas of direct contact with water. laminating it with a cement board or Hardi backer is typical. As Leslie D stated, you can chip away at it yourself and save a few dollars. make sure to wear eye protection and put duct tape or blue tape across the opening of the drain to prevent blockage. Good Luck... should you need more help you can e-mail me directly @ wlmathis@aprorenovation.com
A-Pro Renovation
on Jul 07, 2013
-
here's a hug. I bet you could use a little kindness by now :) Many of us have learned the hard way. No fun, but you have learned a lot. Good luck to you!
 Nancy Keay
on Jul 07, 2013
Nancy Keay
on Jul 07, 2013
-
You DO NOT need to tear it all out and start fresh! I do this for a living I should know! The only thing that I see wrong is the way he floated in you shower pan. You can probably get away with tearing out the old pan and redoing it with out tearing into your walls. Don't forget you float in half of the pan with quick set, after that install your rubber membrane, then float in the rest with an appropriate grade. There are a number of "YouTube" vids out there that show you how to do it. Good luck!
 Anthony Joseph
on Jul 07, 2013
Anthony Joseph
on Jul 07, 2013
-
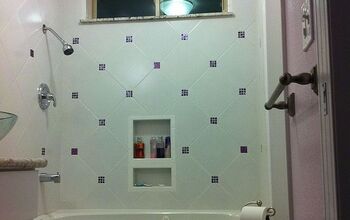
I've done three of these in my house the past 7 years, the last one looks nearly identical to yours (same tile on threshold and same tiles, different color on the rest of it.) I am not a pro, but I have learned a lot in gutting and remodeling my entire home. The first thing I learned about the shower is NOT to use cement board over green board. Moisture gets trapped in between the two, the green board eventually breaks down and then things go bad. The second time I did that shower, I went with a rubber vapor barrier right over the studs and then cement board and then tile. That was 5 years ago and still holding strong with 16" tiles all the way around. The third shower was a new build and I went with studs->cement board->RedGuard membrane->tile. I may have gone a bit overboard on the RedGaurd (I painted the entire shower) but I can pretty much guarantee there will be no leaks. The next shower I do I will do studs->DenseShield (lighter than cement board)->KERDI system->tile. Seems like the best method yet. If I was in your shoes, I'd probably start from scratch so that I knew it was right, but I definitely understand cost constraints. In that case I think A-Pro Renovation has it right. At least take up the tile to the 2' mark and then, assuming that there is no vapor barrier behind the cement board nor green board, I would coat those bottom two feet and the new pan with RedGuard or similar product, then re-tile everything. Unfortunately, you'll probably have to redo the threshold as well as you have no way of knowing if the seam he did is credible, or at least the inside of the threshold depending on how those glass tiles are laid out. The toughest part will be resurfacing the pan and getting the pitch with the drain already in place. At least it was for me. That part of my shower doesn't look as good as the rest of it, but I know to use a Schluter-KERDI system next time and all will be well. Good luck! BTW, this site (www.johnbridge.com) is unbelievably helpful if you are going to do any of this yourself or just want to vet your next contractor.
 Just S
on Jul 07, 2013
Just S
on Jul 07, 2013
-
If the p-trap is filled with concrete/motor, that is a pretty big problem! P.S. I am not a moron, just a master plumber with 30 years of experience.
David Favara
on Jul 07, 2013
-
This just goes to show there are a lot of different opinions out there....sometimes we have a different approach to get to the same result. Just S has provided the same application process as I have, just in a much simpler explanation. So... I will add that in the case of showers, more is less... since you don't want issues down the road. I personally wouldn't want to fix just the base, and have the walls leak down the road. I hope in the future we can agree to disagree without name calling. There are a lot of talented people on here just trying to help out a person who was taken advantage of by a contractor.... a battle we all fight each and every day.
Straight Nails Construction
on Jul 07, 2013
-
Many questions need to be answered prior to assuming what is or is not code. Green Board in a high-humidity area is no longer recommended, and code specifically states that green board is not to be installed over a vapor barrier, as it traps moisture and swells/breaks down. IRC, R702.3.8 (excerpt) "Water-resistant gypsum board shall not be installed over a vapor retarder in a shower." However, your repair person put Cement Board over Green board, which is not a good idea. Neither product is water proof...they are water resistant, with cement board being a much better product. It will not swell in water/high humidity, but your studs and the green board behind it will. If there are air leaks from an exterior wall behind that, it further increases the chance of moisture buildup due to condensation from temp differences hit dew point. Does your space include a proper CFM vent fan, and do you use it properly (running while showering and for 15 min typical after for full air exchange, depending on size of your bath)? Bottom line is that local codes require different installation methods. Some codes require only 6" of moisture barrier protection from a shower floor when cement board is used. Other codes require full barrier protection for high-humidity or shower-head installs, and you live in LA, a high-humidity area. While a moisture barrier may or may not be required (you can find out by calling your local building department, which is always a good idea since building code is typically left up to the inspector for his interpretation of the intent of the code), I always lean to the "better than code" philosophy, especially where high humidity and water is concerned. I own my own building company and manage subcontractors every day. My statement of a sub not wanting to take on someone else's work stands. If anyone has ever tried to replace a bad subcontractor mid-way through a job, you will find that a reputable company will not take on another person's work unless there is a clear line of responsibility/work scope/warranty performed by each. The work scope I write for installation of tile in a shower always includes a full height waterproof membrane behind the cement board as all cement board products specify as correct install, or a waterproof surface membrane (such as Schluter) as a surface applied application where there is a tile shower, and may or may not include properly backed insulation, depending on whether it is an interior or exterior wall. Anyone who tells you definitively what you MUST do on this thread may be wrong, unless they are licensed and building under your local building department jurisdiction.
Leslie D
on Jul 08, 2013
-
Well if I didn't know any thing about tiling I would be pretty confused after reading some of these reply's...... Drywall is not a approved substrate for shower walls unless you use Schluter kerdi which is a waterproof membrane, you do not install a vapor barrier behind the substrate if you use the following kerdi or a liquid waterproof membrane like hydroban or redguard as this will trap moisture.
 FloorNerd
on Jul 09, 2013
FloorNerd
on Jul 09, 2013
-
If you are using a topical membrane and you have an exterior wall with either plastic facing or kraft paper facing you need to cut slits into that facing before installing your substrate.
FloorNerd
on Jul 09, 2013
-
Remove everything, get inspection. install laticrete shower pan and curb, install dens shield wall board, silicone seams , paint on laticrete hydroban anti fracture/waterproof membrane, get inspection. tile, grout, seal. install fixtures get final and enjoy. A license does't save you from bad work, a good inspector does. always get a permit.
 Mills Tile & Granite
on Jul 10, 2013
Mills Tile & Granite
on Jul 10, 2013
-
I am in the process of tearing out and redoing a bad shower, too. One contractor suggested that I use one of the epoxy grouts instead of concrete grout. I read very mixed reviews on it and it costs a lot more. Should I spend the extra money and have it installed?
 Linda P
on Jul 10, 2013
Linda P
on Jul 10, 2013
-
@Linda P expoy grout is some pretty tough stuff to get used to. It does stay cleaner than regular grout but for me is not worth the extra cost and "effort" of the install. I have about 500 sq feet of tile in my home and all of the grout is just regular cement based. I have had no issues with cleaning in the 10 plus years it has been installed. The trick is to install grout that is not white...LOL
KMS Woodworks
on Jul 10, 2013
-
To my knowledge epoxy could be the best grout to have, although most epoxy grout has a really fast cure time so working quick with it is key. Some brands require the color to be added. The trick is to keep what ur not using at the moment in the fridge to slow cure time.... As if it drys and you haven't finished you will be out of luck. Hope this help!
FloorNerd
on Jul 10, 2013
-
The guy was an idiot and screwed up your whole job. Its sad but I think you should start over so you don't continue to have problems down the road. I don't know why you would sheetrock and then cement board. The shower base does not sound like it was done at all properly. I didn't see you say anything about a rubber shower pan or anything. Save yourself future problems and start over. So sorry you went thru this.
 Lyman Kitchen and Bathroom Remodeling
on Jul 11, 2013
Lyman Kitchen and Bathroom Remodeling
on Jul 11, 2013
-
I agree with Woodbridge on the system to use (http://www.schluter.com/8_4_kerdi_shower_kit.aspx). What I don't agree with is it going up like wallpaper. It takes quite a bit more elbow grease. Any of the shower pan systems that are separate from the walls can give you trouble. Anti fracture/waterproof membranes are great products, if used correctly. You have address where the walls meet and floor meets walls. You can't just paint the membrane over or caulk it. This guy most likely didn't correctly seal where the walls meet, so the complete unit should be disassembled (not just the bottom rows). Thanks for sharing. I know this was a tough one and hopefully many others will learn from this. Good luck.
 Houseworks Unlimited, Inc.
on Jul 11, 2013
Houseworks Unlimited, Inc.
on Jul 11, 2013
-
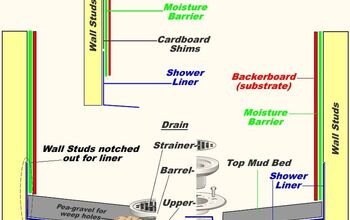
Here is the correct way. None of that was done here.... It's a pitty. If the cement board was water proofed on the walls then you most Lilkely only have to do the floor base over IMO.
FloorNerd
on Jul 11, 2013
-
Thanks to everyone who commented. After pulling the floor out and 26" of tile, I knew it all had to come out. Doing it right this time. Hired a license professional.
Brenda Frisard
on Jul 11, 2013
-
Excellent conclusion Brenda! You'll appreciate your decision when everything still looks great 5 years from now. Just make sure you have vetted this next person fully and make sure you get all of his credentials in case there are any issues. Good luck!
Just S
on Jul 12, 2013
-
I had the same thing happen to me and I did check this person out and saw his work. OMG what a mess. I spent a lot of money on the tile, but it is now all in the trash. I asked the contractor to fix things I thought were amiss he comes to the house and tells me he will be back in a half hour. Never seen or heard from him since. I now need to find a reasonable but competent contractor and have no idea where to start.
 Dee
on Jul 12, 2013
Dee
on Jul 12, 2013
-
Remember a license does not a contractor make. Check out his or her work. I know dozens of contractors who should never been given a hammer, let alone a nail. Remember price does not always mean cheep work, or better work. Careful on the amount of deposit you pay out. and always pay as it goes. If they are a good contractor they will work with you on payments. If they demand 50% or more and then ask for more when materials are delivered. Keep the materials and return the contractor from which they were found. GET PERMITS! Keep us posted on the progress!
Woodbridge Environmental Tiptophouse.com
on Jul 12, 2013
-
Amen, Woodbridge! Permits will require inspections, and at least you have the inspector checking the work for proper install. It may add a few dollars to the cost, but well worth it.
Leslie D
on Jul 12, 2013
-
So where in the world do you start looking for a licensed "good" contractor who will pull permits?
Dee
on Jul 14, 2013
-
Angie's list is a pretty good place to start Dee
David Favara
on Jul 14, 2013
-
It all depends we're you live that requires permits to be pulled for this type of work. What home owners need to do is do the research on the contractor you hire. Look them up on the web, ask for profolio of there work or website. Read up on the work that you wont done. Make sure there insured. If you get referral from some one like a friend who used the contractor make sure it's the same work.
FloorNerd
on Jul 14, 2013
-
Thanks again everyone for your advise. I do have a licensed contractor and have viewed his work. Where I live there are no permits needed. I have a master plummer preping the plymming for the drain. I decided ri gut it myself to save on cost. Will pist pictures when completed. master p
Brenda Frisard
on Jul 14, 2013
-
Sorry about spelling errors. No as to correct from android.
Brenda Frisard
on Jul 14, 2013
-
Leslie D, although pulling permits do have merit, I find the inspections are worthless most of the time. The inspectors are not looking for quality, only substance. They check to see if water proof drywall is used, they check to see that the plumbing is properly piped and pitched correctly. They do not check to see if the drain is properly tiled, or if the water proofing membrane has been installed, The permit process is just to assure that life and safety issues have been followed, they could care less if the tile was installed properly, or if the drain was correctly fitted into the floor, or for that matter if the floor was pitched properly. It may be different in other parts of the U.S. but where I am from, they only look at basic stuff. The rest is the reputation of the contractor.
Woodbridge Environmental Tiptophouse.com
on Jul 14, 2013
-
Brenda, Permits are required throughout the state when doing any plumbing or electrical work. If a licensed contractor is required, so are permits. Also a fire permit, and general construction permit is often required when doing a bath renovation.
Woodbridge Environmental Tiptophouse.com
on Jul 14, 2013
-
Wow... I sure wish I had time to read all these responses. I am a tile pro with 20 plus yesrs experience. My first objection would be the location of the drain as it doesnt give enough space to draw a level mudbed around the showerbase perimeter. You have to have a mild slope and with that drain location you will see the fall or slope of shower base along your back wall. Now saying that you can only work to that point. Install a vinyl floorpan and compatable drain, then a mudbed. Then thinset tile to mudbed. The walls can be strickly studs with 1/2" cement board and the waterproofing is optional. I would tape and skim all seams tho. Waterproofing is fine but can be bypassed. i have some showers in posts on mu wall if you wish to see. They were built for prominent attorneys and the owner of the Winston-Salem Dash Ballteam. NEVER HAD PROBLEM ONE. :)
 Originals by Rhonda
on Jul 16, 2013
Originals by Rhonda
on Jul 16, 2013
-
Rhonda, if there is a vapor barrier attached to studs behind the cement board then you would not water proof the cement board. If there is not then highly recommended to waterproof the cement board with topical liquid or a kerdi to water proof. Your curb and pre-slope is done before your waterproof liner, if its a wood floor then a metal lath could be used for the thinset to adhere correctly to the plywood. For concrete you just skim coat the floor with thinset so the deck mud can adhere.
FloorNerd
on Jul 17, 2013
-
Why would you ever want to waterproof a shower???? (Okay, now that I have your attention, this is the master of the two remodels we are doing. Vinyl base against subfloor, tile set directly to green board. It's a mess...... I'll post pics as we rebuild the shower step by step).
Straight Nails Construction
on Jul 19, 2013

-
@Straight Nails Construction How old is this home? back in the "old" days setting tile on greenboard was common practice, and even "allowed" by code. This is not the case today. OSB is also not so great for a subfloor.
KMS Woodworks
on Jul 20, 2013
-
My house was built in the 70's. I have gutted the entire job. I was going to widen the shower since I had to gut it so I pulled up tile he laid on the floor and the thin set adhesive was still wet. Would this be a moisture problem or did he use the wrong adhesive? Wow! This IIT just keeps getting worse.
Brenda Frisard
on Jul 20, 2013
-
Off topic: I wish KMS and Woodbridge lived in my area LOL!!!
 Sia@South 47th
on Jul 20, 2013
Sia@South 47th
on Jul 20, 2013
-
@Brenda Frisard Thin set ( the real stuff) is cement based and it "cures" by a chemical reaction. Just like concrete to some degree. The color will lighten over time as the residual moisture dissipates. I may "look: wet but should have been rigid and firm to the touch. If is was still "mud like" then most likely it was not real thin set, or was somehow compromised due to poor mixing use of additives etc.
KMS Woodworks
on Jul 21, 2013
-
I do not know about Kevin KMS, but I travel for food! lol
Woodbridge Environmental Tiptophouse.com
on Jul 21, 2013
-
@Woodbridge Environmental Tiptophouse.com And I can cook!!! Old homestyle comfort stick to your guts kinda cookin' hehheeee
Sia@South 47th
on Jul 21, 2013
-
its 19-20 years old. I realize things have changed... I was poking fun at our rude commenter. I just thought the pics would be funny after all the banter on this post. Subfloor is coming up tomorrow, plumber is moving tub drain and water lines, shower drain and valve/shower head. Then we will start to put back together....
Straight Nails Construction
on Jul 21, 2013
-
@Sia@South 47th I'm a lot closer to CA than @Woodbridge Environmental Tiptophouse.com and I love good food too.
KMS Woodworks
on Jul 22, 2013
-
@KMS Woodworks I think both of you should come here LOL!!!!
Sia@South 47th
on Jul 24, 2013
-
Brenda Frisard sounds like he might have used Mastic which is not designed for showers or floors. Can take a long time to cure in that situation and when it gets wet is softens back up.
Lyman Kitchen and Bathroom Remodeling
on Jul 26, 2013
-
I used a shower pan in my shower. Easier to clean, and you don't have to worry about the slope. Simple setup, just put it in place, glue it down, or screw it to the walls, plumb it, and you're done. The wall tile rests over the lip of the pan, so the walls of the shower have to be cut back a little so the pan edges go under the concrete board. I used to make these showers in a modular home plant, and never had a service call, so I made mine the same way.
 Kirt N
on Jul 28, 2013
Kirt N
on Jul 28, 2013
Sign Up to Answer