


DIY Modern Address Sign
Step One: Remove Old Address Sign I removed the old address sign with my drill and if you look carefully, you’ll see that two anchors were still left in the concrete after I took down the sign. I hate drilling into concrete, so I did everything in my power to make sure the new sign could be hung using those existing anchors. To do that, I made sure to save the screws from this sign and drill them in the exact same spot on the next sign.

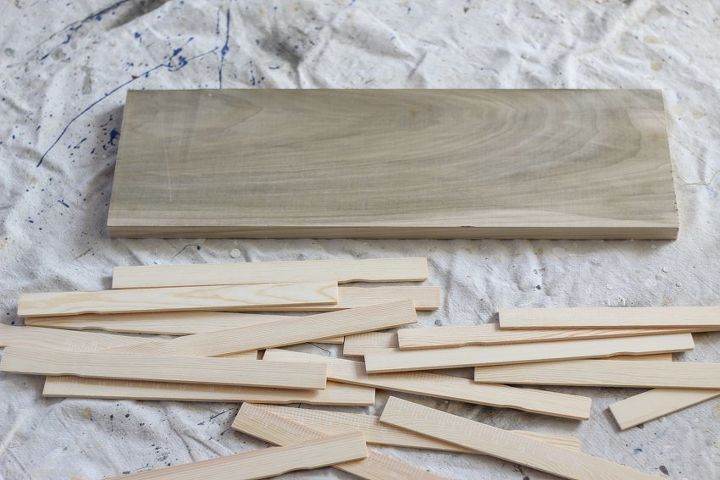
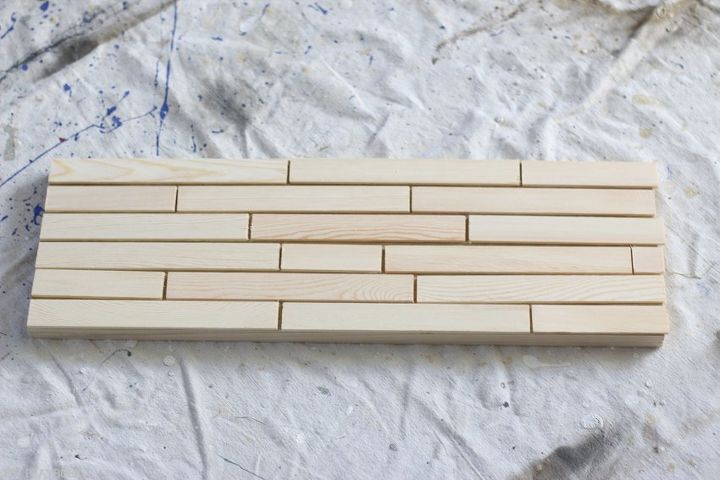
Step Two: Layout Paint Sticks to get the pattern you like At this point I set up my miter saw and started laying out the paint sticks and cutting them to size. I wanted the paint sticks to be laid randomly on the block of wood so that none of the seams lined up. Honestly I didn’t use any particular method, instead I just eyeballed it and cut the paint sticks to fit the length of this board.
Step Three: Cut Paint sticks to size and attach to board with nail gun I used the nail gun to carefully nail each paint stick in place… trying to keep the board’s original “layout” in place as much as possible so I knew where to nail each piece.
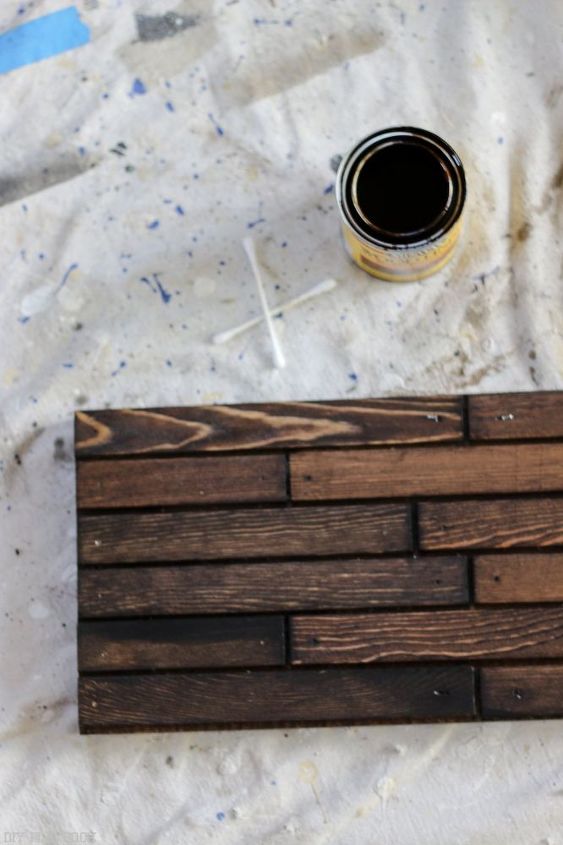
Step Four: Stain & Seal I stained the board and sticks using Minwax stain in Dark Walnut. I wanted the sign to be dark brown but not SUPER dark brown (like Jacobean, which I typically love). I wiped the stain on the sticks (and in between the seams with a q-tip) and then wiped off the excess. This process did the trick, but like I said, I would recommend completing all staining before cutting and nailing.
I allowed the sign to dry overnight (with a fan). Then I used this spray to water proof the sign. Honestly, this address sign is located under our home’s soffit so it doesn’t experience a whole lot of water exposure, BUT I thought sealing it couldn’t hurt for the few times it may get wet. (note: the color of the wood changed after I sprayed the waterproof seal but once it dried, the color was back to normal). I did two coats of this spray and let it dry overnight before attaching the numbers (see directions on the bottle for more specific instructions).
You can find the house numbers used in this project right here.
For the remaining steps (only two more to go!) , check out ---> http://thediyplaybook.com/2016/08/diy-modern-address-plate.html

Want more details about this and other DIY projects? Check out my blog post!
Comments
Join the conversation
2 of 24 comments
-
Hello. I have collected the items to make an address sign for my daughter. Tell me, please. What are the measurements of the board? The board the paint sticks are nailed to.
-
May I have a reply to my question about the size of the board you used and did you need a drill guide to drill the holes for the numbers to be straight?


Frequently asked questions
Have a question about this project?
How did you hang it?