


How to Make an Easy Patio Privacy Screen {Step-by-Step Tutorial}
I've seen several DIY projects for privacy fences, but I didn't want to spend a lot of money or put a ton of effort into this project. Unfortunately, I have a champagne vision with a beer budget, but we were able to complete this project for less than $30 in under two hours. Paul (the hubs), was going to be doing most of the work, and I would be the job foreman. I'm happy to report that we're still married, even after our..."lively" debate about why its unrealistic for me to expect full growth ivy winding it's way through the lattice panels, while we sit in cushy new patio chairs sipping Mojitos listening to the gentle gurgle of a three-tier water feature that he could also build that weekend? Geesh, he's such a killjoy.
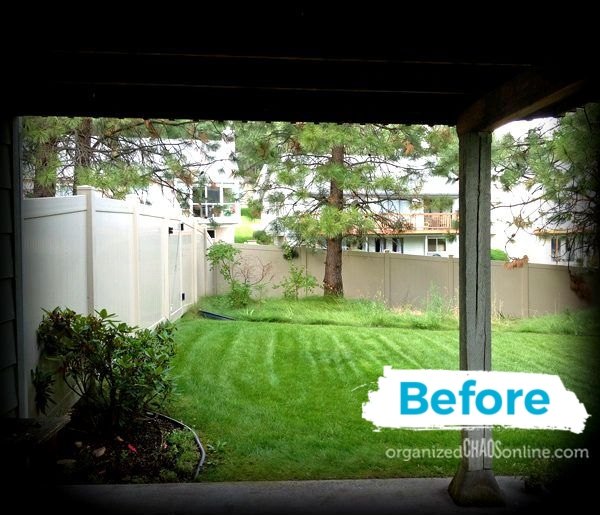
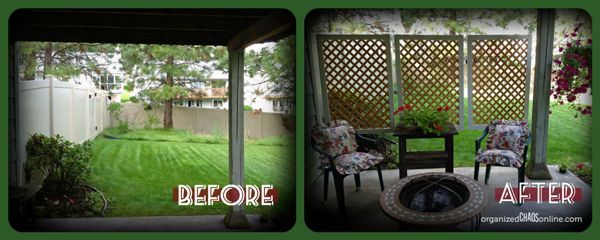
Our house is built on a slope which gives us a front entrance at street level, but a totally daylight lower level. We spend most of our time on our upper deck, but occasionally entertain on the patio below. When we do spend time on the patio, we have the houses across the street looking down on us from their decks. I feel so exposed! Even though we don’t spend a lot of time on the downstairs patio, when we do, I want privacy
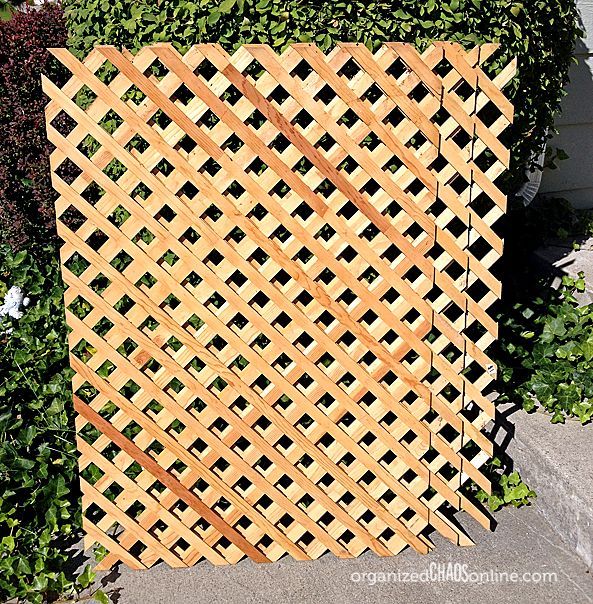
I wanted to keep the lattice it's natural wood color, but I wanted to paint the frame white. We had some 1x3 boards left over from a previous project, and a half can of white paint in the basement, so all we needed to buy was a bit of hardware and we were good to go.
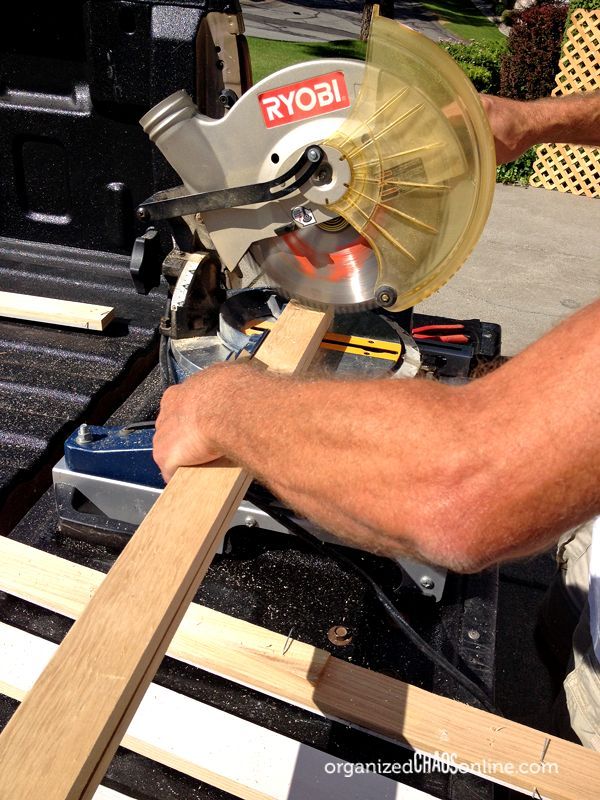
Our lattice panels measured about 32 x 48, so Paul cut enough 1 x 3's to create frames for each. Instead of mitering the corners, we decided to straight cut the boards and just butt the corners together.
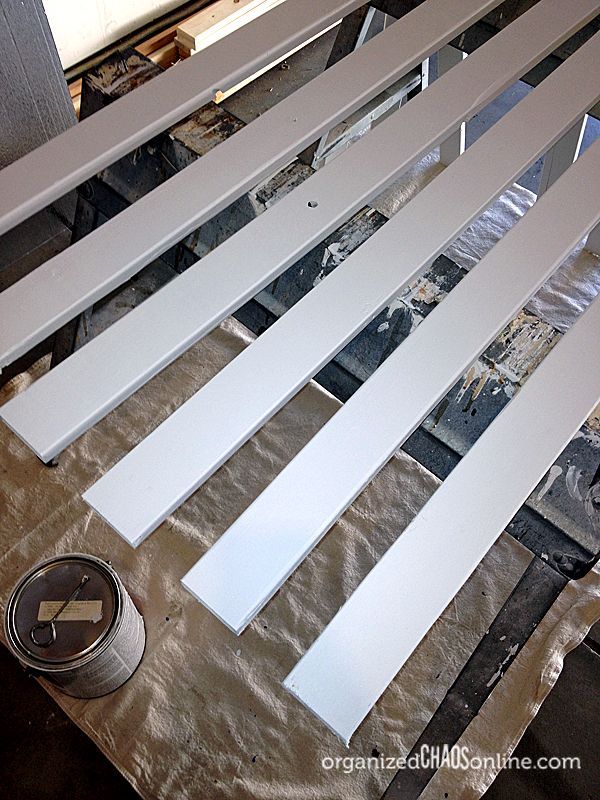
Paul took a break while I painted all the boards with a couple coats of white exterior paint. I made sure to paint the ends of the boards since some of the ends would be exposed. I wanted to sandwich the lattice between two frames, but we were out of lumber, so I agreed to seeing how it looked with the frame on just one side. If it looked tacky like that, we'd add a frame to the back.
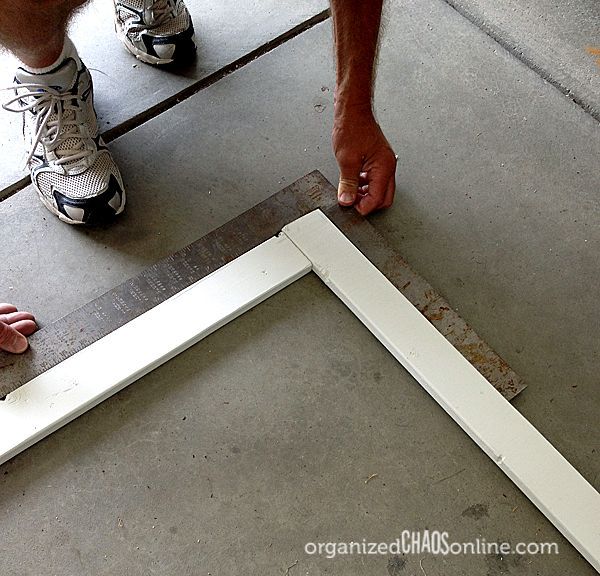
When the boards were dry, we laid them out, squared the corners, and glued the frame corners with wood glue.
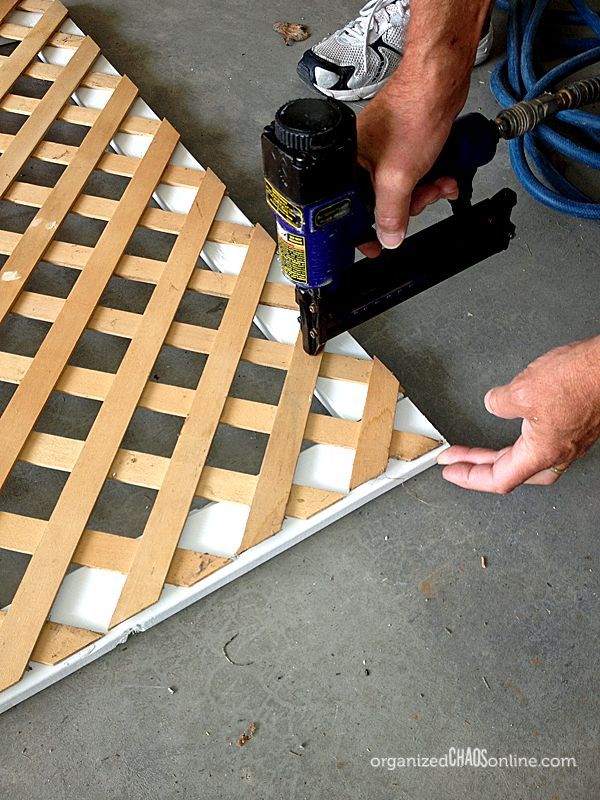
We did a final check to make sure everything was square, then air stapled the end of each lattice slat to the frame. It turned out a lot sturdier than I thought it would be. We quickly finished the other two panels, and the construction phase was done. (At this point we had begun speaking again).
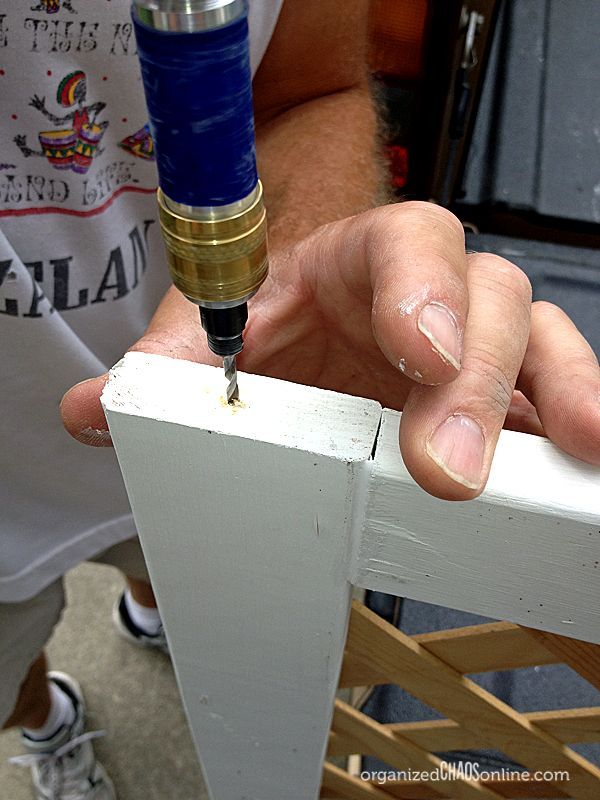
Next, we hauled the panels to the patio (notice that I said we?), and drilled starter holes in the center of both end boards on each panel.
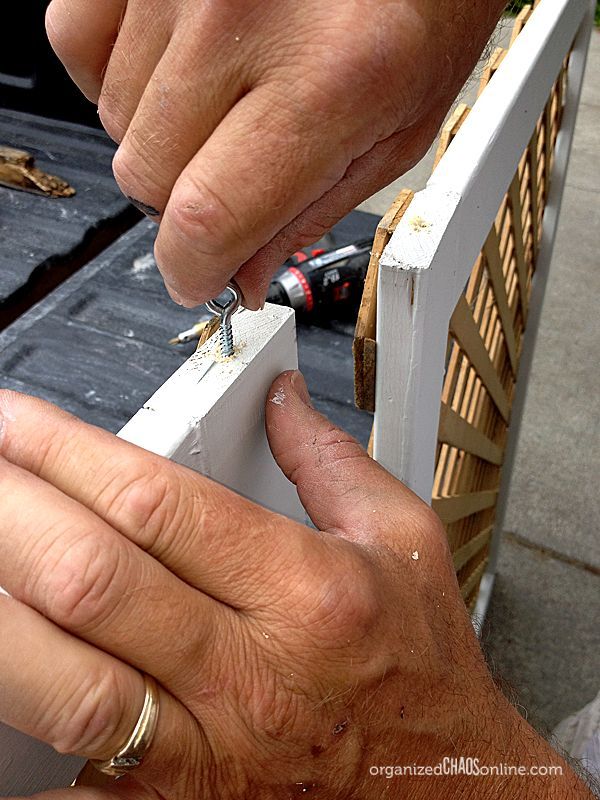
We then screwed eyescrews into the starter holes. These suckers were ready to hang!
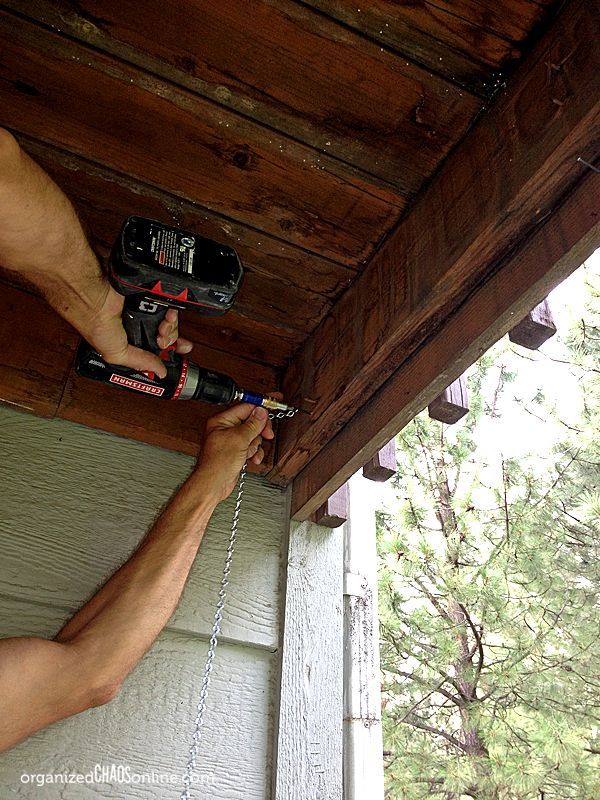
I wanted the panels to be placed at a height that provided privacy both when we were sitting or standing. Paul held up a panel while I eyeballed the height (very high-tech precise measuring system, yes?). Then we measured and marked to be sure the three panels were evenly spaced across. Starting at one end, Paul slipped the drill bit through the chain , attached a screw to the drill bit (I love that they’re magnetic), and drilled the screw at his first mark. We used 10 lb capacity chain (that I was certain wasn’t strong enough to hold the panels).
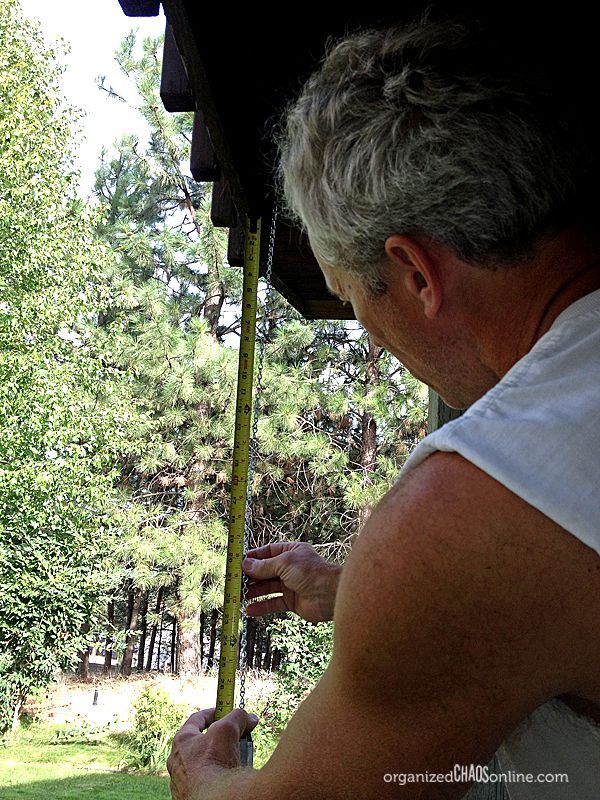
He measured the chain from the drilled screw to the length we needed to attach it to the panel for the height we had decided on. Using two needle-nosed pliers, he opened the last link on the chain and slipped off the excess chain. He then attached an S-hook into the bottom link, and squeezed the link back together with his pliers.
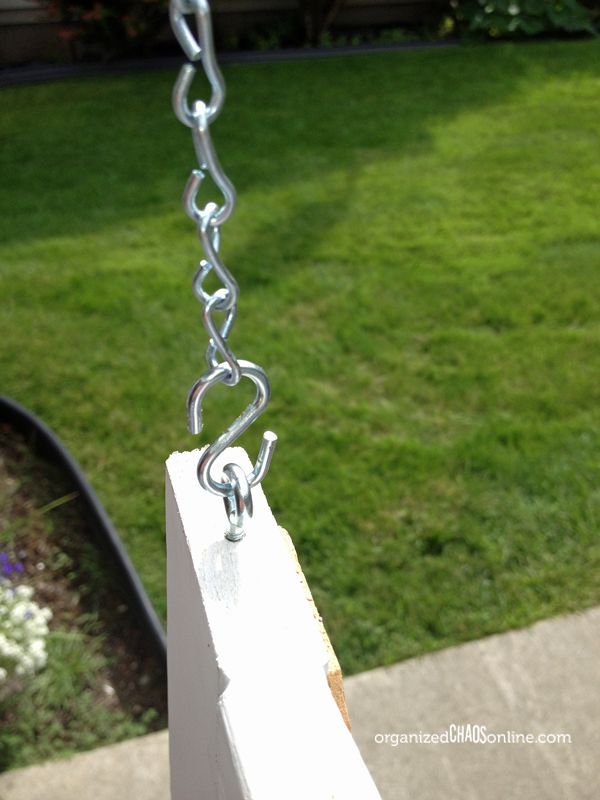
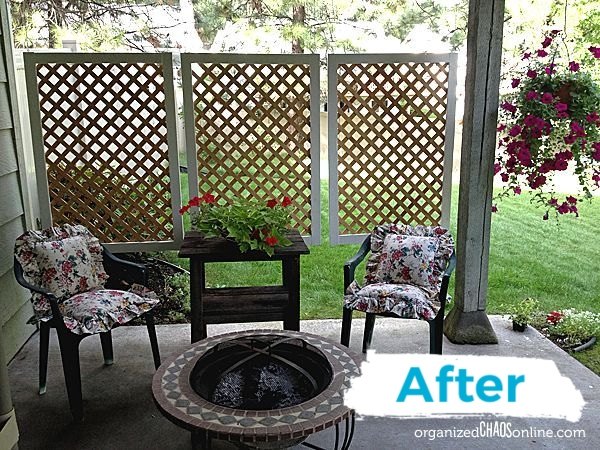
Finally, we hooked the S-hooks that were attached to the end of the chains, into the eyescrews on the top of the frames, and hung the panels. We stood back to take a look, and I’ll be damned! After only a little bit of adjusting, which we did by moving the screws holding the chains a hair up or down, the panels were level and evenly spaced. Not bad for a couple hours work!
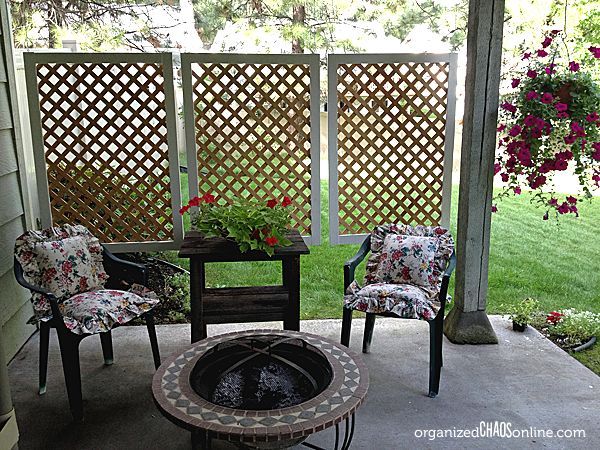
Turns out, all my kicking and screaming was a waste of energy, because the end result looked almost exactly what I had envisioned (minus the furniture and waterfall). I had originally wanted the bottom of the panels to be anchored, but was talked out of it. I ended up loving the airy feeling it has by just letting them hang free. I had also originally wanted to use heavier chain, but by using the lighter-weight, the chain is barely visible and gives the panels the appearance of being suspended in mid-air. I really need to work on this control issue a teeny bit, and put a little more faith in my man. Obvs he knows what he’s doing.
So, by using a lot of materials we already had, and scoring a great find at an estate sale, I’m able to enjoy my private little patio for under $30. And I LOVE IT! (Thank you honey).
Resources for this project:
See all materials


Comments
Join the conversation
-
I’m glad I saw this !!! I have been going back and forth about whether to use outdoor curtains or what but this would be for Sun shade. I want to do this instead !!! I have an Arbor that I will do this to, but I will need to anchor mine at the bottom side to my posts due to the wind. Thanks !! 😊
-
You are lucky to have such a talented husband. I do everything, including light carpentry. Hubby worked in corporate and never got the home improvement thang goin on.


Frequently asked questions
Have a question about this project?
How is it as far as keeping the sunlight out
Don't the screens swing when its windy? I think your original thought of anchoring the bottom was correct.
The project did turn out great.
What was his reasoning for no anchors at the bottom of the panels? I live in Oklahoma and worried about wind damage. Don’t they blow when you have storms or strong winds??