How to Turn Discarded Junk and Vines Into a Woven Basket

Karen Manasco
by Karen Manasco
4 Materials
$5.00
2-3 Days
Medium
A discarded wire-framed bin becomes a hand-woven root basket!
Yes, you can do this!
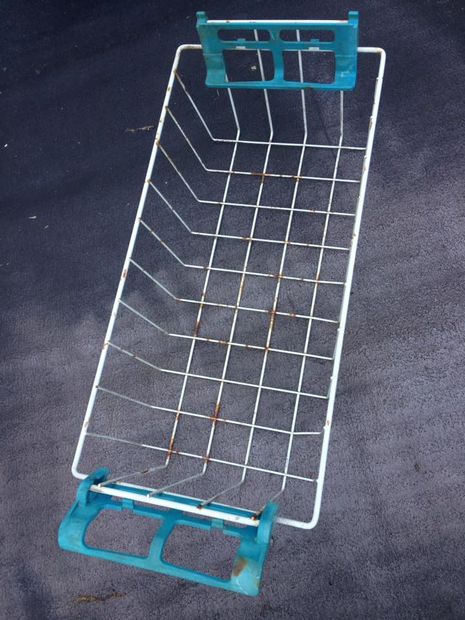
I found myself wandering through my husband's junk pile out back, when I came across an old wire basket, the kind that is typically found in chest freezers. With a good yank, it came free from the rubbish pile, and I dragged it back to the house.
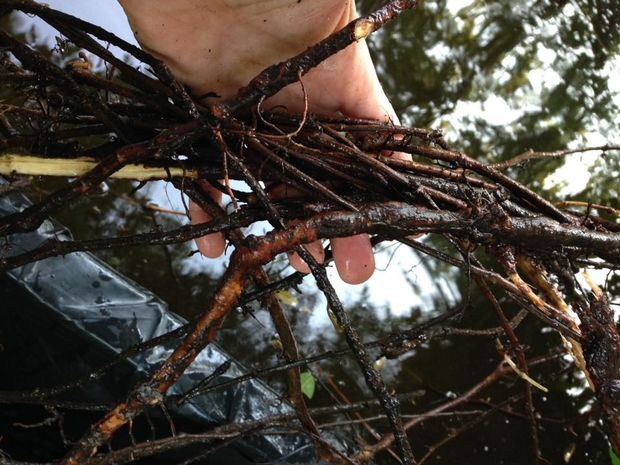
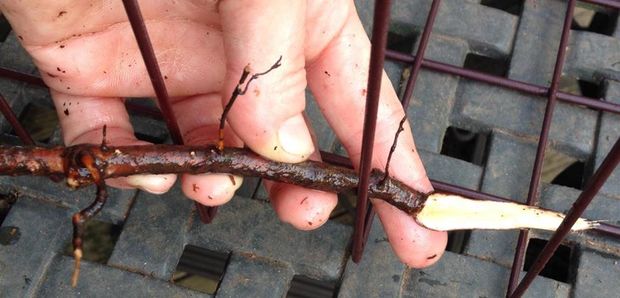
Fast forward a few weeks. While cleaning a part of the property, I noticed a large mass of roots growing atop the ground, ready to trip the next person that might be out for a casual stroll. Eureka, the perfect weaving material for my junk basket!
While I'm certainly not a trained basket weaver, the project flowed smoothly, and turned out well. Suddenly, I'm searching for anything durable with wire segments for weaving. Come along, and I'll share what I learned while turning trash into treasure.You'll find yourself seeing potential in junk you've never noticed before.
Time to hunt through the junk pile...
SANFORD AND SON: Though not everyone has a junk pile in the back woods, wire baskets are easily found in other places. Yard sales, flea markets, and garage sales are often great sources for items that are no longer of use to someone else. When shopping at yard sales, take note of any junk laying around the garage. It never hurts to ask if an item could be for sale. Old farm houses are great sources for wire and fence-related items.


Refrigerator repair shops may even have a bounty of wire baskets. Once upon a time, heavy-duty milk crates were made in similar fashion. Restaurant supply stores have plenty of baskets with wire supports, as well. Hanging plant baskets are also an option, especially the type that use coco-liners.


Don't forget about that junky old lampshade, the one with fly spit and cobwebs. Simply tear off all of the fabric, and you have a great wire support, ready for weaving.


An old, broken-down golf cart likely has a basket on the back. Yet another option.


Bird cages! You'll probably not want to use one that a bird is occupying.


Find an old junky one.


Once you start looking, you'll find plenty of resources.
Plant precautions!
Please be mindful of the plant matter you choose for this project. Though vines are durable and plentiful, there are many plants growing beneath our feet and beside our bodies that we might never think about. Yanking an unknown vine is never a good idea, considering you may be grabbing poison ivy, which I have included a picture of, lest you encounter any during your harvest. Don't touch it. Just back away, and keep walking.


Chemical Irritant Contact Dermatitis - a fancy term for 'plant that makes me itch'.


Though my current weaving project makes use of Virginia Creeper, (Parthenocissus quinquefolia) it is not free from potential skin reaction. The creeper's sap contains what are known as raphides, which are metabolic by-products in many plant cells.


A quick Google reveals that raphides are needle-shaped crystals of calcium oxalate. In layman's terms, this means that you may very well experience itchy hands, even after washing them. I noticed a marked difference in using freshly yanked roots (read: very itchy) and roots which had been soaking in the pond for a week. It is a great idea to soak the roots, but even better to boil them, which seems to soften the crystals, reducing, if not eliminating most of the itchiness to your hands. Panic not. Even daffodils and tulips contain raphides. What helps a great deal is using light garden gloves while weaving. If you dare to go bare, a thorough hand washing with a good pumice soap such as Lava is very helpful.
Finding a source of fiber to weave...
Though living in the city will likely pose difficulty for a variety of natural fibers, the country life provides plenty of it.


I'll be the first to admit to a love of plants deemed invasive by others, and allow it to grow as it will, for the most part, on our property.


NO VINES? NO PROBLEM!


If you have found a wire frame, but do not have easy access to natural vines, have no fear. You can weave paper, string, yarn, fabric, and so many other materials. If it can be cut to size and woven over and under, you can make a Trash To Treasure basket!


Strips of cotton, silk, burlap, just about any fabric!


Hint: T-shirt Yarn


String


Yarn


Rope


Clothesline


VINES AND TWINE FROM NATURE:


Here are just a few natural choices that will work for weaving:


* Kiwi


* Virginia Creeper (Parthenocissus quinquefolia)


* NOTE: Please be certain to read step 1 for known precautions regarding your chosen fibers.


Honeysuckle - Lonicera


Bittersweet - 'False' bittersweet, Celastrus scandens (American)


Bittersweet - Celastrus orbiculatus (often referred to as 'Oriental') - be careful, as it has tiny thorns


Wisteria - Wisteria sinensis


Trumpet Vine (Campsis radicans)


Kudzu - (Pueraria montana)


Grapevine - (Vitis)


Crossvine (Bignonia capreolata)


Many basket weavers suggest harvesting vines in fall or winter when the sap is lowest, to avoid snapping while weaving, but waiting for another season is not always in tune with my impulsive creativity streak. The good news for those who are able to wait, you can harvest the vines now, roll them into loose coils, and store them until you are ready to use. Simply soak them in water to make them more pliable, or even better, boil them for about half an hour before weaving.
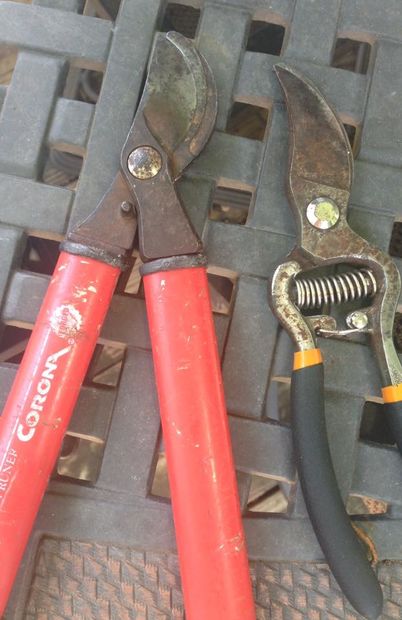
Gather your tools and components...
TOOLS (and other items) REQUIRED FOR THIS PROJECT:


A wire-framed basket, old lampshade, or other sectioned item that can be woven with material


Spray paint, if desired. I just used scrap paint I could find in our garage


A source of vines, roots, or other weaving material (see step #2 for ideas!)


Pruning shears, hedge clippers, or other tool to cut vines / roots


Light gloves with rubber coating


A strong, scrubbing soap like Lava, especially if you work bare-handed.


A source of water, to keep the vines or roots moistened, and to occasionally wash your hands


Grinding wheel, Fein oscillating-multi-tool, or other motorized tool to remove wire that may obstruct weaving.


Yarn, string, or other material to wrap the top of your basket, and / or handles of it


An oversized needle, often referred to as a lacing needle, plastic canvas needle, or large-eye needle
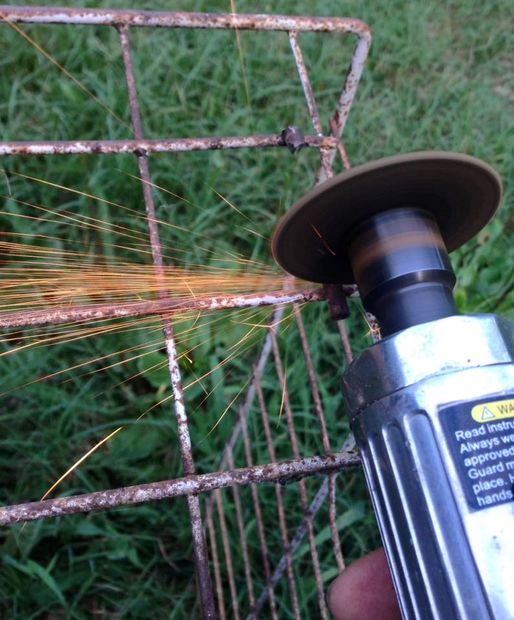
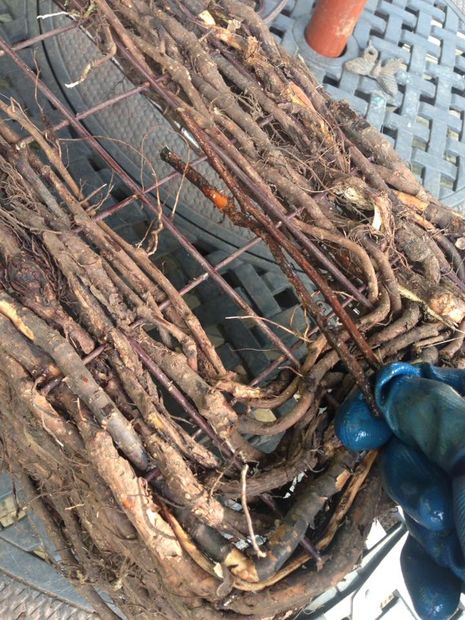
Prepare your wire form...
CLEAN UP, CUT UP, DRESS UP:


Many wire racks or baskets are basically ready to weave, but in the case of one of the baskets I found, there were wheels welded onto the sides of it, so I had to remove them. If you've chosen a lampshade, you'll need to remove the fabric covering.


CUTTING TOOLS:


Though a Fein Multimaster Oscillating tool (dear Santa) would make light work in removing wheels or other weaving obstacles, our toolbox offered only an angle grinder, so I had to be careful with the grinding disc, so as not to cut into the other wires while removing the wheels. Alas, I damaged part of the wire, so I will doctor it, and hope no one notices.


A COAT OF SPRAY PAINT:


If your wire form is dented, you may want to straighten it out as best you can. If it is a bit rusty, perhaps a coat or two of a good spray paint is in order. I suggest Rustoleum, which can be sprayed directly onto rusty surfaces. Although most of the wire will be covered with vines or roots, some of the wire will still show, so you might as well make it look nice. Try to choose a color that will blend in with your weaving material. Straighten, scrub, and spray, and we'll be on our way!


TWO AT A TIME: I'll be working on two baskets at the same time, so you'll be able to see the differences in weave, based on the thickness of the vine or root you choose. Note how much tidier the smaller, more plentiful vines make the completed basket look.
Soak the fibers of choice for easier weaving.
WET WORK MAKES IT EASIER:
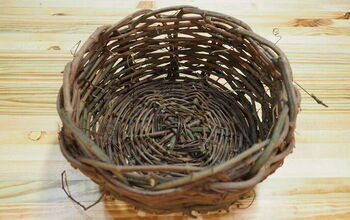

There are several ways to acquire and keep fibers until you are ready to weave, but since I chose ground-creeping roots, I soak them as soon as I harvest them, to keep them pliable. In fact, I pull a handful of vines, then toss them into our pond. Though you wouldn't want to leave them in the water for days and days on end, a few days won't hurt. I began this project with roots that had spent a week in the water.


You can simply wind your fibers into a circle, then place them into a bucket or other large container, and fill with very warm to hot water.


If the roots or vines are boiled or soaked at length, you may notice the bark of the vines beginning to peel off. If you are feeling overly industrious, and have the time, peeling off the bark will often reveal a beautiful, ivory-colored vine that will produce a gorgeous basket. If not, go for the rustic look of the occasional stripped bark.
Begin weaving...
OVER, UNDER, OVER, UNDER:
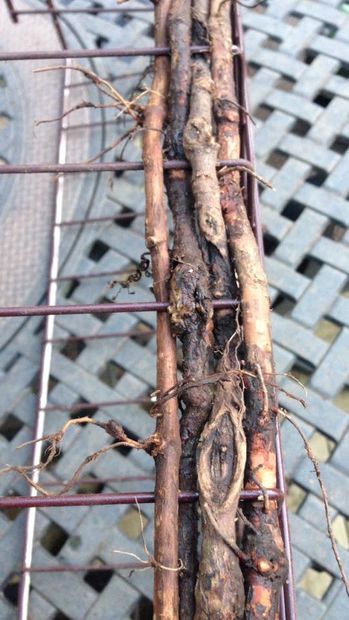

Basic weaving of a framed structure is not overly difficult in terms of understanding the process. If you remember weaving place mats in grade school, you'll do just fine. Over, under, over, under.


YOU CAN DO THIS:


For me, it is easier to weave the sides of the basket first, starting at the bottom, in order to push the fibers down as you go. This will help to keep the weave nice and tidy. Don't be overly concerned with the rudimentary appearance at this point, it will get better, and we'll snip off and tuck in any misbehaving fibers later. Tuck what you can, but don't worry too much about them. Don't give up, even if you think your basket is the ugliest thing you've ever seen. It will come together, I promise.


PICK A VINE:


Choose a strand of fiber that is of good size, but not so thick that it cannot be coaxed into bending just a bit to fit between the wires. If you try to force a fiber, and it breaks, but does not come apart, you should be able to tell if the fibers will hold together long enough to weave. By the time you make a few rounds on top of the weak point, it should be fine. You can always go back in and tuck a reinforcement vine just in case. Or, you can go ahead and cut it, leaving enough of a tail to tuck in and hide it.


START SOMEWHERE, ANYWHERE:


Though it does not matter where you begin, you might want to experiment with the thicker end, and weave it so that the very end will lean securely against a wire. As you make the rounds, you can tuck and squeeze to hold it down, or if you have a longer tail, you can always trim it off. Just start, and the rest will quickly fall into place.


WEAVING MISTAKES:


Should you be weaving along just fine and then discover a weave that is under, but should have been over, simply get back on track by weaving the correct one. As this is a rustic basket, I'm not going to become a perfectionist at this point. Keep weaving, and don't worry about it.


METHOD OF WEAVING:


As you weave, especially if you've never completed such a project, you may find yourself trying various things to make it easier, considering some of the vines are much like wrestling rubber bands. Sometimes, it is easier to feed the end of the vine through a hole, and guide it where it belongs, and other times, you can get away with making a small hump in the vine, which can be easily pulled through the wires, allowing you to use both hands.


LEFT HAND or RIGHT HAND?


Another trick to easy weaving is to place the wire basket at a level which will allow you to use your foot to hold the basket, while you can use both hands to weave. This, you will notice, yields quick work. Keep in mind, there really is no right or wrong regarding direction, and a great opportunity to practice ambidextrous movement, as no particular hand preference is necessary.
Keep weaving...
WORK A LITTLE, WORK A LOT:


You certainly don't have to start and finish this project all at once. It is easily forgiving of a stop-and-go process, but you might consider at least finishing up one full strip at a time, instead of leaving half the length of your current strip, unless you are able to soak the unwoven strand to continue working.


I actually like to work on the baskets near a pond, so I can just dunk the entire project into the water, and keep weaving. This method, however, is quite messy, but refreshing on a humid Oklahoma day.


GRADUAL WEAVING:


Try to keep the weaving strips of thicker size down towards the bottom of the basket. If you have selected and soaked all of your fibers at the beginning of the project, you can simply choose the largest of the pile each time, so your basket will have a nice, gradual reduction in weaving size.


KEEP IT TIDY:


Push down on the fibers as you go, keeping an eye on the amount of space left to weave, which should be approximately equal on all four sides of your wire form. If not, simply push the fibers as best you can, to tidy up the balance yet to be woven.


SPLIT VINES:


When you come across a vine with a fork in it, you can either weave the attached tail with your working vine, snip it off, or off-weave the strand.
Finish weaving the bottom, and tidy up.
Once you've completed the weaving on the sides of the basket, it is time to weave the bottom. Although it is the same process, it is a bit more difficult due to the fact that you must reach into the entire basket to reach the bottom if your basket has depth to it. A good reason not to select a basket that is deeper than the length of your arms.


WEAVING THE BOTTOM:


Flip the basket over and choose any size vine to begin weaving. I chose a large one, and selected smaller vines as I made progress. You'll soon find it is tricky to round so many tight corners, but don't fret about trying to be too perfect, because it won't be.


Don't forget to push the fibers toward the first vine, to keep it nice and tidy. When you are finished, snip off any wild vines, sticky-outties and such. Tuck in any ends that might be trying to work their way out, and secure with a small wire, if necessary,
Leftover macrame cord is perfect!
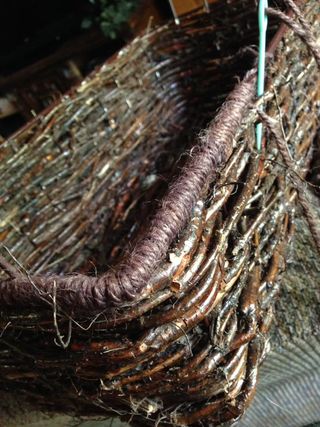
Wrapping the top with string, cord, etc.
Though at this point, your basket should be fully woven, it never hurts to add a little extra flair. This step is optional, but is very easy, relaxing, doesn't take long, and will add much to the appeal of your project.
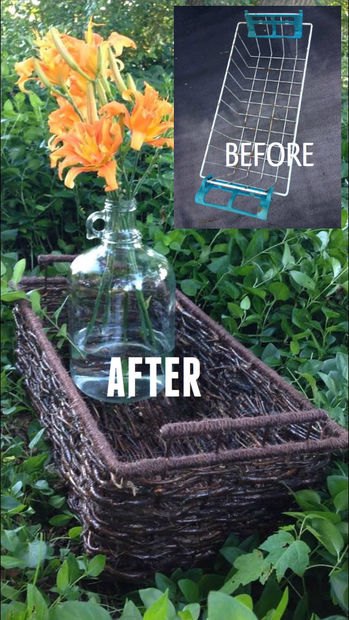

WRAP THE TOP:


Using just a few yards at a time, thread a large needle with yarn, string, or other material to wrap the top rung of the basket. I chose a nice, fibrous macrame cord of small diameter, yet large enough to show well. Simply tie the string to a section of the wire on the top, and wrap the cord around the wire, including the tail of the cord to keep it hidden, and secure. You may want to add a dab of glue to hold it for a bit, then proceed with wrapping. Use a chip clip, clamp, or other device to hold the wrap long enough for the glue to set.


As you add additional cord, repeat the process, hiding the tail as best you can. At the end of the wrapping, a dab of glue, or a nip and tuck should hold it securely out of sight.
Before and after...
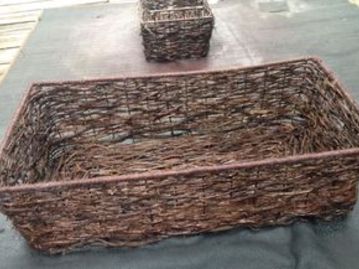
Making great progress, getting closer!
PROTECT YOUR COMPLETED PROJECT:


To ensure your basket will be around for a very long time, you might consider giving it a few coats of clear spray. Though the basket fibers are natural, they will age and weather if left exposed to the elements. Keeping your basket safe and sound will keep it from falling apart with age.


See the images above to see the difference between woven roots, and those that have been sprayed with an acrylic mist in clear. If you have chosen to wrap the top rim, you can do this before, or after the wrap has been added.


Be certain the clear spray has dried completely before using the basket. It would also be a good idea to let the basket air out for a few days, especially if your clear spray has an overly strong smell.


Your newfangled, Trash-To-Treasure basket is now ready for a multitude of uses.


Toys, clothing, staircase organization, fruit, miscellaneous household items, and so much more!


Thank you for taking the time to view my project. For additional pictures and tips, please be sure to visit my Instructable, which is a step-by-step tutorial.


If you decide to make your own Trash To Treasure basket, I hope you will share it with all of us in the comment section below. Many thanks!
An old freezer basket becomes a lovely item!
Suggested materials:
  • A wire basket or other form   (Junk pile, second hand store, etc.)
  • Macrame cord, string, twine, etc.   (Craft room, craft supply store)
  • Vines or roots   (The great outdoors!)
See all materials
Karen Manasco
Want more details about this and other DIY projects? Check out my blog post!
Go
Frequently asked questions
Have a question about this project?
  1 question
  • Clara Steendahl Clara Steendahl on Oct 01, 2016
    Do you think young twisted willow stems would work for with this? I sure would like to try it. Oh and would I need to soak them in water to keep them pliable while I'm working with them?
Comments
Join the conversation
2 of 70 comments
Next