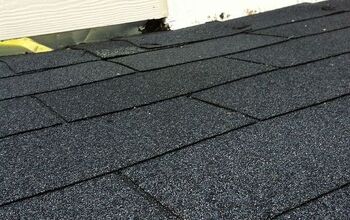
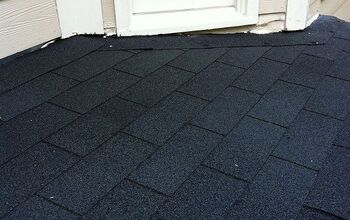
New deck roof right at window sill.

by
Laura D
+2
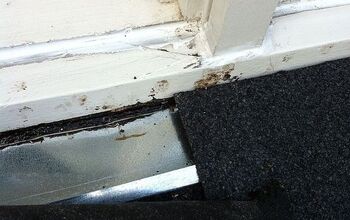
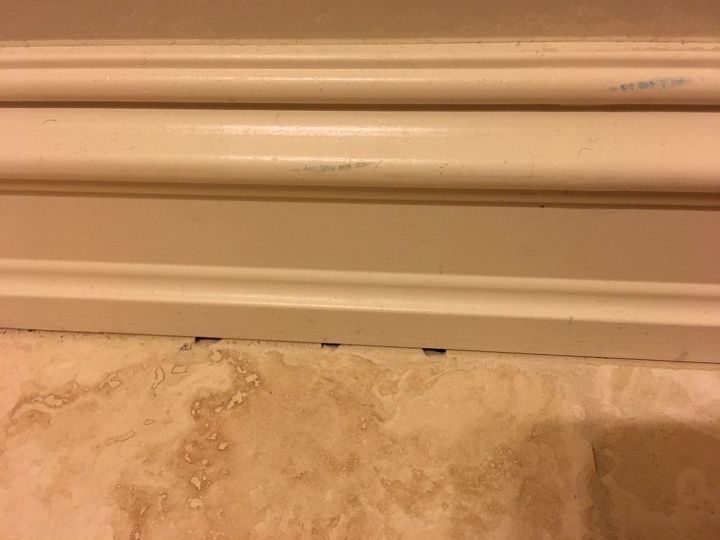
I am having a roof put over my deck and it is finished except for a punch list. There is not one inch of space between the roof and a window. I have questioned this and he had the sill removed to make sure the flashing went under. Well the shingles don't go under the sill and I was washing the window today and it leaks. I will try to post pics of what it looks like. How should the roofing be done in this situation?
5 answers
-
The guy made a v in the flashing and now water pools here when I washed the windows. Made its way through the siding of course since no where to go. How should this be roofed and flashed?
 Laura D
on Nov 06, 2013
Laura D
on Nov 06, 2013
-
Good evening, Miss Laura! What type of roof are we dealing with; sloped (shingles, slate, tile, wood, etc) or low-sloped (roll roofing, etc)? Are you able to provide any pictures of this area? Thank you kindly, ma'am!
 S & S Roofing and Contracting, LLC.
on Nov 08, 2013
S & S Roofing and Contracting, LLC.
on Nov 08, 2013
-
I posted pics in comments above, hope you can see them. It is a shed roof over the deck, asphalt shingles, sloped down since I wanted it to have a high ceiling. One clapboard was supposed to be left between the roof and window sill but that did not happen so just want it leakproof and it is not.
Laura D
on Nov 08, 2013
-
Thank you, ma'am as I just viewed your photos! From what I'm able to see in your photos & where there are a couple of things that stand out; the flashing installed is a major concern & why they manipulated it this way is beyond me; however, don't lose hope, Miss. Laura. As for My first priority would be getting in touch with the contractor ASAP, as they need to be aware of the workmanship defect; thus, honor their "Workmanship Warranty". To immediately stop the leak as a temp solution, apply felt (or even better would be Ice & Water Shield (peel & stick membrane) by sliding up under the siding & lay covering the apron cap (shingles covering flashing). In order to repair their defect, the flashing needs to be removed & replaced according to the flashing specifications below, as well as I also notice a couple pieces of the lower siding were split/broken in the photo, so those too need to be repaired/replaced at the same time. Where I'm not certain as to what manufacture they installed, CertainTeed has the best continual education available. Thus, I've pasted the installation requirements section from their Shingle Master Applicator Manual for Vertical Wall & Side Wall Flashing. FLASHING AGAINST A SIDEWALL ▼ There are three things to keep in mind when installing flashing. First, don’t fasten the cap flashing to the roof deck or to the step flashing, since they are meant to move independently of each other to accommodate any structural movement. Second, each metal step flashing piece (sometimes called a flashing shingle) is to be placed slightly up the roof from where the exposed edge of the next overlapping shingle will be located (that’s why it’s called step flashing). This will help keep the flashing out of sight while maintaining a water-tight fit. Third, the material used for step flashing must be corrosion resistant. (Tip... Avoid driving nails through metal flashing that covers two sides of adjoining underlaying materials, such as different pieces of roof decking or between vertical and horizontal planes. It is very difficult to permanently seal the punctures in these situations and, over time, expansion and contraction of the flashing can cause the flashing to buckle...) The minimum dimensions for applying step flashing shingles against vertical sidewalls are listed below. All of the following minimums apply when installing any CertainTeed shingles (see also Figure 6-2). 1. The width of the step flashing on the deck must be at least 3" wide. 2. The height of the step flashing installed against the vertical surface must be at least 2" high. 3. For a step flashing application, the pieces of flashing must overlap each other by at least 2". 4. The length of the step flashing pieces depends on the type of shingles being applied. The following table compares these different lengths: CERTAINTEED MINIMUM LENGTHS FOR STEP FLASHING SHINGLES Roofing Product Minimum Length ...LandmarkTM Series, and all Three-Tab Strip Shingles 7" (75⁄8" for metric dimension shingles) (NOTE: As a general rule of thumb, the minimum length of flashing should be 2" more than the shingle exposure. For instance, metric shingles installed with a 55⁄8" exposure require flashing of at least 75⁄8" in length. ARMA recommends that step flashing be 5" high and 5" wide, while NRCA recommends that step flashing be 4" high by 4" wide. However, CertainTeed’s minimum requirement of 2" x 3" provides full protection against normal water back-up...) When installing step flashing against a vertical sidewall (Figure 6-2), place the first flashing piece over the end of the starter strip and, finally, position it so that when the tab of the end shingle in the first course is applied, the flashing will be covered completely. Fasten the part which sits on the roof with one nail. Next, apply the first-course shingles up to the wall. Position the second step flashing piece over the first-course shingle and against the wall, 5" up from the bottom edge of the first-course shingle. This will permit the tab of the shingle in the second course to cover it completely. As before, only fasten that part of the step flashing piece which sits on the roof. Step flashing fastener(s) should be placed in the uppermost 2" area of the step flashing piece, to avoid leaks. Continue up the roof or sidewall area in a similar manner until complete. FLASHING AGAINST VERTICAL FRONT WALLS ▼ To apply base flashing against a vertical front wall: 1. Apply the shingles up the roof until a course must be trimmed to fit at the base of the vertical wall. By planning ahead you can adjust the exposure slightly (and evenly) in the previous courses, so that the last shingle is at least 8" (vertically) wide. This allows a minimum 5" exposure of the top course and a 3" headlap. The metal flashing strip should be bent, using a metal brake, to extend at least 2" up the vertical wall and at least 3" onto the last shingle course; that is, to the top of the cutout. Apply the metal flashing, which can be 8' to 10' in length, over the last course of shingles. Embed the metal flashing in asphalt roofing cement, or another appropriate adhesive, and nail it to the roof every 12". Do not nail the strip to the wall. If side laps are necessary, overlap the pieces at least 6". Do not fasten in this joint area.
S & S Roofing and Contracting, LLC.
on Nov 08, 2013
-
Thanks soo much!!! The contractor was notified and sent the pics and I also have another roofer coming Tuesday, for other minor roof repairs to get more feedback. I know he will take care of it but if not I want my ducks in a row for when final payment comes around. Thanks again.
Laura D
on Nov 09, 2013
Sign Up to Answer
Related Discussions


Suggested Project Book
