


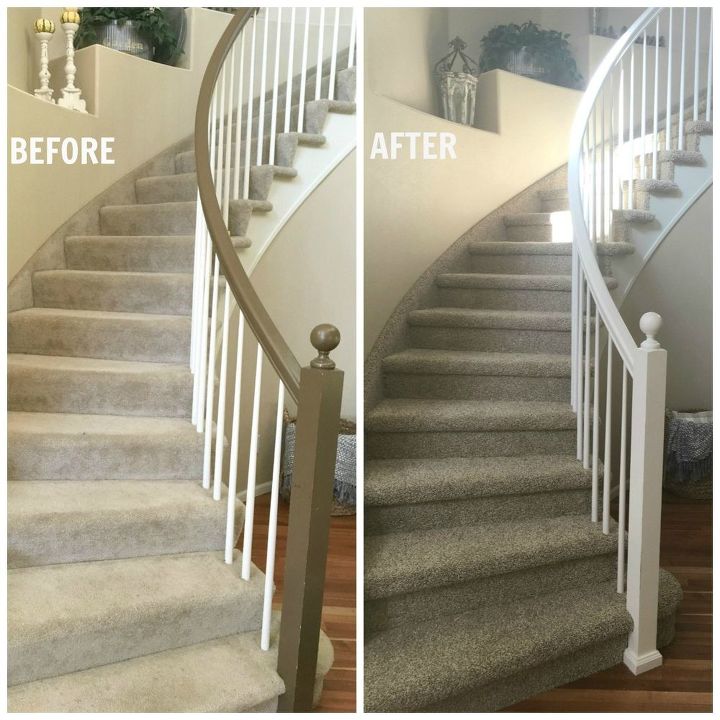
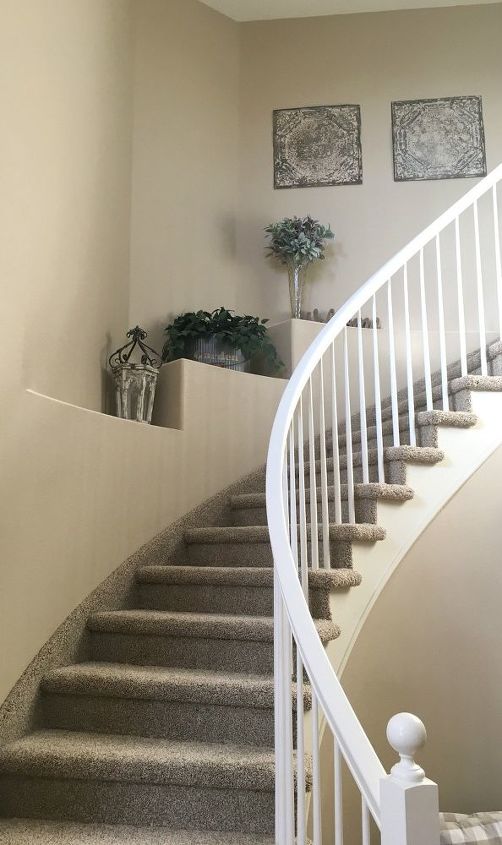
Staircase Makeover
Medium
Let me start by saying if you are painting just your banister than this can be considered a "weekend DIY project". For instance, I did the banister in three coats over one weekend with 24 hours drying time between each coat. I was feeling pretty confident with my progress until...the spindles. Honestly, the spindles are just tedious to paint. But nothing that should stop you! When it is time to do the spindles, choose "x" amount that you will do at a time. I started with the banister and then did the spindles. The banister was my priority, and we weren't positive if the white was going to truly cover the chocolate brown color. Another reason I suggest doing the banister first is that you don't have to worry about getting a little paint on the spindles (watch for drips though!). To see more sources and pictures visit me at http://www.raisingrustic.com/staircasemakeover/.
Supplies:
-Benjamin Moore White Dove in Advance Satin - This is the highest grade paint Benjamin Moore sells. I showed the people at the paint store pictures of the brown I was trying to cover and they felt this was the most cost-effective way to do it. I didn't purchase a primer or sealer. So I went with it. If you have another type of paint you use often and think it would work for your banister and spindles then by all means substitute it here. After 2 months we are still happy with it. I used a little less than 1/2 the gallon. The spindles take very little paint. I had to do three coats on the banister but otherwise I think a quart would suffice for this project.
One quick note on Benjamin Moore Advance Paint - It dries in 4-6 hours but recoat time is 16 hours. I wait at least 24 hours between coats. Besides the reasons above, I also chose this paint for the staircase and banister because I read that it typically shows less brush marks and it cleans up easily with soap and water. Both have proven true for us. The one down side we found is that you must sand between coats. This will ensure a smooth and durable finish.
-Paintbrush - I love these guys. Your favorite paint brush should do the trick.
-Painters Tape - We didn't use any because we were replacing the carpets and doing the banister and spindles the same color. But you would want to tape around edges that you don't want painted white. I did use a small piece of tape to mark where I was on the spindle progress (more on this below).
-Tarp/Drop Cloth - Again protect anything you don't want speckled with white paint.
-Electric Sander - I used my electric sander for the original sanding, then a hand sander with fine grit paper for the spindles and in between coats on the banister.
Painting the banister:
1. Prep - Clean, Sand, Clean. First I cleaned the banister. I just used a damp cloth and really scrubbed. I couldn't believe the filth that had accumulated. You can see it in the pictures above, gross! Then it was time to sand. Because the chocolate brown was so dark and the banister so rough I gave everything a really good sanding with my electric sander. I didn't completely strip the old paint off I just made sure everything was really smooth. I concentrated the most on any scratches and knicks. After you are happy with your surface, clean it really well again. Make sure you get all the dust up.
2. Paint - The banister was simple. Using a moderate amount of paint I got to work. Think of your first coat as the primer, give everything a very even coat of white paint. I did the underside of the banister now as well. This way the banister itself is completely done before getting to the spindles. After the first coat, it looked bad. I was quickly regretting the white on white decision. But I have painted enough to know to never judge by the first coat. So I cleaned my brushes and called it for 24 hours.
3. Keep Painting - My paint needed 24 hours between coats. Follow the directions on your can. Then apply the first coat as you did the second. I knew I wanted three coats because of the wear our banister gets. After the second coat dried for 24 hours, I applied a third coat.
4. Done! - How is easy was that. The banister itself really was such an easy thing to paint. And fast!
If you are doing just your banister than you can pack up your supplies, and sit back and enjoy your new staircase. If you are doing the spindles as well, like I did, then time to take a break too. I almost tried starting it right after doing the banister and I am so happy I waited till the following weekend.
Painting the Spindles:
1. Prep - Clean, Sand, Clean. I gave them all a really good cleaning. The spindles looked so much better after being cleaned, that I almost didn't paint them. But I knew it was now or never with new carpet coming. Next, I used fine grit sand paper and gave each spindle a quick sanding. Ours were in good condition, so I didn't spend a lot of time here. But if yours are broken, knicked, or scraped this is the time to fix that. After this you would want to use painters tape to protect your stairs. Again, we were getting new carpet so I didn't need to do this. I do wish we had cut the carpet away from the spindles, it would have made it easier to get to the bottom of each spindle. I didn't think about it till after!
2. Paint - The key here is to use very little paint on your brush. It is almost a dry brush technique. It took me about three spindles to perfect exactly how much paint each spindle would need. It's a balance between enough coverage and no paint dripping. For the lower spindles, I would complete the entire spindle before going to the next. For the higher spindles because I needed the ladder, I would do 5 or 6 at a time on the side on the stairs then switch to the ladder and complete the other side. This is when I would use painters tape to keep track of which spindle I was on. Painting white on white made that part a little tricky. We have 58 spindles total. 58! The first night I worked really hard and could not believe in 3 hours I had painted 15 spindles. I was so disheartened. The next night I moved at a bit faster pace because I had gotten into a rhythm of how much paint to use. But guys this does not go fast. Unless you have done this a lot, it's a slow somewhat painful process.
3. Done - I did one coat and called it. I may one day do another coat on them, but for now I am very happy. It is clean and was done before the carpet was installed. I want to emphasize how much easier this project was because I wasn't worried about getting paint on the actual stairs. It totally took the prep work out of protecting them. So if you are doing a total staircase makeover like we did, try to plan it where you do the painting first!
While the spindles were a task, it was so worth it. It saved us so much money to do ourselves, and it really is such a managable painting project. I am so happy I finally could share this with you!


Want more details about this and other DIY projects? Check out my blog post!
Comments
Join the conversation
5 comments
-
Love what you did to the hand rail!! Looks great!!


Frequently asked questions
Have a question about this project?