


DIY Lighted *Bright* Christmas Sign
Last spring, I picked up a little wood box at a yard sale. I thought I could do something with it pretty easily. It was just the perfect little box.
I guess it was harder then I thought because it has been sitting in the garage since I picked it up.
That all changed in late November when I had a vision of a lighted “bright” Christmas sign.
The pictures below show how easy it was to transform this little box into the lighted “bright” Christmas sign. Since our box did not have a back, that was the first thing Hubby had to do. He added a trim piece inside the two sides of the box. Then, he nailed a piece of wood to that trim on the outside of the box. He left an opening at the top so we could put a string of lights inside the box. Then, because the box had so much dark stain and varnish on it, we needed to sand it if we wanted to paint it (which was negotiable as you will see later in the post ).
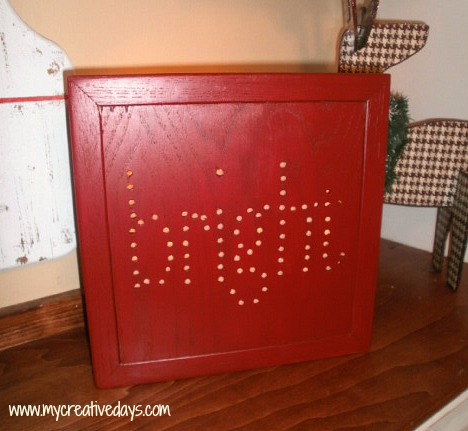
To get the word “bright” on the box, I printed the word from the computer and laid the paper on the front of the box.
I secured it with some painter’s tape and Hubby drilled holes about an inch apart along the lines of the letters.
Now, to be honest, I really liked the “natural” look it had when we got it done. I thought we should leave it the way it was. Hubby did not see my “natural looking” vision and (being the colorful Christmas person he is) thought it needed some color. So, my “natural looking” sign became red.
I won’t argue. The red looks nice too.
This little box has come a long way since last spring. It has finally become the lighted “bright” Christmas sign it was destined to be.
YOU MAY ALSO LIKE -
I guess it was harder then I thought because it has been sitting in the garage since I picked it up.
That all changed in late November when I had a vision of a lighted “bright” Christmas sign.
The pictures below show how easy it was to transform this little box into the lighted “bright” Christmas sign. Since our box did not have a back, that was the first thing Hubby had to do. He added a trim piece inside the two sides of the box. Then, he nailed a piece of wood to that trim on the outside of the box. He left an opening at the top so we could put a string of lights inside the box. Then, because the box had so much dark stain and varnish on it, we needed to sand it if we wanted to paint it (which was negotiable as you will see later in the post ).
To get the word “bright” on the box, I printed the word from the computer and laid the paper on the front of the box.
I secured it with some painter’s tape and Hubby drilled holes about an inch apart along the lines of the letters.
Now, to be honest, I really liked the “natural” look it had when we got it done. I thought we should leave it the way it was. Hubby did not see my “natural looking” vision and (being the colorful Christmas person he is) thought it needed some color. So, my “natural looking” sign became red.
I won’t argue. The red looks nice too.
This little box has come a long way since last spring. It has finally become the lighted “bright” Christmas sign it was destined to be.
YOU MAY ALSO LIKE -
Lighted "Bright" Christmas Sign.

Want more details about this and other DIY projects? Check out my blog post!


Frequently asked questions
Have a question about this project?