Can You Paint Furniture With Wall Paint?

by
Lori Haught Harper
(IC: blogger)
5 Materials
$65
12 Hours
Easy
When you are a homeowner, every penny counts. But can that leftover interior paint be used for anything besides walls? Turns out, it can!
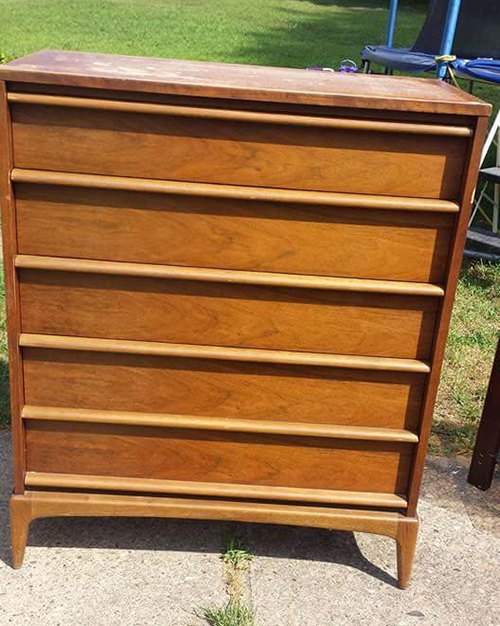
I bought this Lane dresser from a friend a few years ago, and as the way it always seems to go, I never quite got around to fixing it up. But then – an idea came to me. Since I wanted this piece to eventually go in the bedroom, I wondered if I could redo it in the same color as the freshly-painted walls? I had some paint left over and an inspiration in mind, so I went to work!
As you can see in the before picture, this dresser was in decent shape. It’s very solid and heavy, but the top was a little rough. To start, I gave the top, sides and drawer fronts an overall cleaning with some Krud Kutter to remove the any grease and dirt. Furniture polished for years with Pledge and Endust type of products, which are silicone based, should be cleaned prior to refinishing, or you’ll have problems with paint or stain adhering. Plus, a good cleaning is always a must before starting your project.
I next scuffed up the surfaces with my Festool Random Orbit Sander. (Sidebar: WHY did I wait so long to get a sander?) This is a good practice anytime you are repainting or refinishing a wood project, whether you use a sander or sand by hand. It gives the paint something to “grab” onto vs. sliding off a slicker surface. Be sure to wipe off any dust left behind.
I chose to leave the drawer fronts and the legs of the dresser in the wood tone and use the paint for the top and sides. The leftover paint of choice was Valspar’s Optimus Paint & Primer, satin finish, in “Owlet” – a nice taupey color with a soft blue undertone that I paired with “Blue Cashmere” for the rest of the room. The paint is an acrylic latex paint and primer in one that cleans up with soap/water, and goes on really nice. After taping off where the painted areas met the part I wanted left wood, I applied 2 coats, drying several hours between coats, with a 2ʺ brush.
To add a little depth to the color on the painted surfaces, I decided to add a glaze of General Finishes Van Dyke Brown. I would advise that you use a scrap to test the colors you plan on using together, but since I didn’t have a scrap, I decided to live dangerously. I figured I could always sand it off and paint over it if I hated it. If this happens, you can also keep a wet cloth nearby and wipe it off. General Finishes recommends adding 10% Extender to give you more dry time to wipe the glaze off, especially if you are in a low humidity area or finishing a large area.
The glazing process involves putting a coat of the translucent glaze on, then wiping it back off, with the idea that the color left behind settles in the grooves and recessed parts and leaves some residual glaze on the rest of the project. This is a good way to antique a piece or give it a wash of another color. Besides the Van Dyke Brown, GF offers Red Sienna, Yellow Ochre, Pitch Black, Winter White and Burnt Umber.
I started on the side, brushing on some glaze nearest the back part of the dresser, a section about 4ʺ wide at a time. By the time you lay your brush down and grab your shop cloth, it’s time to wipe it off. A few extra seconds won’t hurt anything – in fact, I stopped to take a picture before wiping it off – just don’t dilly-dally too long or the glaze will dry too much and not wipe off as easily, especially if you have not used Extender.
Using a straight, smooth motion with a wadded up, lint-free cotton shop cloth, I started at the top of the dresser and pulled the cloth down the surface to the bottom, removing a lot of the glaze as I did so, but leaving an almost grain-like appearance, while still letting the “Owlet” color show through. I then re-wrapped my cloth to a clean spot, being careful not to leave “tails” that might drag in the glaze, and did another swipe right beside the last one, overlapping slightly. I continued this around both sides, the top and the inside strip that will show once the doors are back in. I must say, I liked what I was seeing!
When all that was dry, I added three coats of GF High Performance Satin Topcoat, drying between each coat. I also did a light hand-sanding between coats for a smoother finish.
In the meantime, I was also working on the drawers. I had some General Finishes Antique Oak Wood Stain on hand, so I used that to revive the finish.
I brushed on two coats of stain, then three coats of GF High Performance Satin Topcoat. It really brightened up the wood and made the drawer fronts a nice complement to the painted and glazed outer portion of the dresser.
When redoing a piece of furniture with drawers, it’s a good idea to lightly sand any drips that may have occurred on the sides. If the drawers are a tight fit, even a fraction of an inch additional width could be problematic.
Time to move the dresser to its new home, and put the drawers back on! I’m going to let the paint fully cure before I put anything heavy on top, but I’m pretty happy with how it turned out.
It never occurred to me that you could paint anything but walls with interior paint. Light bulb moment! Hope you enjoyed my tutorial.
Enjoyed the project?
Suggested materials:
- GF Van Dyke Brown Glaze - $15 (https://www.woodcraft.com/products/general-finishes-van-dyke-brown-glaze-pint)
- GF Antique Oak Stain - $15 (https://www.woodcraft.com/products/general-finishes-wood-stain-water-based-antique-oak-stain-pint)
- Krud Kutter - $8 (https://www.woodcraft.com/products/krud-kutter-tsp-substitue-32-oz)
- GF High Performance Topcoat - $28 (https://www.woodcraft.com/products/hp-polyurethane-top-coat-satin-quart)
- Valspar Interior Paint - $0 (leftover) (Ace Hardware)

Want more details about this and other DIY projects? Check out my blog post!
Published April 6th, 2017 3:48 PM
Comments
Join the conversation
1 comment









Frequently asked questions
Have a question about this project?
Can I paint a melamine chest, and what with ?