


No-Sew Upholstered Chairs Project – My Favorite Kind
Another no-sew upholstered chairs project – my favorite kind!
You might remember my first no-sew upholstered chair project that I posted about here. Upholstered projects are great when the only tool needed is a hand-held stapler. Once you start needing a sewing machine to recover something, I run for the hills.
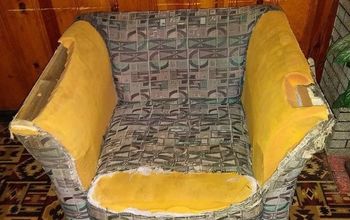
When I saw this pair of chairs at an estate sale, I loved them, but the fabric was dingy from being in storage for so long. The seats had zippered covers which would be easy to take off and wash, but how in the world would I wash the fabric on the backs of the chairs?
I wasn’t convinced that I could recover this kind of chair so I walked away from them. Then, I walked back past them again……….. five times. I finally decided to bite the bullet and give them a try.
I AM SO GLAD I DID!
When I got home, I thought I would try the easiest thing first. I removed the seat covers and washed them. Four different times. Still dingy. On to scary Plan B…… recover the chairs.
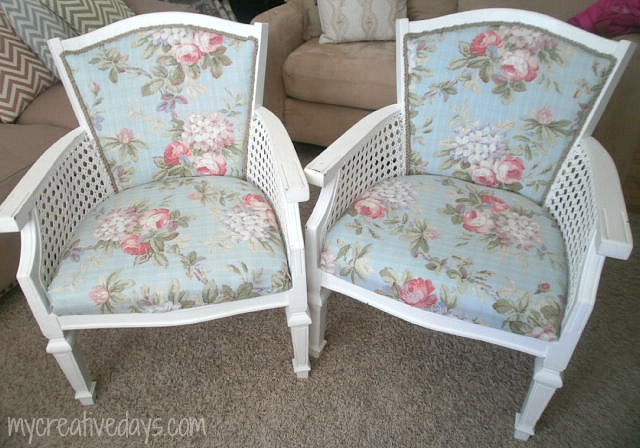
To be honest, I was not going to post this project because I had no idea how it was going to go. I knew there was going to be a lot of trial and error so I only took a few pictures here and there. I wish I had taken more pictures because when we got the chairs done, I was floored by how well they turned out! If I would have taken step by step pictures, it would have been easier to show you what we did. And the best part, we only needed a stapler and a hot glue gun to get the job done!
Look at these beauties!
This is how I bought them (I had already taken the cushions off before I took the picture).
To start this project, I laid the chairs down and saw that I could take the bottom of them apart. This helped me recover the seat cushions without any problem. I reused the cushion and stapled the new fabric to the bottom of the seat (there was a black piece of fabric that went on the bottom of the chair to cover up the staples).
For the fabric on the back of the chair, Hubby pulled the cord off around the edges and then pulled the fabric off the chair. (I was freaking out a little bit at this point because I had no idea what I was going to use to replace the cord??).
The chairs have an open back so to recover the back of the chair, we stapled the new fabric (which I scored last summer at a yard sale for $2!) on the back of the chair. Easy. I got rid of the buttons on the back cushion and reused the cushion. I covered it with the new fabric and as I held the cushion on the back of the chair, Hubby stapled. (I pulled the fabric taught and folded all the edges in as he stapled).
They look great so far, but now I have to tackle that cord part? There was a pretty good size gap between the fabric on the back of the chair and the wood of the chair (which the cord covered). I would not be able to sew fabric around the old cord for two reasons: #1. That would involve a sewing machine and we know I don’t do sewing machines. #2. Hubby broke one of the cords when he was pulling it off.
Think. Think.
Twine! Of course twine, duh! I grabbed some twine to see if it was big enough to cover the gap. Not even close. Then, Hubby came up with the genius idea to braid the twine to make it thicker. This man is brilliant! It was the prefect solution. Braiding the twine gave us the exact size we needed to cover the gap! After I braided enough twine to cover the gap, I hot glued it in place (the cord was hot glued as well so I knew this would work). *Tip: To start the braiding process, I hot glued the three ends of the twine together to make it easier to hold it all together.
The braided twine around the chairs looks so much better than the cord. I LOVE it! I decided not to repaint the chairs because I like the bumps and bruises (character) that they came with.
I can’t tell you how happy I am with this entire process. Not only did I get some great chairs in the end but this project taught me not to give up on something before I have even tried it.
You might remember my first no-sew upholstered chair project that I posted about here. Upholstered projects are great when the only tool needed is a hand-held stapler. Once you start needing a sewing machine to recover something, I run for the hills.
When I saw this pair of chairs at an estate sale, I loved them, but the fabric was dingy from being in storage for so long. The seats had zippered covers which would be easy to take off and wash, but how in the world would I wash the fabric on the backs of the chairs?
I wasn’t convinced that I could recover this kind of chair so I walked away from them. Then, I walked back past them again……….. five times. I finally decided to bite the bullet and give them a try.
I AM SO GLAD I DID!
When I got home, I thought I would try the easiest thing first. I removed the seat covers and washed them. Four different times. Still dingy. On to scary Plan B…… recover the chairs.
To be honest, I was not going to post this project because I had no idea how it was going to go. I knew there was going to be a lot of trial and error so I only took a few pictures here and there. I wish I had taken more pictures because when we got the chairs done, I was floored by how well they turned out! If I would have taken step by step pictures, it would have been easier to show you what we did. And the best part, we only needed a stapler and a hot glue gun to get the job done!
Look at these beauties!
This is how I bought them (I had already taken the cushions off before I took the picture).
To start this project, I laid the chairs down and saw that I could take the bottom of them apart. This helped me recover the seat cushions without any problem. I reused the cushion and stapled the new fabric to the bottom of the seat (there was a black piece of fabric that went on the bottom of the chair to cover up the staples).
For the fabric on the back of the chair, Hubby pulled the cord off around the edges and then pulled the fabric off the chair. (I was freaking out a little bit at this point because I had no idea what I was going to use to replace the cord??).
The chairs have an open back so to recover the back of the chair, we stapled the new fabric (which I scored last summer at a yard sale for $2!) on the back of the chair. Easy. I got rid of the buttons on the back cushion and reused the cushion. I covered it with the new fabric and as I held the cushion on the back of the chair, Hubby stapled. (I pulled the fabric taught and folded all the edges in as he stapled).
They look great so far, but now I have to tackle that cord part? There was a pretty good size gap between the fabric on the back of the chair and the wood of the chair (which the cord covered). I would not be able to sew fabric around the old cord for two reasons: #1. That would involve a sewing machine and we know I don’t do sewing machines. #2. Hubby broke one of the cords when he was pulling it off.
Think. Think.
Twine! Of course twine, duh! I grabbed some twine to see if it was big enough to cover the gap. Not even close. Then, Hubby came up with the genius idea to braid the twine to make it thicker. This man is brilliant! It was the prefect solution. Braiding the twine gave us the exact size we needed to cover the gap! After I braided enough twine to cover the gap, I hot glued it in place (the cord was hot glued as well so I knew this would work). *Tip: To start the braiding process, I hot glued the three ends of the twine together to make it easier to hold it all together.
The braided twine around the chairs looks so much better than the cord. I LOVE it! I decided not to repaint the chairs because I like the bumps and bruises (character) that they came with.
I can’t tell you how happy I am with this entire process. Not only did I get some great chairs in the end but this project taught me not to give up on something before I have even tried it.
No- Sew Reupholstered Chairs!

Want more details about this and other DIY projects? Check out my blog post!
Comments
Join the conversation
2 of 10 comments
-
Well done, really beautiful!!!
-
Wonderful I am filled with envy :)


Frequently asked questions
Have a question about this project?
How can I do this if the seat and back are one piece like hospital lobby chairs without sewing