Barn Door Table, Simple DIY for My Deck!

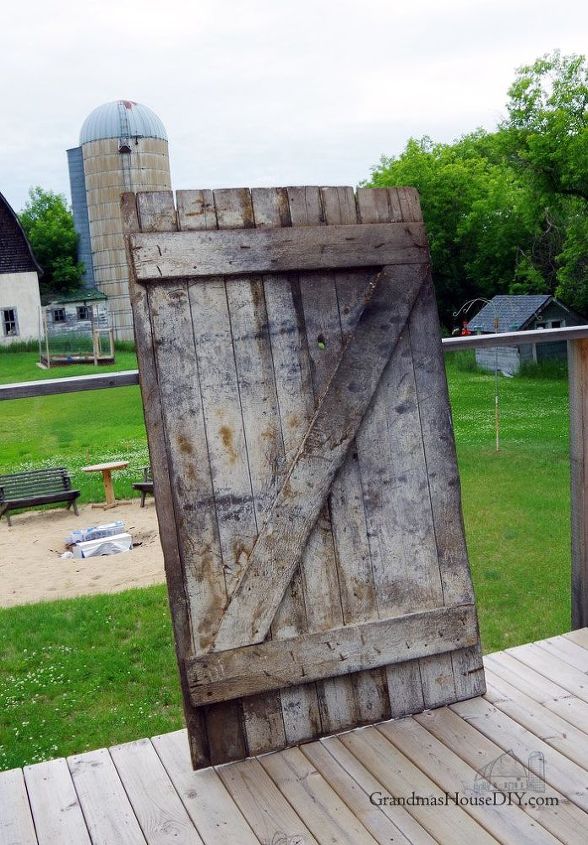
A post on how I built a base for a barn door table for outdoor entertaining on my deck! Many times I've gone out to my old barn (my grandparents' old wood working shop) and grabbed something and stashed it somewhere safe for a future project. This barn door was one of those stashes!
I even had two old workshop benches that I knew would be perfect for seating!
So when I got to designing the base I tackled my first two major pet peeves. I hate tables with legs out on the corners and I hate tables that are so short I can't cross my legs when I'm sitting at them. Tables with legs at the corners literally trap anyone whose sitting at them and if you can't sit comfortably (a lot of people cross their legs) what is even the point? So I took some measurements while sitting both on the benches and on my dining room chairs before I came up with the height I wanted my base to be by compensating for the depth of the top so I would end up with a table no taller then 32".
I had just enough 2x4s leftover from the little house remodel and I used 3" outdoor decking screws with a star bit and my Dewalt impact driver for the construction. I took my measurements, cut all of my timber in the basement on my mitre saw and then assembled it out on my deck.
2 2x4s at 50" (the long sides of the rectangle)
2 2x4s at 28" (the short sides of the rectangle)
4 2x4s at 28" (the legs)
2 2x4s at 41" (the feet)
2 2x4s at 50" (the center supports that run along the feet)
(The majority of barn doors are built like this one where one side (the front) is "flat" made up of several boards (sometimes tongue and groove like this one) while the back has the supports, usually one near the top and one near the bottom with one long board at an angle across the whole thing. It was imperative that my rectangle hit along the top and bottom boards so I cut it to be just long enough to run along them so my screws would then go through the top barn boards, through the barn door's support boards and then into my rectangle.)
With the rectangle built I put the legs on the inside of the corners using several deck screws for each one (not unlike how I also built my grill station) then flipped it "right-side-up" before putting the barn door on top of it. I centered the rectangle the same distance around the barn door and I screwed down through the door into the rectangle - very sturdy. At this point I think some people would have called it done but I HATE wobbly tables and leaving just four legs like that gave me nightmares about them ripping off if anyone tried to drag the table anywhere. Nope, I wasn't done yet, it was time to add some support and some "feet".
I made the feet the width of the table and went ahead and mitered the top of each side so it wouldn't interfere with chairs as much etc. (It wasn't necessary but I do like the way it looks) Using a tape measure I compared the top distance between the legs and made sure it was exactly the same along the bottom when I added the feet - this squared up the table and totally eliminated all wobbliness. I put the feet on the inside of the legs and then grabbed my last two boards to create the center support. The support boards just landed on top of the feet (also on the inside of the legs) and ran from leg to leg along the length of the table on either side. Another batch of screws and this base was all but done.
First I tackled the barn door table top by sanding it down with medium grit sand paper and my Dewalt Orbital sander. I tried to leave as much patina as I could but, honestly, the door was rather nasty. From there I made a mix of 50/50 water and vinegar and scrubbed the whole top down. The vinegar darkened the bare wood that I revealed in sanding and created a little more cohesiveness. Then I did a coat of Minwax dark walnut stain on the base by brushing it on and then wiping it off after about twenty minutes.
All done except the top needed a little protection which I added by putting on a heavy coat of poly acrylic. When I use it now I throw a clear plastic table cloth on top of it - it helps make the top a little more level for plates etc. I was worried after I added the last support boards across the bottom that people would find them annoying but everyone has agreed they like them because it makes a great foot rest and, otherwise, they're "deep" enough into the center of the table that no one seems to notice or bump them with their feet.
And now I finally have a place to eat out on my deck at my barn door table!
Enjoyed the project?
Resources for this project:
See all materials
Comments
Join the conversation
-
 Hilary Daugherty Cook
on Sep 08, 2018
 Beautiful!!
-
 GrandmasHouseDIY
on Nov 14, 2018
Thank you!!
-
-
-
 Joanne Guanciale Dunn
on Sep 25, 2018
❤️
-
 GrandmasHouseDIY
on Nov 14, 2018
Thank you!
-
-








Frequently asked questions
Have a question about this project?
I have 2 barn doors and they have a very bad smell how do you get the smell out of them before we start a project like this ? As it would be perfect for all my grandchildren when they come to eat out on .
How much door overhang is there on the ends and sides? I'd like to do the same thing, but not sure how much space to leave for people to eat.
Is the table outdoors because the poly listed here is for interior wood?