


How To Build A Shower
6 Materials
$2500
4 Weeks
Advanced
When my husband and I were remodeling our master bathroom, we decided to bite the bullet and tackle building a shower ourselves. On our remodeling adventure, we had already done a lot of tiling and my husband already knew quite a few things about plumbing, so we figured, why not? Building a shower isn’t that much harder than tiling a wall, but there are some special considerations to keep in mind. I learned a lot on this project, so I thought I’d share the wealth, so to speak, and let you guys know what I learned along the way. The only thing standing in between you and the shower of your dreams is some knowledge (easily learned on the internet) and believing in yourself. So, I’m here to tell you that I believe in you. You really CAN build a shower if you want to. I only cried a couple times, I promise.
One thing you need to decide is HOW you are going to build a shower. Are you going to go the traditional route with a mortar bed base and cement board walls with plastic installed behind it? This is definitely the cheapest option, but also has the most points of failure and the experts themselves have mostly abandoned this option for the “fancy” waterproofing methods available today. Do you want to do a roll-on waterproofing membrane? Definitely doable but I really hate the smell and I’m afraid of missing a spot and having a leak. Or do you mind dropping a few more bucks to go with one of the waterproofing systems like Schuter-Kerdi Shower System, which is what we ultimately decided on. The Kerdi shower pan has a pre-sloped styrofoam base that definitely makes installing the shower pan a lot easier. I really recommend this if you are a relative newbie like me.
Check out my blog for more information, including the video tutorials and websites I found the most helpful when deciding to tackle this project: https://www.countryesque.com/how-to-build-a-shower/
BTW, if you're not wanting to tackle a shower just yet, you can check out how we redid our guest bathroom without replacing the bath, if you're interested:

Bathroom: Before
This is our master bathroom before the remodel. First, my husband tore out the existing shower insert. He turned off the water and used crowbars, hammers, and a reciprocating saw to take out the old shower.
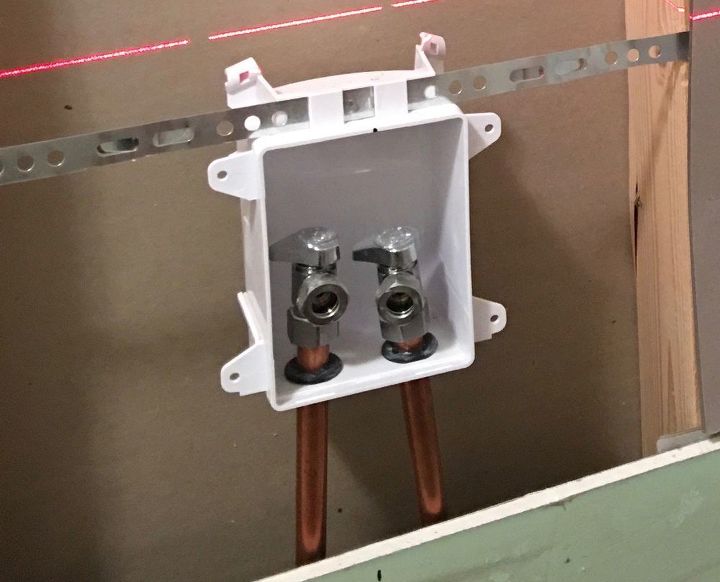
Make Plumbing Changes:
Our shower has two exterior walls. Initially, we wanted to have multiple shower heads installed with Pex plumbing. Unfortunately, we weren’t able to go this route because it’s a bad idea to have plumbing running through exterior walls. Unless you like frozen pipes, you probably want to avoid this. We decided to go with a shower panel. Shower panels require a different plumbing set up than your typical shower, so we had to change up our plumbing anyway. I found a great youtube tutorial for installing our specific shower panel if you want to check it out on my blog. I definitely recommend it, since the shower panel we bought had pretty limited instructions included with it.
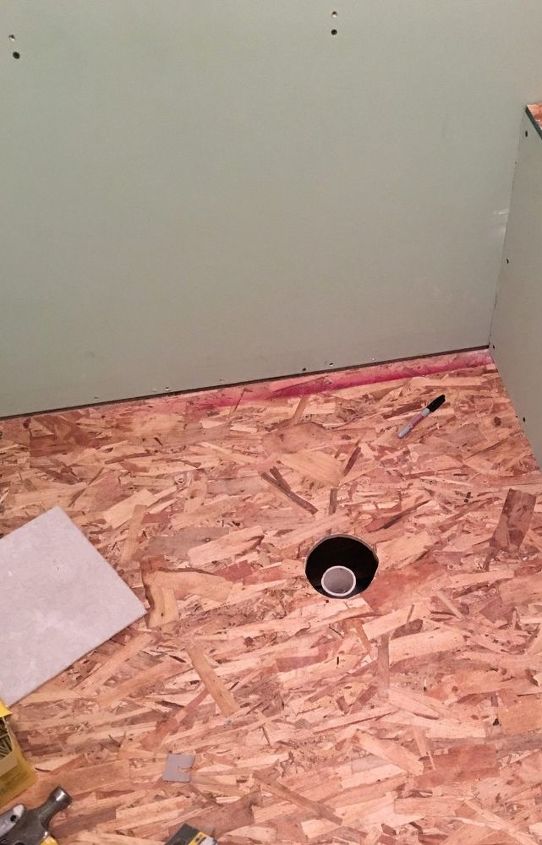
Check Subfloor:
If you decide to mud in a mortar bed, you’re going to have to make sure your sub-floor and floor joists can handle it. Yet another reason I recommend getting a pre-formed shower pan to tile over. When we tore out our shower insert, we realized that they had cut a huge hole in the subfloor for the drain. We installed additional plywood over the top of our subfloor so that our shower pan would be properly supported. For more information about how to prepare the subfloor, head on over to my blog for links to a tutorial.
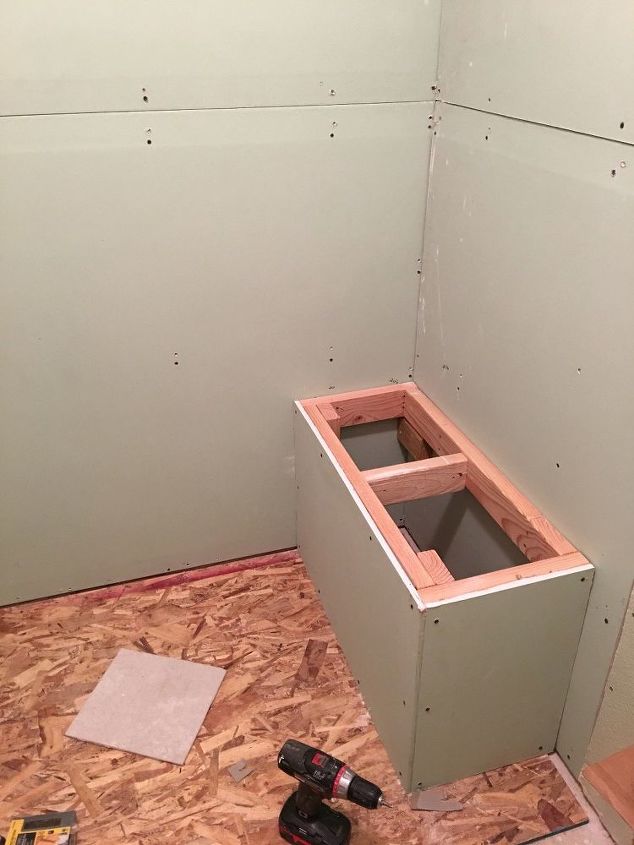
Build A Bench:
If you’re going through all the trouble building your own shower, you really ought to put in a bench. If you are a woman, you want one. If you are a man, your wife wants one, so that means you want one. Anyone who has precariously balanced on one leg trying to shave their leg in a shower knows that a bench is a necessity. The bench needs to be sloped so water runs off of it and waterproofed properly. My blog has a link to a site that I found very helpful when building my shower bench.
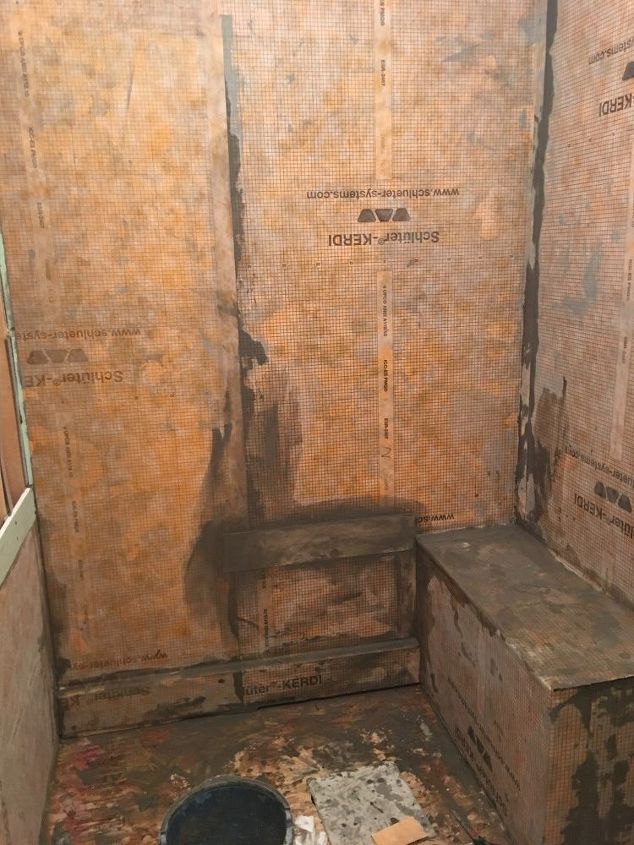
Install Waterproofing Membrane:
Once you have all your plumbing in place, put in your walls. We went with Kerdi membranes for our waterproofing, so we were able to simply install drywall. You’ll notice that we used green board, but this isn’t necessary, it’s just what we had on hand. If you are using a roll on membrane, you’ll want to install cement backerboard that has been properly taped at the seams with fiberglass tape, which is a bit more labor intensive than using the Kerdi membrane. With either of these methods, do not install plastic behind your drywall or backerboard. The only time you install plastic behind cement backerboard is if you are choosing to build a shower the traditional way. Again, I really like the new surface waterproofing products that are available these days, so I don’t see a reason to build a shower this way. Also, the only time you should be using drywall in the shower, green board or otherwise is if you are using a waterproofing membrane over the drywall, preferably Kerdi. Repeat after me: Green board is not waterproof, Kerdi is. Once you have your walls up, waterproof them. I followed a video tutorial that you can find a link to on my blog.
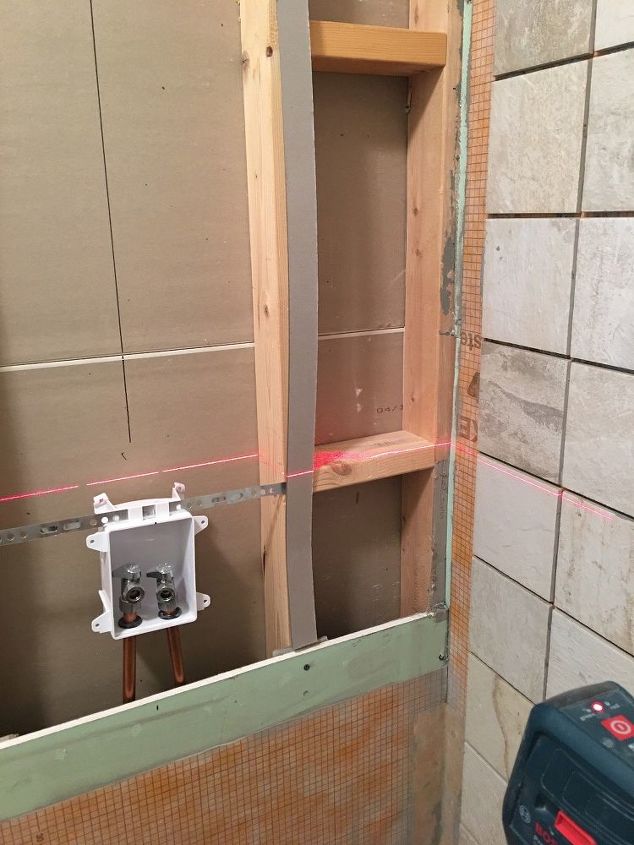
Optional Step: Determine Placement For Niches
I love having niches in my shower. If you’re building your own shower, why not make it more user friendly and make places to store shampoo bottles and such? As I mentioned previously, we had two exterior walls in our shower, so we couldn’t put niches on either of those walls. Those walls need to have one thing and one thing only in them: insulation. The last thing you want in your exterior wall is a gap in your insulation. Unless you enjoy a freezing cold shower experience, which I do not. We planned to have two, narrow niches on either side of our shower panel. If you’re building niches, you want them to line up with your grout lines so that they don’t look out of place. I was afraid that I wouldn’t be able to correctly figure out where my shower niches would go, so I cheated. I left out a chunk of drywall where the niches would go and installed the rest of my waterproofing membrane and shower pan first. Then I tiled the adjacent wall, leaving enough of a gap in the corner so I could waterproof the corner of my shower correctly. I used my laser level to determine the height that I wanted my niches to be and my husband put in 2×4 cross supports at the correct height. Once we had the cross supports in, we put in our last chunk of drywall and installed the rest of our waterproofing membrane. I used a tutorial that you can link to on my blog and found a template for cutting out my Kerdi membrane for the niche online that you can check out as well.
Install Shower Pan:
Again, the pre-sloped shower kits are the way to go if this is your first shower. Even if it isn’t, they just make life so much easier. The styrofoam can easily be cut to size and you can be pretty sure that your shower will drain well and be waterproof if you use one. Schluter has a great video tutorial available for installing the shower kit and I have the link over on my post.
Don’t even think about installing your tile until you’ve done a water test. You don’t want to go through all the work of installing a shower only to find out it’s not watertight. Basically, once your waterproofing is installed and dry, block the drain, draw a line with a sharpie at a certain height around your shower pan and fill water up to that line. Let it sit for 24 hours. If the water level doesn’t drop below the line, then your shower is water tight. Congrats!

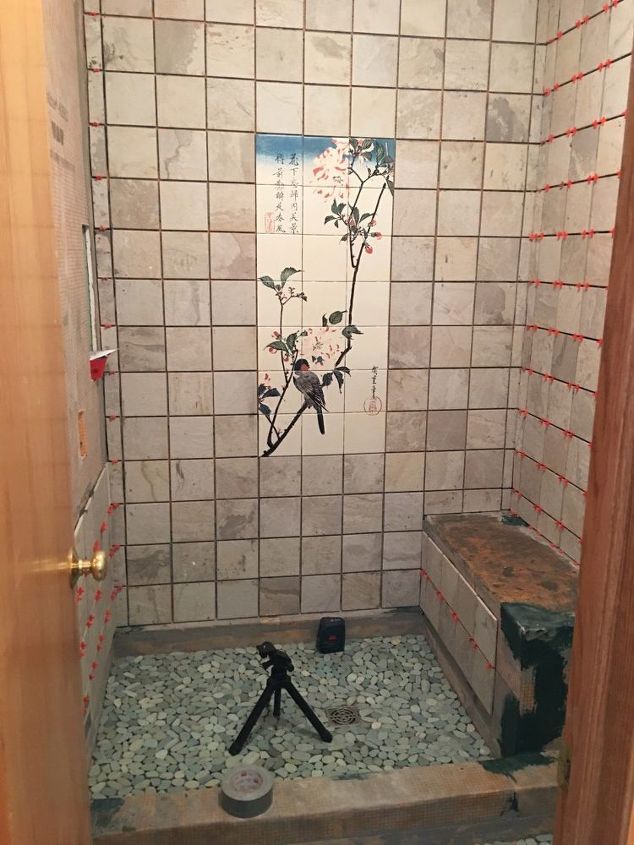
Tile Shower Floor:
Tile your shower floor first. That way, you’re not guessing how far down your wall tile can go. Because we were going for a spa retreat feel for our master bath, we went with pebble tile. I definitely recommend going with sliced instead of rounded pebble tile because it’s much more comfortable on your feet. Install the floor and let it set for 24 hours, then move on with the rest of your installation. I put cardboard over the top of my floor tile so that I wouldn’t hurt it in case I accidentally dropped a wall tile when tiling the walls.
Tile Walls:
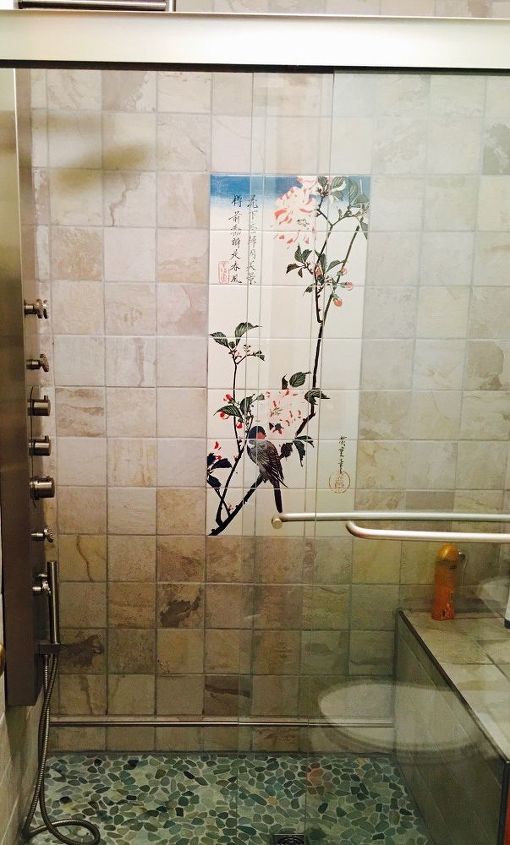
We used stone-look porcelain tiles for our walls. A word of caution if you use a tile that has a lot of crevices in it to mimic the look of stone. If your grout dries in these crevices, it can be darn near impossible to clean out. Make sure you clean your tile well and often as you are installing these or any porcelain tile with a rough stone-look, and certainly natural stone as well.
Tile should be installed from the center out. If you have to cut your tiles to size, you want the edges of your tile work to look the same, not to have a full sized tile on one side of the wall, and little, inch wide pieces on the other side. That looks bad. Center your tile and your tile work will look professional.
Whatever you do, make sure that your first row of tiles is absolutely, perfectly level. Don’t rely on the floor or any other surface to make sure of this. You may need to use a batten board to hold your first row of tiles level. This is just a 2×4 or other wood cross support that you use to hold your first row of tiles in place until they dry. If that’s the case, you’ll need to fill the holes once your batten board is removed. Kerdi makes a wall fix product, but I've read you can simply use 100% silicone. Once you have your first row of tile installed, you can install the rest using spacers to keep the tile level. The thinset is sticky enough to hold the tile to the wall until it dries completely. Instead of using bullnose tiles for my exposed edges, I went with a tile edging product. You can find out more information about what tile we used, including where I found my mural on my blog. After your tile is installed, grout your tile. Use an acrylic caulk in all corners.
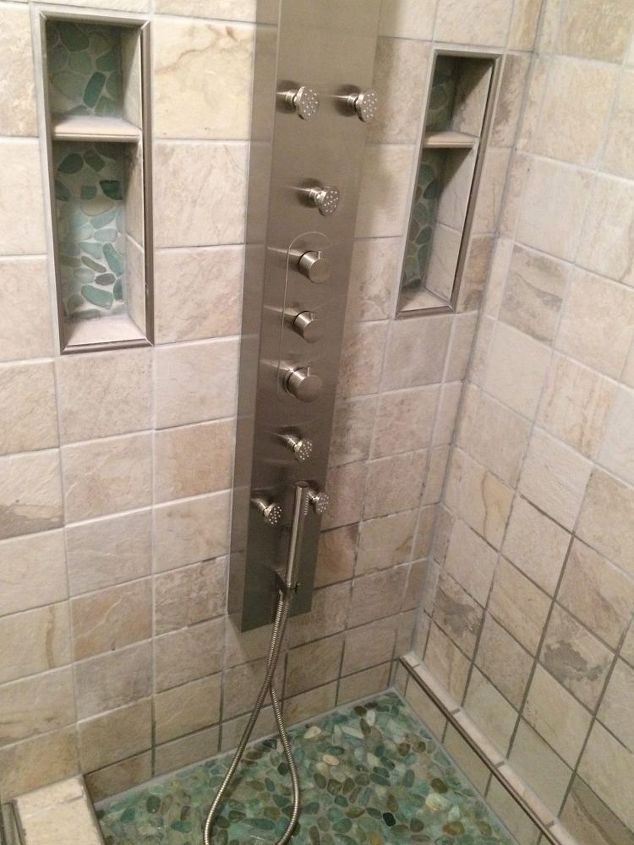
Install Shower Panel:
If you went the route we did, watch the video link in my blog to see how to install the shower panel. The hardest part is making the holes into your porcelain tile to anchor the panel. We used a diamond bit on our drill and kept it wet with a sponge.
Install Shower Door:
Our shower door. Boy, we sure had some issues. We bought three, yes three, online before we finally received one that wasn’t dented, scratched or otherwise unusable. It was a pain. I think it was just bad luck, because I’ve never had this much trouble receiving online orders before or since, but it was a definite hassle and it delayed finishing our shower as well, which sucked.

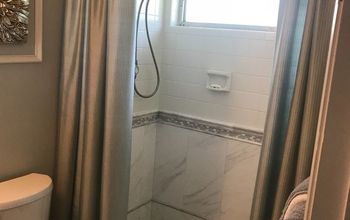
That’s everything it took to build our shower. It took a long time and a lot of hard work, but it was definitely worth it. I love my master bathroom now. It feels like my personal spa retreat!

Want more details about this and other DIY projects? Check out my blog post!
Comments
Join the conversation
2 of 27 comments
-
I LOVE everything about it! I want one!
-
As a tile setter, I think you need to explain the ledge down near the pan. Unpressure treated wood rated for ground contact is preferable. Some counties have pan requirements for membrane shower pans. I kinda like it, but the test is how long it will last....


Frequently asked questions
Have a question about this project?
I understand not having plumbing lines running in an exterior wall and that you had two exterior walls involved but...if you wanted two shower heads, why didn't you run the plumbing to the opposed shower head via the basement or crawlspace?
Can you tell me what you spent? Just curious. Im getting ready to do my grandmas bathroom buts she wants to buy a kit that costs $700 for three walls and the floor. Ive been trying to concince her to do it the way you did it. Obviously it would be more time consuming, but they don't have near as much money as I have time. I'm gonna show her this, maybe I'll ba able to talk her into it
looks awesome...very professional. Any links to how to install the glass shower door ?