


I Turned a 1930's Farmhouse Closet Into an Art Studio!

Several years ago, I wanted a change from the city life and moved into a 1930's farmhouse in a tiny Kansas town. The house was very dark inside and suffered from years of neglect. I took on the task of slowly renovating it into a bright and cheerful home. One of the projects I would tackle is to create a space for art.

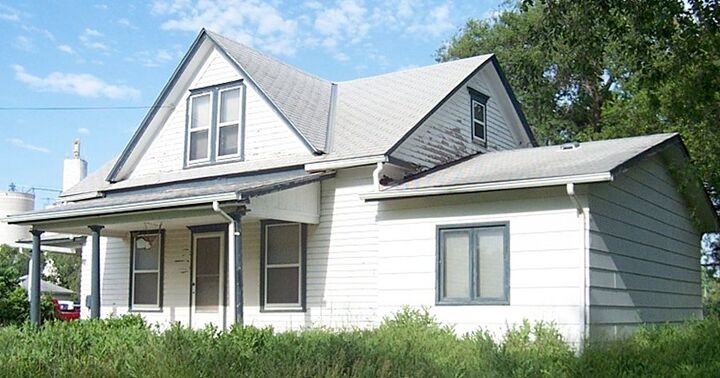
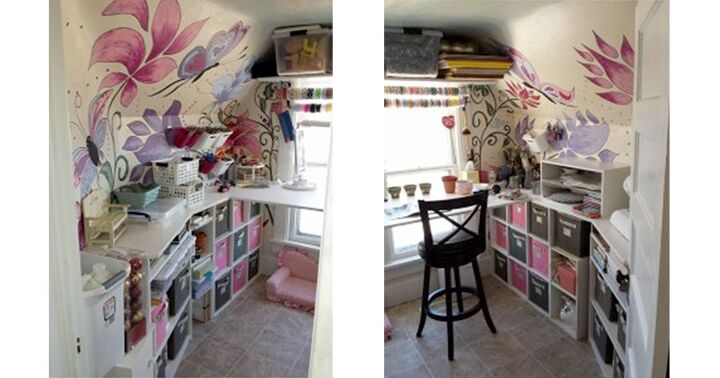
The second floor featured two bedrooms on each side of the house. In the middle was a smaller room that the previous owners had turned into a closet. The room had two small access doors into the attic. One on each side of the room with a large dual window in the center of the east wall. The walls were curved making it difficult to find a desk and storage options. I would have to custom build something to make it work.
There was a large rod on the west wall that was being used to hang clothes on. I would need to remove that and patch the wall. It had the original light fixture that seemed to be held together with electrical tape. There was wallpaper on all four walls and the ceiling. With most of the homes in this area, they have gone through several changes in wallpaper.
The house had gone through a recent addition in the early 90's. This added additional square footage on the lower level. They turned the original bedroom into a bathroom. The addition itself created a larger kitchen and added a bedroom that attached to the new bathroom.

This smaller room was at the top of the stairs and had an east facing window that would be great for natural light. I was already working on other areas of the home at the time and was still deciding on what I wanted to do with this room. I knew I needed two bedrooms, one for my son and the other for my daughter. I would take the bedroom on the main level, leaving this room for either storage or something else.
I had thought about making it into another bathroom because it was right above the bathroom on the main level, making it easier to extend the plumbing from below. I could make it an office, but I had already decided to renovate part of the kitchen for an office space. After a few months of contemplating, I finally decided to make it into a small art studio.
I started out by removing the wire hangers that were on the metal rod. Then I started tackling the wallpaper. At first, I was using a wallpaper steamer, but it kept burning my hands. It was leaving a mess with all the glue from the wallpaper, and it wasn't really doing the best job anyway. So, I opted for trying something new. I dripped a few drops of dish soap into a spray bottle and then added some hot water. This was doing a much better job at removing it.
As I would get one layer off, another layer would reveal itself below. You could tell the general decade that it was applied by the design on the wallpaper. It was fun seeing the different popular patterns throughout the years. I counted at least six different designs. Sprinkled here and there was a layer of aluminum foil that was used to cover holes and cracks from the house shifting.
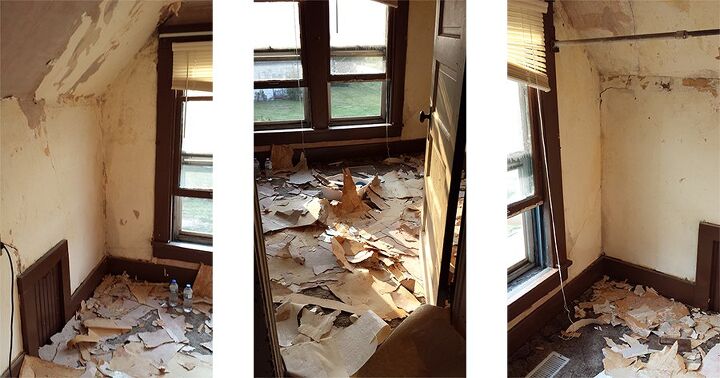
Once most of the wallpaper was off, I rolled it up inside the carpet and attempted to slide it down the stairs without making a mess. I thought that would be a better idea than spending time bagging it all up. I had already started taking off the carpet on the stairs, so it did slide down a little easier. I was using the original dining room as a trash dump. The front door was attached to the dining room and was at the bottom of the stairs. This was the best location for storing demo items because I could just pull the truck up to the front porch and load it up.
After seeing the condition of the lath and plaster underneath all that wallpaper, I thought about tearing it all out and installing new sheet rock. But this meant I would have to re-wire the electrical and then install the sheetrock.
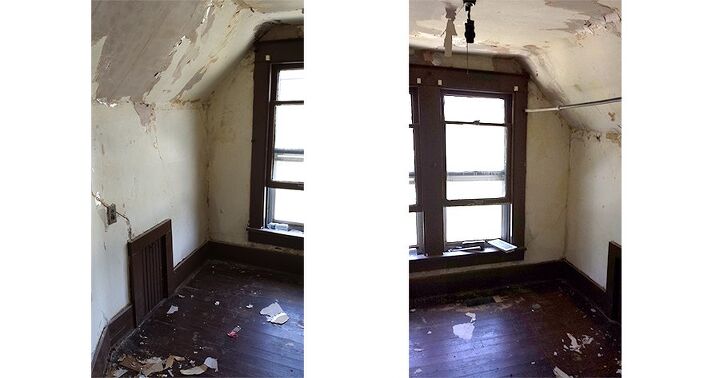
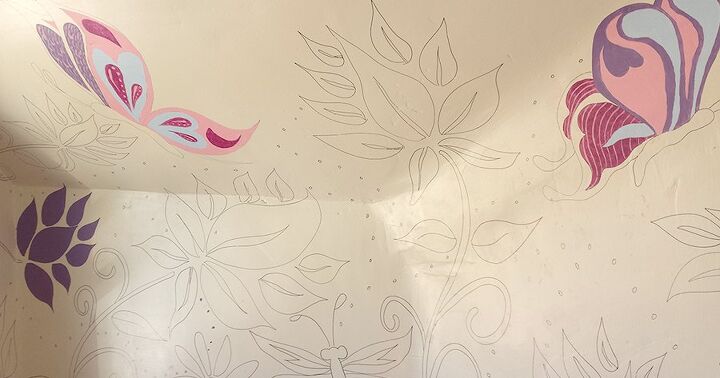
By this time, it was July and in the heat of the summer. The sun was beating in through that south facing window and most days I would finish the day soaked in sweat. With everything else that I was working on, I didn't want to take additional time and budget away from other projects. So, I opted to just clean up the rest of the wallpaper and patch the wall where I could and give it a fresh coat of paint. I chose a nice neutral off white because I had thought about doing some sort of floral mural on all the walls.
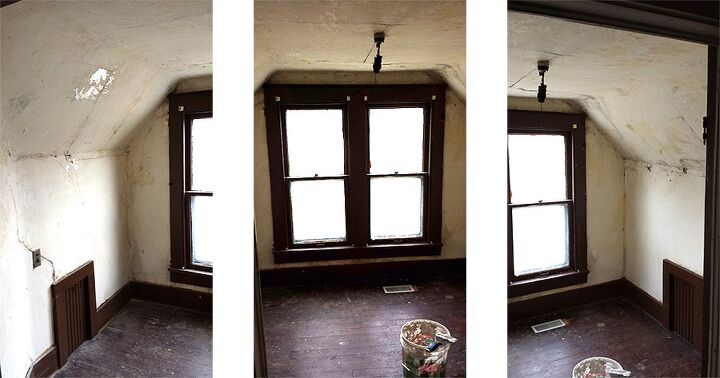
I wanted a happy place to create and something that would make me smile every time I walked into the room. I decided to move forward with the floral mural idea. I looked at a few reference photos and sketched out my plan on the wall. I probably should have sketched it out on a piece of paper first, but I wanted to get started without delay. Plus, hand painting a mural on all four walls was going to take up a lot of time already.
After I had the design on the wall, I chose the colors of the butterflies first. This would give me a general idea of what colors to paint the flowers. I used some left over recycled latex paint that I had lying around. I also had picked up some small sample bottles of latex paint that Home Depot had on sale before I left Denver.
I spent hours and hours up in the room just painting away. A lot of times in the middle of the night with only a floor lamp illuminating the wall. I was relaxed with music playing and in my own little world just enjoying each individual brush stroke.
All the curves and corners of the wall made it extremely difficult when drawing the design and painting. I would take breaks here and there to work on other areas of the house and then come back to this room. I tried to do most of the painting early in the morning before it got too hot or late in the evening when the sun was down and starting to cool off.
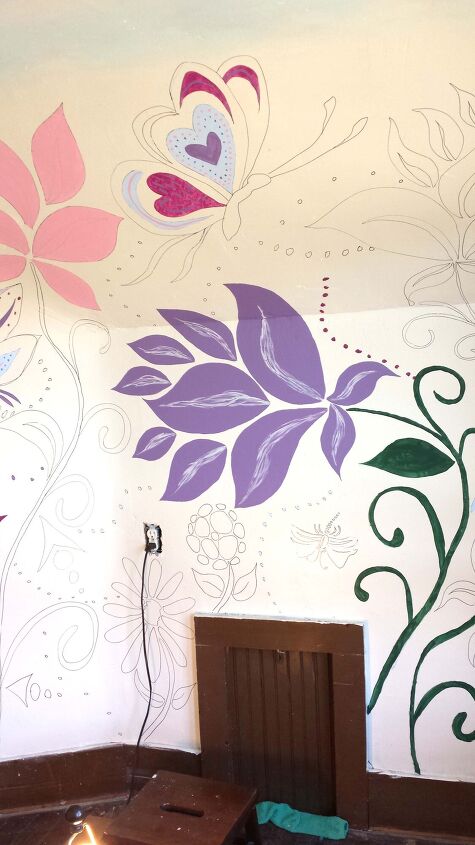
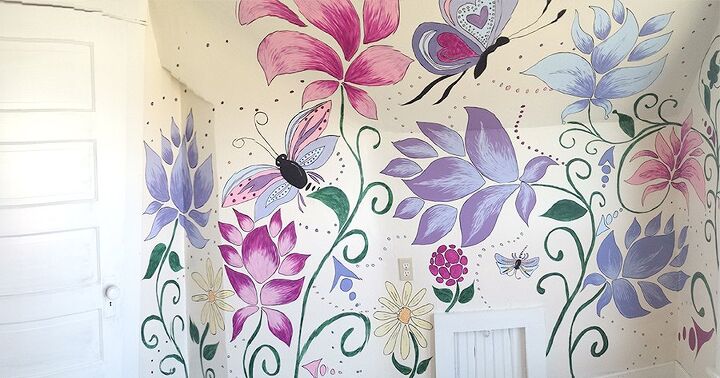
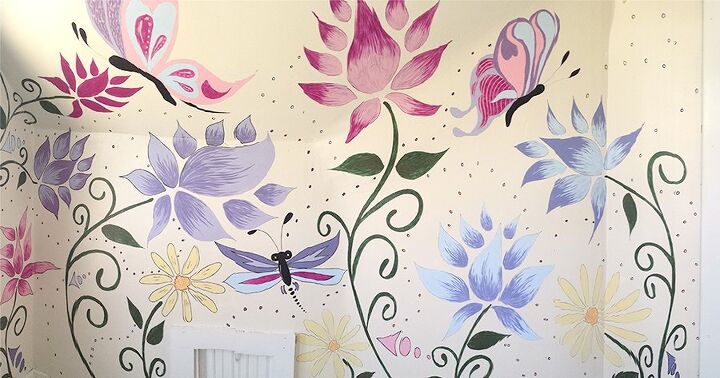
I finished up most of the color and wanted to add a bit more pop to the illustration. I worked on adding a black line throughout all the pieces of the mural. It was time consuming to add all the details to the flowers and then add in all the outline, but it was so worth it!
Some of the flowers look a bit distorted and the petals are too close together. I think this was due to fatigue and heat exhaustion. I grew up in Kansas as a child and remember the summers being hot, but the humidity seemed to affect me the most as an adult.
I did take breaks from painting the flowers and painted the first coat of white onto the trim, doors, and window trim. I wanted to get rid of that awful depressing brown. A fresh coat of white trim paint brightened the room up tremendously!
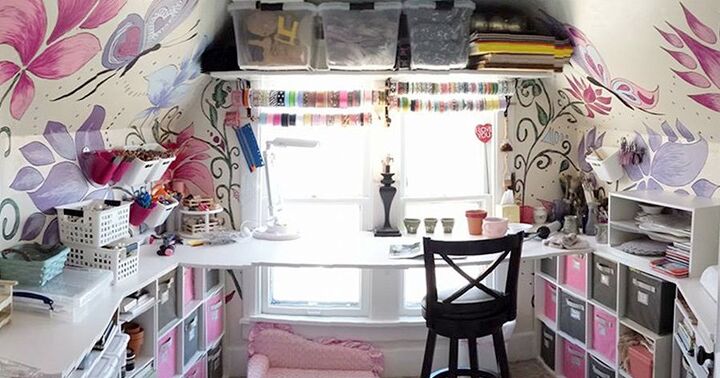
I picked up a roll of neutral tile looking flooring remnant from the local hardware store. It was thick, heavy, and made for commercial spaces without the need to glue it down. It looked perfect in the space and hid the beaten-up hardwood floors underneath.
Because the walls were curved, I had to find the right size of storage options to place against the walls. Walls in older homes tend to not be straight due to shifting or sinking of the house. In this case, the center of the home was sinking and needed to be reinforced. So, all the walls and floors were off, making it difficult when doing renovations.
I picked up a large sheet of white melamine tabletop so that I could cut it down to fit the space. This allowed me to add a workbench up against the window and add curved tabletops on top of all the shelving units. I sanded and painting the edges so that it would match the top. Adding tops to the storage units gave me added storage and more workspace.
I had a few bins that I needed to store and all my art paper. I wanted to keep them off the floor so that it would be easier when it came time to clean the space. The best option I could find for such a small space was to create a storage shelf above the windows.
All in all, I am pleased with the way it turned out. Let me know what you think in the comments or what you would have done differently.
Head on over to my blog to view more projects like this.


Comments
Join the conversation
-
The mural is a great way to handle uneven walls with many corners, curves, and other oddities that result from the wear and tear on an older home. Who sayid it must be precise and perfect. If you go out and look at flowers and plants in a garden, you will find many, many, similar flowers and leaf structures, but no 2 or 3 flowers or leaves, will be virtually identical. Even nature is flawed. Art specialists examine paintings with this in mind when evaluating their authenticity. Every true master had tiny flaws in their work. Intentional, unintentional, individual techniques, and so forth that establish that this piece is authentic. When a painting appears to perfect or matches a well known piece or artist’s work too closely, too perfectly, then the seed of doubt (is it a copy? Is it a fake?, etc)about it begins. They use every tool at their disposal to evaluate it. So anyways, be unconcerned about the imperfections, life is imperfect. Only you will notice them any how. I grew up in a farm house with after construction electrification. I’m surprised there was even a single outlet in your room. I had a single drop light in my room just like that. The only difference was a 2 socket plugin for an extension cord above the bulb, no wall outlets. Were I you that’s the one thing I would have done differently. Had an electrical contractor up there to check, and if necessary, upgrade all three rooms, to current code status. Adding new fixtures, outlets, and upgraded wiring to handle some window A/C units during the Summer’s heat. A large double window for a small single room, in a building of that age, is very unusual. It’s possible when the original house was built the upstairs might have been all one big room, the dividers added later. It was not uncommon when large families lived in small farmhouses like that. The heat from downstairs rose to the second floor, and everybody sleeping in one room made for warmth. Privacy issues were different. Many of those houses weren’t constructed with bathrooms, they were added later. In our house the bathroom had been a tiny bedroom. The upstairs had been subdivided into small rooms to take in lodgers, after the kids were grown, for extra income. All the accoutrements for no plumbing in the rooms were still in the side attic, when we moved in. When your first floor was renovated, the electricity down there was likely upgraded, it is required during new construction. You are only 3 people, a single bathroom should not be an issue. Especially as there won’t be that much time when everyone is home at one time, with work, school, activities, and so on. That was a wise choice. Enjoy your new art nook it looks cute and efficient.
-
Loved the mural you painted! Hope you did another in your new home in the city.


Frequently asked questions
Have a question about this project?
Best piece of work that Zi’ve seen on here!