


How To Paint Rays on a Wall
4 Hours
Easy
To create a wall with bursts or rays like this, first pick the colors.
For my office I used two very light shades of grey (Behr Silver Drop 790C-2, Dolphin Fin 790C-3). I wanted the colors to be subtle. All my art is very bright and I wanted the pattern to stand out but not compete with the bright “pop” colors. I also used an eggshell on the lighter of the greys and a semigloss on the darker for an added little contrast. Then paint the wall the base color. I suggest the base be the lighter of your two colors.
For my office I used two very light shades of grey (Behr Silver Drop 790C-2, Dolphin Fin 790C-3). I wanted the colors to be subtle. All my art is very bright and I wanted the pattern to stand out but not compete with the bright “pop” colors. I also used an eggshell on the lighter of the greys and a semigloss on the darker for an added little contrast. Then paint the wall the base color. I suggest the base be the lighter of your two colors.

Next decide which corner you want the rays to come from. Next mark of 1 ft. segments on the floor and opposite wall. These are the points you’ll make your lines to.
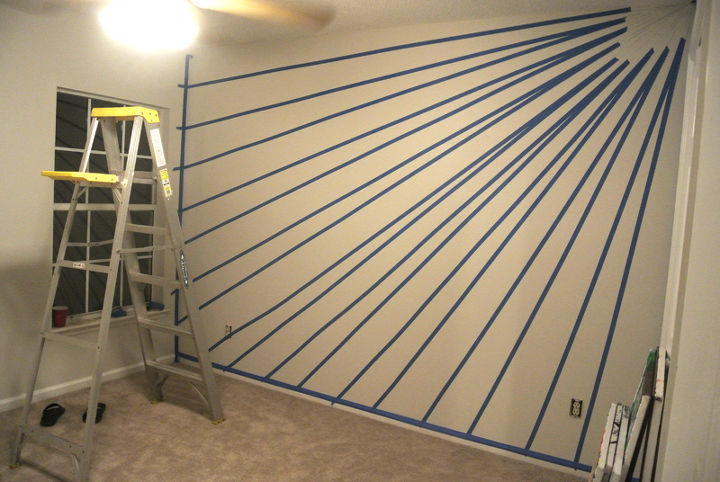
For the next step, you’ll need at least another person, 2 is very helpful. Using a chalk line one person hold the end of the line in the starting corner (you might need to stand on a ladder for this) and the other person pulls the string down to the first mark. Pull the chalk string tight, so there is a lot of tension and snap it against the wall. Just pull back and let go. This is where the third person comes in handy. Have them snap the line. When the lines are long, it is hard to keep the tension on the line while holding it.

Be sure to check out the full post on my website.

Want more details about this and other DIY projects? Check out my blog post!
Comments
Join the conversation
2 comments
-
Now THIS is cool!
-
Amazing!


Frequently asked questions
Have a question about this project?