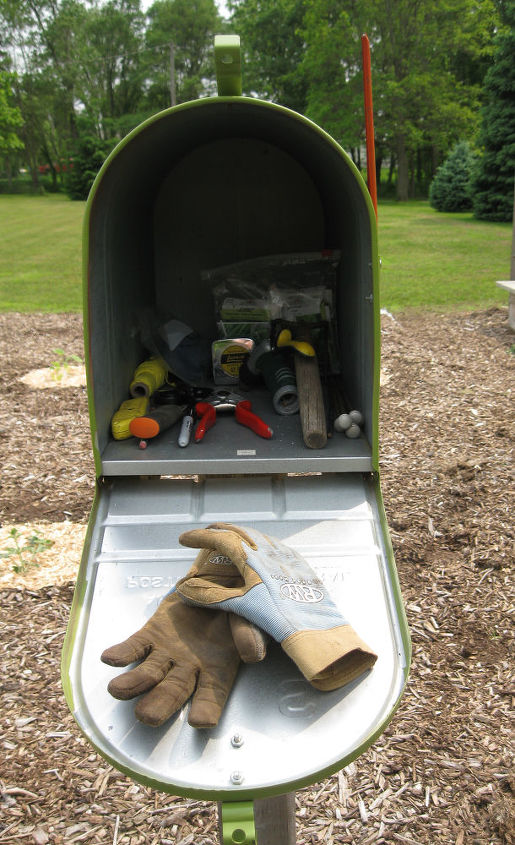
« View Post
Photos

Oops! Leave without saving?

If you leave this page, the information you have entered will not be saved!
Are you sure you want to leave this page?

Leave this page Stay on this page

Hometalk.com

  • Sign Up
  • or
  • Log In
  • Professionals
  • Community
    • All Members
    • Professionals
    • Bloggers
  • About
    • About Hometalk
    • Blog
    • FAQ
    • Guidelines
    • Resources
    • Support
    • Press
    • Contact
    • Terms of Use
    • Privacy Policy
  • Following
  • All Topics
    • Cleaning & Organization
    • Crafts
    • Design & Décor
    • DIY Projects
    • Gardening
    • Home Maintenance & Repairs
    • Outdoor Living
    • Painting
    • Remodeling
    • Repurposing & Upcycling
    See More Topics »
  • Questions
    • All Questions
    • Open Questions
    • Unanswered Questions
  • Clips
Post & Ask
Join Now Log In

Hometalk is where people share and help with everything home & garden

151
Old World Garden Farms
Old World Garden Farms Blogger Newark, OH on Oct 30, 2012
Like Clip

Constructing A Cool Mailbox From A Pallet - For Under $13!

We needed a mailbox for the farm – and wanted it to match the barn and surroundings. After looking on-line and in stores over the past few months – we realized anything unique was well over $125 to $150.00. We decided to continue the recycle, re-use and re-purpose theme and build one ourselves out of a few pieces of left over scrap lumber and a pallet.

Utilizing the scrap we had on hand – our total cost was under $13. But even if one had to purchase the couple of 2x boards needed for the project, you would still be under $25 to build.

How We Built It: (you can see a complete picture tutorial on our blog post)

Like most of our projects – we started by cutting out all of the pieces and setting them out. (You can find a complete materials and tool list at the end of this post)

Beginning with a couple of scrap pieces of 2 x 10″ lumber left over from another building project – we made the base and two ends. The base we cut at 22″ long to make the rectangle needed for the mailbox to sit on. We then cut two more pieces from the 2×10 stock at ...»

18″ high for the end pieces. We drew a 45 degree angle line from the top of the end pieces – and used the jigsaw to cut the roof lines for each piece. For the front of the mailbox – we took the mailbox we would be using and traced the outline of the door. We then cut that out with the jigsaw as well.

Next, we assembled the 2 ends with glue and a few screws to the 22″ long base.

Once the main base was assembled – we cut 6 of the pallet slat boards to 22″ long. We used those to build the sides – gluing and nailing them to the two end pieces.

We then cut four more slat boards at 26″ long for the roof top – and again attached them with glue and nails – leaving each end with about a 2″ overhang.

At this point we decided to add some trim to the mailbox house to dress it up a little bit. Using some more pallet boards – we cut 1″ wide trim strips with the jigsaw. and then cut them down as needed to trim out the corners and bottom of the mailbox. Using the pallet wood and wanting a rough look – the jigsaw was more than okay to use for the cuts.

A quick coat of paint and stain we had left over from the barn – and we were ready to install!

The hardest part of the project turned out to be digging the hole for the post at the road! We have dug quite a few holes for a lot of different projects around the farm – and I can say without a doubt – the dirt near the road bed is the hardest anywhere on the farm! After scraping and clawing with the post hole diggers for over an hour – we finally had the hole dug to the proper depth (28″ for us).

Beyond the hole digging issues..putting it up was as simple as attaching two 40″ 2 x 4′s cut from the scrap to the post. This created the stand for the mailbox to sit on. We then attached the mailbox house to the 2×4 ledge with four screws. We added an angle brace cut from scrap at 45 degrees to the bottom, attaching it from the post to the 2×4 ledge. All that was left was to slide in the metal mailbox – and we can get mail at the farm!

One final note: we ended up cutting off the back-end of the 2×4′s from the post. We had originally thought about attaching a sign to it – but decided we liked it better without. To receive our DIY and Gardening Tip Posts each Tuesday – sign up to follow the blog via email or hit the "Like" button on the Facebook tab on the left side of the page.

Materials List

10 ea.) Slat wood pallet pieces (easily obtained from 1 pallet)

3 ea.) Small pieces of scrap 2 x 10 lumber : Lengths : 22″ 12″ and 12″ – a four-foot scrap board will work.

1 ea.) 4 x 6 x 6′ treated post – $9.75

2 ea. 2x4x8′s – we used scrap – (could purchase for $5)

1 ea.) #80 bag of all-purpose concrete – $3.25

Wood Glue or Construction Adhesive

2″ nails or screws

Tools Used:

Jigsaw

Measuring Tape

Hammer and Nails

  • Like Clip
    Our New Mailbox – built from a pallet and a few pieces of scrap lumber
  • Like Clip
    After the frame was attached – we simply covered it with strips of pallet boards, and added a thin piece of pallet wood for trim around the edges. All cuts...
  • Like Clip
    A single pallet is all you need!
  • Like Clip
    Once I had cut the two ends from scrap lumber – I used a jigsaw to cut out the area for the mailbox to slide into
  • Like Clip
    The Mailbox Base Structure - Made from scrap 2 x 10's

To see more: http://oldworldgardenfarms.com/2012/10/30/building-a-cool-mailbox-from-a-pallet-for-under-13/

Post Comment | Like | Clip | Share
7053 Views
5 Comments
  • Steve G Fort Collins, CO
    Looks great, and thanks for the detailed explanation.
    on Oct 30, 2012 · Like 0
  • Old World Garden Farms Newark, OH
    Steve - Thank You! It's an easy project to do!
    on Oct 31, 2012 · Like 0
  • Krafty Kat Dexter, GA
    Love pallets! The mailbox looks great!
    on Oct 31, 2012 · Like 0
  • Old World Garden Farms Newark, OH
    Thank you Krafty Kat! We love working with them for so many projects
    on Oct 31, 2012 · Like 0
  • Cindy brickley Penfield, PA
    We are in the process of painting the house and also want to move the mailbox.

    Now would be a great time to make this to match the house. Just love this idea! Now any ideas on what to do with the steel pole that the mailbox is on now? May a Birdhouse? Ideas welcome.

    on Jan 07, 2013 · Like 0

NOTE: You can drag and drop your photos to reorder them
Required
Comment Saving...

Related Posts

  • Harvest Cart made from Old Pallets and Reclaimed Iron Wheels
  • How-To Make a Pallet Bookshelf
  • A junk styled pallet wood coffee table ANYONE can make
  • 40 Likes

    Matt Catchpole Anita Gail Johnson Adrienne Jacques Shanna M Alma Annette S Michelle Thompson Jill Smith Vanessa Smith Theresa Green Tracy Steinhofer Sandy Brown Horton WsSbee
    +27 more

Clipped to 60 Boards »

  • Donna Dixson
    Pallet recycle
    by Donna Dixson
  • Sharon Jeffreys
    Making New Again-pallet/barn wood
    by Sharon Jeffreys
  • Kelly T
    Pallets and Scrap Wood
    by Kelly T

Related Topics

Pallet Projects

Recent Questions »

  • Frankie Laney
    I knew I should have taken a different rout...
    14 minutes ago 52 answers
  • Vetsy
    What is the secret for carrying for Christ...
    19 minutes ago 10 answers
  • Have a question?
    Ask now & get answers»
Back
to top
Feedback