160K Views
DIY Vintage Clock Face

by
Meadow Lake Road
(IC: blogger)
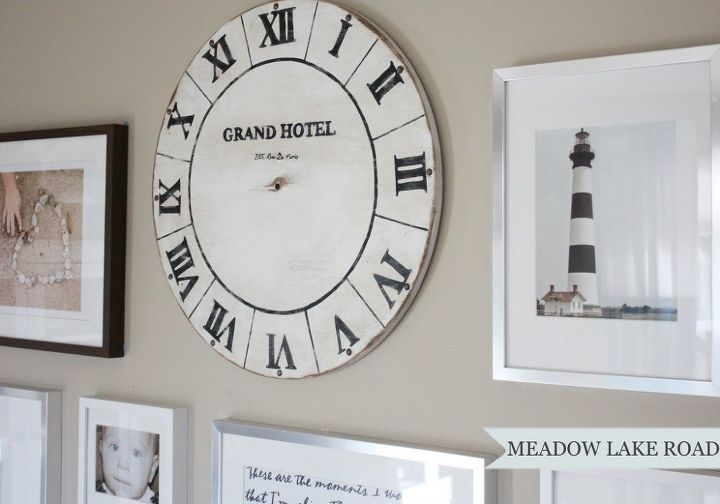
When creating gallery walls, I love to incorporate unexpected elements, like vintage clocks and mirrors in addition to a mixture of frames showcasing art & photos. So when I was putting together the gallery wall in our family room, I knew I wanted to add in a large scale vintage style clock face. To have a unique piece and to save money, I decided to create one myself.
Here's how I created it...
After giving it a good sand-down to smooth it out, I applied 2 coats of stain-blocking prime (Kilz brand).
Then I gave it two coats of semi-gloss white paint from Sherwin Williams.
Which leads me to the next step, which was…
After doing a google search for roman numeral clock faces, I found the above image, which I printed off an blew up on our copier.
Once I was happy with the size of the numerals, I cut them out and taped them to my painted circle. Notice that I taped the smaller clock to the center to the board to use a guide for placement and also kept the arches above my numbers to help me space them evenly from the outside edge.
To transfer my numerals onto the clock, I used carbon paper {from Staples}, cut into little pieces and stuck behind my numbers. Then I simply traced the outline of the numbers with a ballpoint pen.
Using a combination of a black paint pen and a tiny paint brush with black acrylic paint, I filled in all of the numbers. This part was very time consuming!!
I used the same method for the lettering in the middle of the clock {which I copied from a clock I saw at Pottery Barn}.
I used a piece of twine tied to a pencil to draw the large circle onto my clock. To fill it in, I again used a tiny paint brush and acrylic paint.
To give the clock an aged look I applied a glaze on top of everything. Just rub a little on then rub a little off until you are happy with the result. A great tip I was given was to keep a spray bottle with water handy, so that if your glaze gets too dark, you just spray some water on it and wipe it off.
Once the glaze dried, I tapped in some bronze furniture nails {from Lowe’s} above each number for some added detail.
And last, I sprayed the whole thing with some flat, non-yellowing polyurethane to protect all of my hard work.
It may not have turned out perfectly, but I think it's perfectly imperfect! To see more of our gallery wall, visit here: http://www.meadowlakeroad.com/family-room/family-room-gallery-wall-completed/
Enjoyed the project?

Want more details about this and other DIY projects? Check out my blog post!
Published February 18th, 2015 12:45 PM
Comments
Join the conversation
2 of 129 comments








Frequently asked questions
Have a question about this project?