


Smart DIY Toy Bag

by
Katie
I always used to say we wouldn't have a lot of toys for Jack. And until recently, I didn't think we did! But then I started looking around, and I realized that we have slowly accumulated a lot over the past two years...and I kind of feel like we live in a small toy shop. I keep telling Forrest that we can just wrap up old toys that Jack outgrows for other kids we may have, just so we don't become overrun with toys. He thought that was a great idea...Check back with me in a few years to see how that turns out!
Most of the toys we own aren't big - just lots of smaller toys. These small toys are perfect for Jack's latest favorite game - throw all the toys out from behind the couch and then do nothing with them. Jack is excellent at throwing small objects. Needless to say, we've been trying to teach Jack how to clean up after himself lately (and thankfully, have had success. I was checking on him in nursery in church on Sunday, and my heart just beamed as I saw him put away a toy without being asked...ah, the simple joys in life.)
I wanted to come up with a way for us to quickly put away all of our smaller toys, as well as store them. I remember seeing toy (or lego) bags with drawstrings growing up at friend's homes and thinking they were so cool. So I went to Pinterest found this post from Make It Perfect for a lego sack tutorial. It seemed simple enough and like it would be the perfect solution to our tiny toy problem.
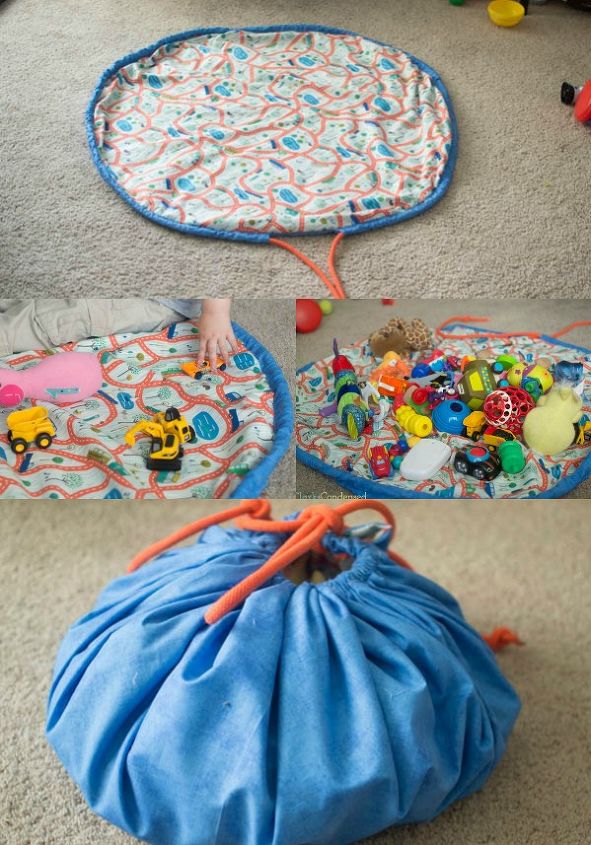
This toy back is easy and fun to make - even a beginning sewer can enjoy it. See the full tutorial here:
Want more details about this and other DIY projects? Check out my blog post!
Comments
Join the conversation
3 comments
-
Great idea! Perfect way to keep things organized.
-
Oh, boy. This makes cleanup time SO much easier! Well done!


Frequently asked questions
Have a question about this project?