« View Post
Photos

Oops! Leave without saving?

If you leave this page, the information you have entered will not be saved!
Are you sure you want to leave this page?

Leave this page Stay on this page

Hometalk.com

  • Sign Up
  • or
  • Log In
  • Professionals
  • Community
    • All Members
    • Professionals
    • Bloggers
  • About
    • About Hometalk
    • Blog
    • FAQ
    • Guidelines
    • Resources
    • Support
    • Press
    • Contact
    • Terms of Use
    • Privacy Policy
  • Following
  • All Topics
    • Cleaning & Organization
    • Crafts
    • Design & Décor
    • DIY Projects
    • Gardening
    • Home Maintenance & Repairs
    • Outdoor Living
    • Painting
    • Remodeling
    • Repurposing & Upcycling
    See More Topics »
  • Questions
    • All Questions
    • Open Questions
    • Unanswered Questions
  • Clips
Post & Ask
Join Now

Hometalk is where people share and help with everything home & garden

505
Find me on g+
Ethan@OPC
Ethan@OPC Blogger Catonsville, MD on Jan 24, 2013
Like Clip

A Flawless Drywall Repair

Fixing a hole in drywall is a great DIYer project, and it's a skill that every homeowner should master. There's more than one way to patch a medium-sized hole. However, this is the fail-proof method used by pro contractors.
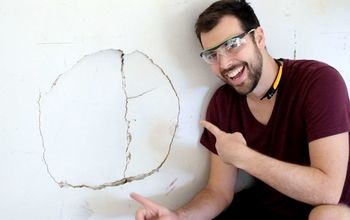
1. Square the hole

2. Install a backer-board

3. Cut a new piece of drywall

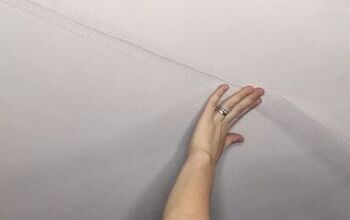
4. Tape all the joints

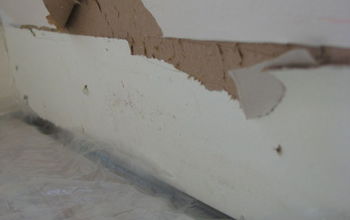
5. Apply several coats of mud
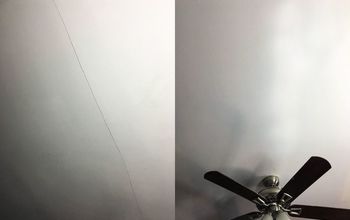
6. Sand smooth

7. Prime and paint

#drywall #repair

Time: 2 Hours Cost: $10 Difficulty: Easy
  • Like Clip
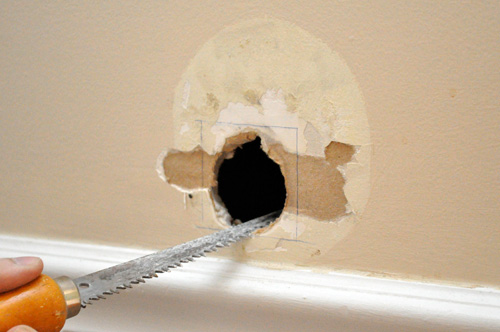
    Squaring the hole makes it easier to fit a new piece of drywall.
  • Like Clip
    Slip a backer-board into the hole and hold it with a temporary screw.
  • Like Clip
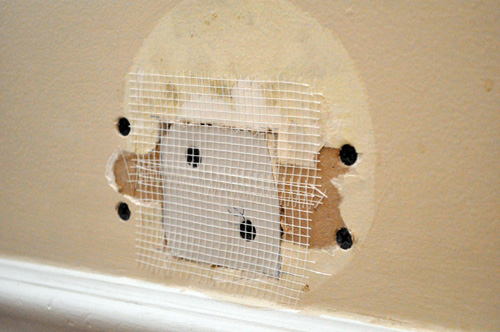
    Screw in the backer-board and a new piece of drywall. Countersink all the screws and cover the joints with tape.
  • Like Clip
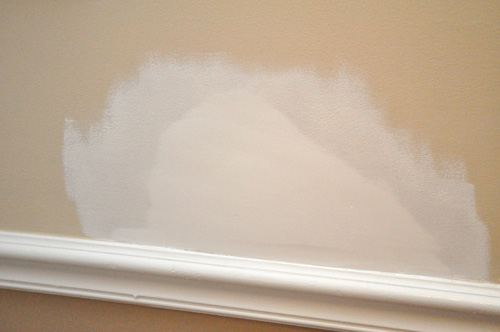
    Apply a few coats of patching compound, and when it's completely smooth, prime the repair.
  • Like Clip
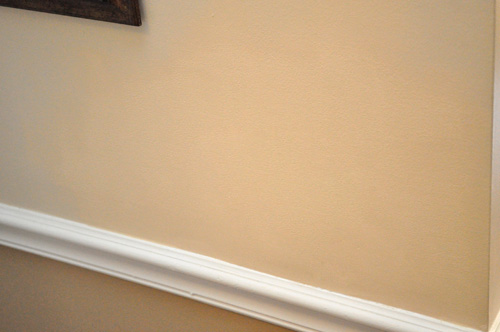
    In the end you can't even tell the wall was damaged.

To see more: http://www.oneprojectcloser.com/how-to-repair-medium-size-hole-in-drywall/

Post Comment | Like | Clip | Share
9365 Views
23 Comments
  • Miriam I New York, NY
    Ah! This is an awesome tip!
    on Jan 24, 2013 · Like 0
  • Steve G Fort Collins, CO
    Good summary. I learned the hard way that it makes everything so much easier if you square the hole first.
    on Jan 24, 2013 · Like 2
  • Ethan@OPC Catonsville, MD
    It seems counterintuitive to make the hole larger but it really does help. I've also heard a tip to cut the new piece of drywall to the approximate size (but slightly larger than the hole), and then trace it to ensure a perfect fit.
    on Jan 25, 2013 · Like 1
  • Nancy T South Deerfield, MA
    how do you keep the backer board in place??!
    on Jan 25, 2013 · Like 0
  • Ethan@OPC Catonsville, MD
    Yep. The backer board stays in the wall and adds strength to the repair.
    on Jan 25, 2013 · Like 0
  • Lannie Hagan Broomfield, CO
    Great tip, thanks so much for posting!
    on Jan 25, 2013 · Like 0
  • Kenneth Carrell Katy, TX
    BUT HOW do you keep the BACKER BOARD in place while you screw the piece of dry wall into it?
    on Jan 25, 2013 · Like 0
  • Kp Downers Grove, IL
    I can see if you hold the screw holding the backer board you can then screw around the edge of the backer, BUT how do you get the backetr board in the hole . You would not be able to fit anything bigger than the hole that exists ????
    on Jan 25, 2013 · Like 0
  • Ethan@OPC Catonsville, MD
    Check out the link. It'll show you lots more pictures. In short, I slip the backer board into the hole (holding it with that temporary screw) and screw it in place. Then I put the new piece of drywall in and screw that in place.
    on Jan 25, 2013 · Like 0
  • Linda P Steubenville, OH
    It looks like the backer board is pretty big... long enough to extend beyond the hole so you can attach it to the old drywall.... but... How do you fit the board into the hole? Does it need to be long and thin?
    on Jan 25, 2013 · Like 0
  • Ethan@OPC Catonsville, MD
    You're exactly right Linda. It's slim enough to slip into the hole. Really, it doesn't need to cover the entire hole, just provide a surface to anchor the new drywall.
    on Jan 25, 2013 · Like 0
  • Keri S
    I did that to a medicine cabinet hole, It was much bigger and when I Finished it , It never looked like there was a cabinet in the wall.. Kinda cool looking at the finished work and knowing what a great job it was to complete.
    on Jan 25, 2013 · Like 0
  • Supernewf Canada
    Another trick that I have used is to cut a picce of drywall 1" larger than the square hole. Strip the drywall from the front paper covering, 1" all the way around, that way the piece of drywall will fit in the square hole with the 1" paper covering overlaping the hole. The new piece can be held in place with a little compound on the overlapping edge. Then just cover with several coats of compound, sanding each coat as you go. This way you don't heed to install the backer board.
    on Jan 25, 2013 · Like 1
  • Rustic Crafts & Chic Deco... Brighton, MI
    This came at the perfect time! My husband is working on repairing a wall right now....I will pass this tip along! Thank you!
    on Jan 25, 2013 · Like 0
  • Aquascape Inc. Saint Charles, IL
    Great tips. Thanks!
    on Jan 25, 2013 · Like 0
  • Nancy C
    After you click on the link, it just makes more sense...I've never tried this but have a hole in my ceiling where I moved a light fixture (w/popcorn)! It's been like that since 2005 and I've yet to muster up the guts to try this! Thanks though!
    on Jan 25, 2013 · Like 0
  • Lynn Endicott Denton, TX
    Cut your square like stated in the above... and as you cut the wall bevel the edge abut 45 degrees so that the inside edge of the cut is smaller than the outside edge of the hole. Then bevel cut the insert drywall piece so so that the inside of the wall side is smaller than the outside edge... Insert like a puzzle piece, add your drywall tape, compound and finish. No screws, no backerboard.
    on Jan 25, 2013 · Like 2
  • Ethan@OPC Catonsville, MD
    Supernewf that's called a hot patch, and while it can look good, it's not as durable of a repair. Hot patches rely on mud for strength, and you *might* see cracks form.
    on Jan 25, 2013 · Like 0
  • Ethan@OPC Catonsville, MD
    Lynn Endicott, I've never heard that trick before. Have you ever had trouble making sure the bevel angles match or the new piece of drywall sitting proud from the wall?
    on Jan 25, 2013 · Like 0
  • Supernewf Canada
    Maybe but I've never had a problem with it. So long as the hole isn't too big. Thanks for the feed back.
    on Jan 25, 2013 · Like 0
  • Lynn Endicott Denton, TX
    Na... just wing it at about a 45 degree angle making the profile of the new patch piece look like a trapezoid. This keeps the patch piece from going into the wall... tape and bed and presto chango easy patch. Only reason that this might not work is if you are patching a hole where you need to hang something. I can not guarantee that something mounted on the patch would not pull the whole patch out.
    on Jan 25, 2013 · Like 0
  • Kelly S Bremerton, WA
    Don't forget to texture your patch to match the existing area around it. We have patched holes and replaces entire sections where one of our dogs tried to "dig" her way out of the laundry room. We didn't texture the patched areas and it really shows. That was in '98 and I'm finally getting around to texturing the area as part of my redo.
    on Jan 26, 2013 · Like 0
  • Kelly S Bremerton, WA
    Scrape the texturing off the area surrounding the hole , about 2 inches, to make it easier to feather the drywall compound. We had to redo 2 patches in another room because the original texturing was put on really thick and our hole turned into a bump no matter what we did. We then textured after the final layer of compound dried using Homex in a spray can. Final dteps were to prime and paint. Those 2 patches now can't be found.
    on Jan 26, 2013 · Like 0
  • Kp Downers Grove, IL
    yes the link says it .....all step by step.... thanks !!!!
    on Jan 26, 2013 · Like 0

NOTE: You can drag and drop your photos to reorder them
Required
Comment Saving...

Related Posts

  • I'm starting a house from scratch: What are the best washers, dryers, fridges and dishwashers?
  • The No Scrub Way to Clean Stove Burners
  • Our Dryer Repair
  • 57 Likes

    Connie B Joe S Gregg Todd Debbie Connie D Sherril Criqui Carlee T Joanieshand Dianna Love LaTonya Braggs Rae Clark Pamela K Carol L
    +44 more

Clipped to 102 Boards »

  • Joe S
    great tips
    by Joe S
  • Cheryl Hicks-Nichols
    DIY HOUSE CARE AND REPAIR
    by Cheryl Hicks-Nichols
  • Home Repair Tutor
    Great Ideas
    by Home Repair Tutor

Related Topics

Appliances, Home Maintenance & Repairs

Recent Questions »

  • Elizabeth Wolfe
    Musty smell from broken water line
    3 hours ago 4 answers
  • Heather B
    Does anyone have any experience with...
    4 hours ago 33 answers
  • Have a question?
    Ask now & get answers»
Back
to top
Feedback