


How to Make Tissue Paper Flowers for Endless Party Decor Possibilities

By Alexa Erickson
Tissue paper flowers offer a beautiful display for holiday centerpieces and decorations for special occasions throughout the year. Not only is making tissue paper flowers incredibly easy and inexpensive, but it's a great project to do with children.
Here’s everything you need to know about how to make tissue paper flowers so you can enjoy flowers around your home—.without the fear of wilting We’ll also give you some examples of ways to decorate with tissue paper flowers around your home or at your next gathering.
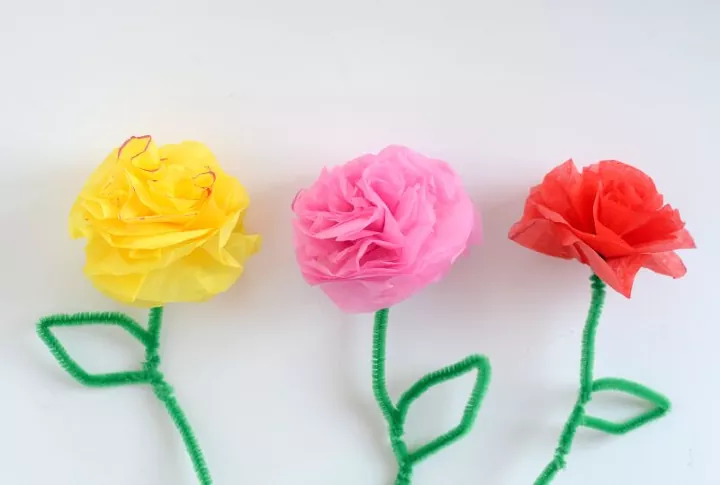
Photo via Reesa @ Mommalew.com
How to Make Tissue Paper Flowers
Whether you want to make tissue paper flowers with a single color and stem or one with multiple colors, the process is simple and yields beautiful, festive flowers as a result. Here’s a simple guide on how to make tissue paper flowers that are one color:
Tools and Materials Needed
- 3 sheets of tissue paper in the same color
- Ruler
- Scissors
- 1 green chenille stem/pipe cleaner or a stapler
Step 1: Cut the Tissue Paper to Size
Stack three sheets of tissue paper, lining them up edge to edge. Cut them into 12-inch x 6-inch sheets.
Step 2: Begin Folding the Tissue Paper
With all the sheets still stacked and lined up, begin folding the tissue paper. Start with the 6-inch side, making a 1-inch fold over the stack of paper.
Step 3: Continue Making an Accordion Fold
Turn your tissue paper stack over, keeping your first fold in place. Hold the folded part with your fingers and flip it up, folding another 1-inch section over the initial fold.
Continue turning over and folding the paper until an accordion-shaped thin strip of tissue paper is formed.
Step 4: Trim the Ends of the Strip
Use a pair of scissors to trim both the ends of the stacked tissue paper to create a rounded edge, mimicking the shape of a flower petal.
Step 5, Option 1: Secure the Middle
If you're going stemless, pinch the accordion and staple in the middle.
Step 5, Option 2: Add the Stem
If you’re adding a stem, fold the tissue strip in half, then place the green pipe cleaner inside the fold. Loop the stem around the crease where the tissue paper strip is folded in half. Twist the pipe cleaner around itself to secure the tissue paper strip.
Step 6: Gently Pull the Tissue Layers Apart, Reveal the Petals
Reveal the petals by slowly, and very gently, pulling apart the tissue folds evenly on all ends. Gently separate the tissue paper sheets to unfold the petals. Once all the petals are shaped, a gorgeous flower blossom will be revealed.
Pointed Petals
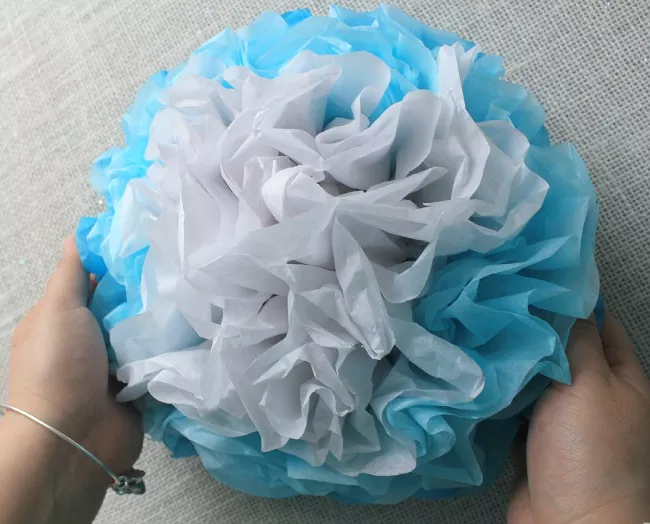
Photo via Linda B
How to Make Tissue Paper Flowers with Multiple Colors
To make tissue paper flowers with multiple colors, the process is the same as with the singular color, but you’ll add in a few more materials.
Tools and Materials Needed
- 2 colors of tissue paper, 3 sheets each or 3 colors of tissue paper, 2 sheets of each
- Ruler
- Scissors
- 1 green chenille stem/pipe cleaner or a stapler
Step 1: Stack the Tissue Paper
Stack the tissue paper, keeping like colors together. Line them up edge to edge. Cut them into 12-inch x 6-inch sheets.
Step 2: Begin Folding the Tissue Paper
With all the sheets still stacked and lined up, begin folding the tissue paper. Start with the 6-inch side, making a 1-inch fold over the stack of paper.
Step 3: Continue Making an Accordion Fold
Turn your tissue paper stack over, keeping your first fold in place. Hold the folded part with your fingers and flip it up, folding another 1-inch section over the initial fold.
Continue turning over and folding the paper until an accordion-shaped thin strip of tissue paper is formed.
Step 4: Trim the Ends of the Strip
Use a pair of scissors to trim both the ends of the stacked tissue paper to create a rounded edge, mimicking the shape of a flower petal.
Step 5, Option 1: Secure the Middle
Pinch the accordion and staple in the middle.
Step 5, Option 2: Add the Stem
If you’re adding a stem, fold the tissue strip in half, then place the green pipe cleaner inside the fold. Loop the stem around the crease of the folded tissue paper strip. Twist the pipe cleaner around itself to secure the tissue paper strip.
Step 6: Gently Pull the Tissue Layers Apart, Reveal the Petals
Reveal the flower petals by slowly and gently, pulling apart the tissue folds evenly on all ends. Separate the tissue paper sheets to unfold the petals. Once all the petals are shaped, a flower blossom will be revealed in a multitude of colors.
Uses for Tissue Paper Flowers
Tissue paper flowers can be used to decorate in a variety of ways. Here are some options:
- If you went the stem route, stick them in a vase—no water needed.
- Hot glue tissue paper flowers to a canvas for a colorful, creative, wall flower display.
- Make a flower wall feature by making multiple tissue paper flowers in the colors of your choice and adhering them to the top corner of a wall.
- Attach tissue paper flowers to a garland and hang on a mantel or a table for a party decoration.
Have you made tissue paper flowers before? How did you use them to decorate?
Comments
Join the conversation
-
Yeh, I remember also that as kids we used to spend hours making paper (and kleenex) flowers for parade floats, using the same technique.
-
I remember using the pastel-colored tissues that were available at that time to make flowers to decorate parade floats for Homecoming, etc. The theme or design of the float base was covered with chicken wire and the paper flowers stuck into the holes in the chicken wire. What an exercise in creativity that was! Great memories! Thanks for the post!


Frequently asked questions
Have a question about this project?