


Holiday Elf Door

3 Hours
Easy
Using dollhouse doors, miniature scale accents and supplies from miniatures.com, we've created a warm and inviting Elf door for the elves that might visit from the North Pole. Small doors that appear overnight help add to the wonderment of the season and allow imaginations to flourish.
**PLEASE be sure to keep small pieces and parts out of reach of little hands and paws that might be excited to touch and play with tiny pieces and parts.**
**PLEASE be sure to keep small pieces and parts out of reach of little hands and paws that might be excited to touch and play with tiny pieces and parts.**
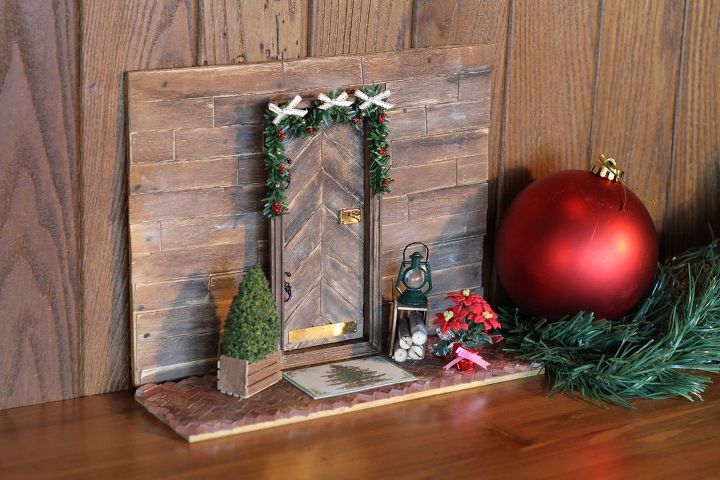
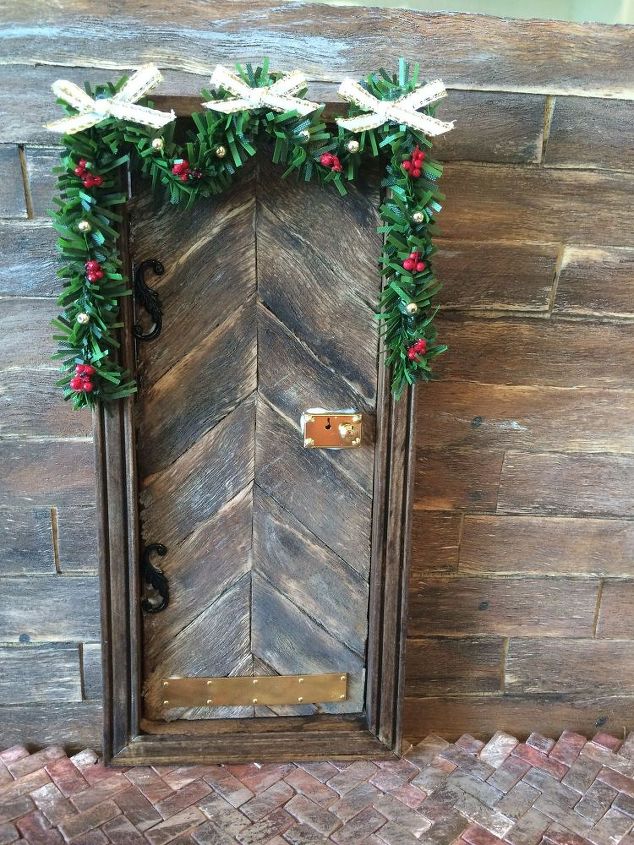
Rustic Elf Door for visiting elves
Recreate this Rustic Elf Door with the following steps and products from miniatures.com.

Tiny bricks (item 2070) glued to a porch base
Use 1/8" to 1/4" plywood or foam board as a wall and porch base. Create the brick porch using tiny bricks (item 2070) glued to the porch base. We chose a herringbone pattern for this porch.
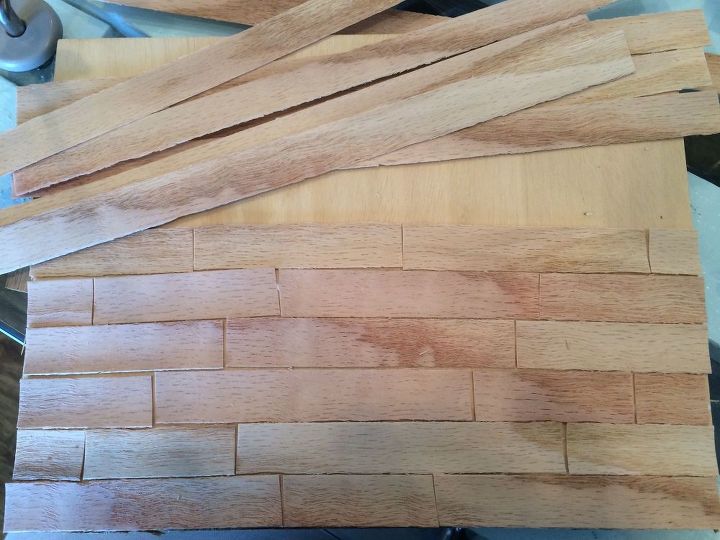
Cut various lengths and glue horizontally
Next, glue Rustic Clapboard Siding Strips (item 39011) in random cut lengths onto the wall board base for a wood wall look.
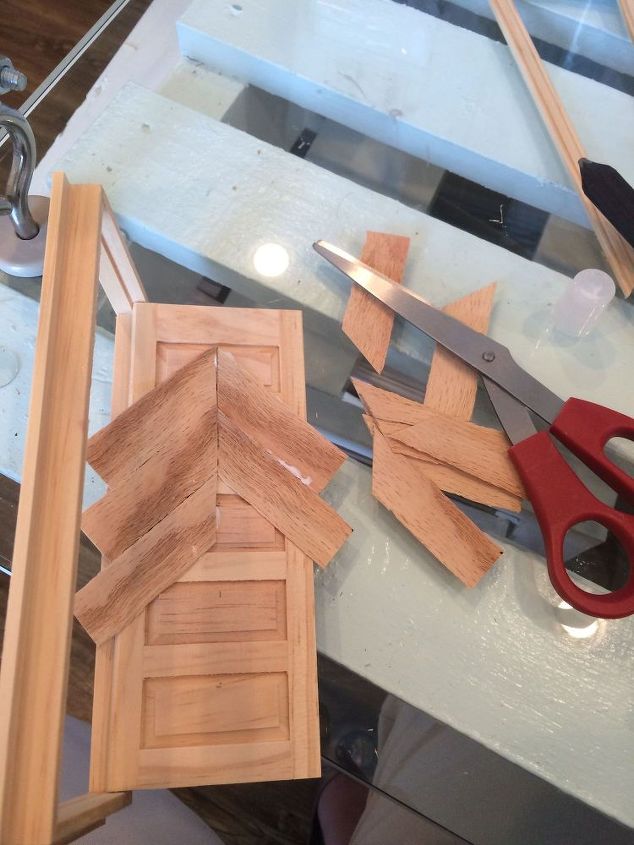
Glue 3" Siding Strip pieces to front of door
Continuing with the Rustic Clapboard Siding Strips, cut (16) 3" pieces. On one end of each 3" piece, make a 45-degree angled cut. Using a 5-Panel Traditional Door (item 6021), measure and mark the middle of the door and draw a straight line down the middle. Glue the 3" pieces of Siding Strips onto the door marrying each strip along the center line at the 45-degree cut side to make a chevron pattern. Once all pieces are glued on, trim away excess overhang of the Siding Strips from around edges of door.
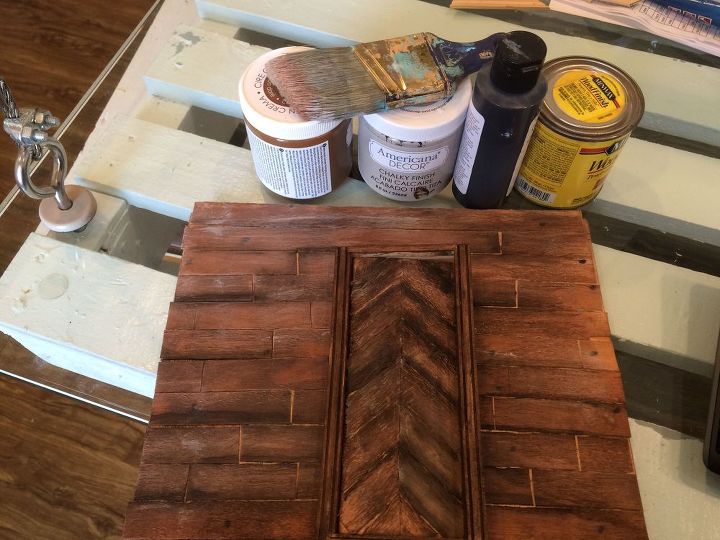
Sand wall and door for a more rustic look
Using various wood stains and/or paint in light and dark colors, create the rustic look of the wood to your preference. We used walnut and kona wood stain and light gray and black acrylic paint. Allow to dry. For a more rustic look, use sandpaper and sand over the stained wood wall and door to expose the natural siding color along edges and corners. We also used tiny amounts of wood stain colors on a dry brush to lightly "weather" the porch bricks as well.
Accessorize the door for more whimsy
Add miniature accessories to the door, including door handle, hinges, kick plate, and garland. Here we used Gold and Pearl Fireplace Garland (item 92410), Black Enamel Brass S Hooks to look like door hinges (item 1101), Brass Americana Lock with Key as a door handle (item 1134), and Brass Kick Plate (item 11500).

Accessorize the scene.
Glue the porch base to the wood wall. Then glue the door to the middle of the wood wall. Be sure to account for the height of the brick porch base when gluing the door on the wall so that the door will rest on the brick porch when assembled. Then, have fun accessorizing the door with miniature products to complete the scene. For our final door, we used a 3"H Spring Green Tree (item 1961) tucked down into a Produce Crate (item 31029), the second Produce Crate with 2 sets of Birch Fireplace Logs (item 51128) glued together and resting inside, an Old-Fashioned Lantern (item 65701) placed on top of the crate, and a Large Poinsettia with Red Foil and Bow (item 88323) set beside the crate. You can glue accessories down, or just place them in the door display so that you may change them out year after year.
Comments
Join the conversation
2 of 27 comments
-
Encantador. Buen trabajo.
-
this is so adorable. I'm going to do this next year. thank you for sharing


Frequently asked questions
Have a question about this project?