« View Post
Photos

Oops! Leave without saving?

If you leave this page, the information you have entered will not be saved!
Are you sure you want to leave this page?

Leave this page Stay on this page

Hometalk.com

  • Sign Up
  • or
  • Log In
  • Professionals
  • Community
    • All Members
    • Professionals
    • Bloggers
  • About
    • About Hometalk
    • Blog
    • FAQ
    • Guidelines
    • Resources
    • Support
    • Press
    • Contact
    • Terms of Use
    • Privacy Policy
  • Following
  • All Topics
    • Cleaning & Organization
    • Crafts
    • Design & Décor
    • DIY Projects
    • Gardening
    • Home Maintenance & Repairs
    • Outdoor Living
    • Painting
    • Remodeling
    • Repurposing & Upcycling
    See More Topics »
  • Questions
    • All Questions
    • Open Questions
    • Unanswered Questions
  • Clips
Post & Ask
Join Now Log In

Hometalk is where people share and help with everything home & garden

Therese C

Greenfield, IA
20 Followers 129Likes 35 Shares
  • Overview
  • Posts5
  • Q&A36
  • Comments164
  • Likes9
  • Following12
  • Send a Message

Featured Photos

About Me:

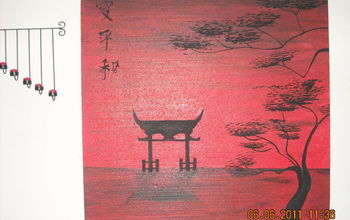
I enjoy painting, charcoal drawing, and interior/exterior design and remodeling. Also cooking, baking and inventing new recipes. I am a probation/parole officer dealing mainly with youth gangs and repeat offenders.

Favorite area of home improvement:

Kitchen, living room, and bedroom.


Recent Activity


Becky FunkyJunk Interiors - Donna Leah DIY Show Off Donna Dixson Karen - The Graphics Fairy Miriam I
  • Therese C
    Followed 7 people on Dec 31, 2012
  • The shows the back, I cut out "tools" from newspaper and laid them on as stencils in order to make it look as though he should hang his tools in these spots. 1
  • I put the "bins" underneath to give him a place to store his "cars" etc that might need to be "worked" on unti he got to them....
  • This is a close up of the top, four layers of paint, the "modge podge transfer" and two layers of Krylon Clear should keep it easy to wipe clean
  • See 1 more photo

Workbench built for my Grandson

A scaled down work bench built for my 2-1/2 yr old grandson, the toolbox will be included on Christmas Morning.
Sharron W
Sharron W Memphis, TN
23 Comments | Post Comment | 1857 Views
  • Therese C
    Commented on Dec 19, 2012
    Well heck, I don't need to build the little guy one now...I'll just order one through you! ...»
    This is a most excellant job Sharron!!!!

  • Share 132
  • Like 17
  • Clip 3
Clipped to:
  • MIY Make-it Youself.
  • diy
Karen Harrison
  • Therese C
    Followed 1 person on Oct 21, 2012
  • Finished Candle Holder Made from a Wine Barrel Stave
Liked a photo from:

Any wine lovers out there?

Old Town Home
Old Town Home Alexandria, VA
Comment on this photo
  • Therese C
    Liked on Oct 09, 2012
  • Share 1
  • Like 2
  • Clip 0
Clipped to:
  • Candles
  • By The Candle Light
Liked a photo from:

Driftwood candleholder/planter

Anita D
Anita D Balsam, NC
Comment on this photo
  • Therese C
    Liked on Oct 09, 2012
  • Share 3
  • Like 2
  • Clip 1
Clipped to:
  • Candles
  • Finished candles
Liked a photo from:

DIY... River Stone Pillar Candles

Cynthia Weber @ A Button Tufted Life...
Cynthia Weber @ A Button ... Canada
Comment on this photo
  • Therese C
    Liked on Oct 09, 2012
  • Share 12
  • Like 5
  • Clip 4
Clipped to:
  • Candles
  • crafts
  • 6
Commented on a photo from:

Pottery Barn Knock Off Hurricane-from spoons!

Melissa-TheHappierHomemaker
Melissa-TheHappierHomemak... Aberdeen, NC
6 Comments | Comment on this photo
  • Therese C
    Commented on Oct 09, 2012
    Love it!
  • Share 11
  • Like 4
  • Clip 6
Clipped to:
  • Decorative inside things
  • decor
  • the most peaceful ceiling in my home...very relaxing! 1

My bedroom ceiling (photo as promised)

This did not photograph as well as I would have liked, but here it is. The details don't all show up but it is nice to lay and look at. This was painted in several sections and hot glued to my ceiling. The only supplies used were: styro-board, egg shell flat latex wall paint, black high gloss enamel paint, a roller, 1 sponge brush, and 2 precision brushes. Total time from start to glued up: 2hrs, 15 min., total size; 11x14, total cost; less than $50.... :)
Therese C
Therese C Greenfield, IA
56 Comments | Post Comment | 2572 Views
  • Therese C
    Commented on Jul 10, 2012
    Yikes! The landlord was Here!!!!! She loved the artwork but was less than impressed that I ...»
    mounted it to the ceiling. According to her, when the company big wigs come through it may have to be removed. I said; "okay I will remove it, and after they leave I will put it right back up again! And I told her that there will be a lot of VERY disappointed people on Home Talk if I remove it."....lol..no worries kiddies I will keep it as long as possible!

  • Share 32
  • Like 10
  • Clip 6
Clipped to:
  • walls and ceilings
  • An old horse gate found on someone's burn pile is now my headboard with hooks, changeable with every season. Fun!

Visit post at: http://www.funkyjunkinteriors.net/2012/05/how-to-decorate-bedroom-with-messy.html 4
  • An old grocer's sign became a whimsical wall element behind a daybed for a playroom. Coordinate bedding with the sign graphics and call it done.

Visit post at: http://www.funkyjunkinteriors.net/2009/11/one-funky-playroom-reveal.html 2
  • An old gate and door, trimmed out with some painted metal siding became part of a whimsical shabby retreat for this white bedroom makeover.

Visit post at: http://www.funkyjunkinteriors.net/2009/11/bedroom-makeover-part-3-reveal.html 5
  • A headboard can be as simple as some wooden painted clouds and hanging stars. 

Visit post at: http://www.funkyjunkinteriors.net/2009/12/young-boys-retreat-bedroom-reveal.html 2
  • See 1 more photo

How to create your own headboard... from junk!

I love to sway away from the norm for most things home. I just find it incredibly inspiring to find a nothing and make it into a something. ...»

So you've got to know the headboards I use in my own home must be rather unique, right? :) The following pictures are found objects I've used to make headboards for my own home. It's a pretty neat feeling knowing I can knock off my own kind of furniture with a few good finds and a little creativity.

How to do it on a budget:

Just look for one big thing or a collection of small elements that will work with the size bed you have. Mount them, snoop around the thrift stores for pillow cases and quilts, decorate, and enjoy your new look for very little cost.

What do you think? Crazy or cool? Do you have an unusual headboard?

(Visit each picture for the direct link to that project.)

#Recycle

FunkyJunk Interiors - Donna
FunkyJunk Interiors - Don... Canada
19 Comments | Post Comment | 35327 Views
  • Therese C
    Commented on Jul 10, 2012
    Very innovative ideas! Love them!
  • Share 8.1K
  • Like 159
  • Clip 154
Clipped to:
  • diy
  • reclaimed lumber
Marg C
  • Therese C
    Followed 1 person on Jul 06, 2012
Loading
Back
to top
Feedback