« View Post
Photos

Oops! Leave without saving?

If you leave this page, the information you have entered will not be saved!
Are you sure you want to leave this page?

Leave this page Stay on this page

Hometalk.com

  • Sign Up
  • or
  • Log In
  • Professionals
  • Community
    • All Members
    • Professionals
    • Bloggers
  • About
    • About Hometalk
    • Blog
    • FAQ
    • Guidelines
    • Resources
    • Support
    • Press
    • Contact
    • Terms of Use
    • Privacy Policy
  • Following
  • All Topics
    • Cleaning & Organization
    • Crafts
    • Design & Décor
    • DIY Projects
    • Gardening
    • Home Maintenance & Repairs
    • Outdoor Living
    • Painting
    • Remodeling
    • Repurposing & Upcycling
    See More Topics »
  • Questions
    • All Questions
    • Open Questions
    • Unanswered Questions
  • Clips
Post & Ask
Join Now

Hometalk is where people share and help with everything home & garden

Vhbungalow

Atlanta, GA
3 Followers 24Likes 76 Shares
  • Overview
  • Posts11
  • Comments5
  • Following8
  • Send a Message

Featured Photos

About Me:

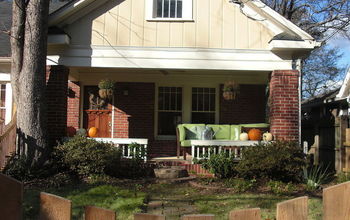
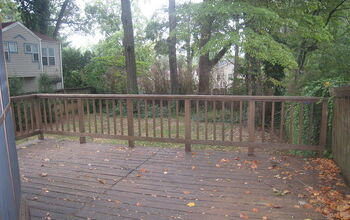
Every space has limitless possibilities. When I enter a room, I immediately want to rearrange the furniture. I live for accessible, affordable design.

Favorite area of home improvement:

Kitchens. I love a great kitchen.


Recent Activity


Becky Sharon @ mrs. hines class Eclectically Vintage - Kelly FunkyJunk Interiors - Donna Leah Donna Dixson Karen - The Graphics Fairy + 1 more
  • Vhbungalow
    Followed 8 people on Mar 17, 2013
  • See 4 more photos

Office/Guest Room Makeover

Being directly off of the living room, it's hard to call this room a true "bedroom." Abandoning that notion, I decided to focus on it as an office, while still having an area for a bed, ...»
that doubles as a lounge space. Through a bold choice of paint, and creative ways to add art to the walls, I was able to create a striking office space

*Options I considered for this project:

This room could really go in any direction, since it was an office/guest room, and I knew I could go bold. It is however, right off of the warm yellow living room, so I knew it would have to play well off of that color.

*Questions and unexpected events that arose during the project:

The entire process went by smoothly, no complaints just yet!

*My motivation to do this project:

I do most of my work in this room, since it has such great light throughout the day, and particular in the afternoon. It was a bland beige color though, and I can't really stand beige for very long without feeling the need to change it.

*Project Steps:

I did my typical color choosing process, where I tape many paint samples up and slowly remove them until I see the one I love the most. I then prepped the room and painted it, all in one day. Then I thought of unique and affordable ways to decorate my walls.

Advice:

Do: Use bright pops of colors when you have darker walls.

Don't: paint walls a dark color if the natural light in that room isn't bright.

Materials:

Behr Premium Plus Ultra Paint - $20.00

Decorative Paper - $15.00

Various Sized Frame Set - $12.00

Twin Bedding Set - $50.00

Switch Plate Covers - $20.00

Vhbungalow
vhbungalow Atlanta, GA
2 Comments | Post Comment | 123 Views
  • Vhbungalow
    Commented on Oct 18, 2010
    The paint color is Elephant Skin from the Behr Premium Plus Ultra line. It looks lighter on ...»
    Behr's site, but I chose it by taping lots of paint chips to the walls in that room and watched how the light hit it at different points of the day. The paper I used was all from The Paper Source, which also has an online store. I simply went to the store and picked through all the clearance papers. They come in large panels, and a large 2'x3' sheet is between $1-5. My color scheme just came together as I sorted through the available papers. My one tip if doing this project is to choose different textures of paper and also mix intricate patterns with larger scale prints. It definitely gives it that "designer" look!

  • Share 0
  • Like 0
  • Clip 0
  • See 11 more photos

Curb Appeal Renovation

Out of a necessity to try and restrain my energetic and playful lab puppy, I decided the front of my home needed a change. Through the use of a scalloped cedar fence, and new plantings ...»
both on the exterior of the fence and within my enclosed yard, the space has transformed into a highlight on my block.

*Options I considered for this project:

I knew I wanted a fence, but I wasn't sure what type of style I would go for. Because my yard has several levels to it, it made it challenging to pick the right type of fence style. I also knew I needed to address the space beyond my fence, which is the strip of yard surrounding my beautiful dogwood tree. Many people walk their dogs on my block, and many of them choose not to pick up after them, which is a pet peeve of mine. I wanted to figure out what I could plant that would be affordable, but would also be something that could stand up to the wear and tear of a busy street.

*Questions and unexpected events that arose during the project:

Unfortunately, despite thorough soil prep and watering, many of the plants I purchased did not survive the oppressive Atlanta summer heat. My more costly plants did survive, and so now I'll have to readdress what I can do for the empty spaces.

*My motivation to do this project:

My dog has tried to make a run for it on several occasions, and since I live on a street that has some traffic flow, I couldn't take the chance of something happening to her. I also don't love some features of the front space of my house, and I'm still deciding how to best address some issues.

*Project Steps:

I took several bids from fencing companies, and did my due diligence to make sure I was using a reputable company. For the plant portion, I thoroughly prepped the soil in all areas, and tried to pick hardy plants for the spaces. I don't have a green thumb, so I definitely need landscaping help in the near future!

Advice:

Do: your research on which fencing company is the best for the job

Don't: be hard on yourself if not all of your plants survive the harsh summer!

Materials:

Various Plants - $100.00

Pine Straw - $40.00

Soil and Fertilizer - $30.00

Vhbungalow
vhbungalow Atlanta, GA
3 Comments | Post Comment | 225 Views
  • Vhbungalow
    Commented on Oct 18, 2010
    Thanks for the compliments! I haven't been to design school and no help from designers ...»
    yet...it would be a great luxury to get advice from a professional one day, but in the meantime, I just love being able to create comfortable living spaces.

  • Share 0
  • Like 2
  • Clip 1
  • See 9 more photos

Living Room Makeover

This room has been one of the trickiest in my house. With the front door opening directly into it, the living room seems more like a pass through, rather than a place you'd want to sit ...»
and stay a while. Through de-cluttering and a change of furniture placement, along with highlighting the original built in features, the room is shaping up to be much more than a pass through.

*Options I considered for this project:

Currently I have my existing sofa and furniture in the space, but I would love to have a leather sectional that would fit the space really well. The reason for this is I have three pets that spend more time on the sofa than I do, and shed consistently, so having a vintage, lived in leather sofa would solve my constant need to vacuum my current sofa! If I did that, I would also mount the TV above the fireplace, to save space and keep the fireplace as the focal point.

*Questions and unexpected events that arose during the project:

I'm not sure how mounting a TV above a fireplace works. I don't know what happens to all the equipment (ie: blueray player, wii, cable box, etc.) Where does it all go?

* Cost Comments:

All the other elements were existing and/or hand-me-downs, so I don't have pricing on those.

*My motivation to do this project:

It's the first room you see in my home, and the most used space (after my kitchen) so I knew it needed to be addressed.

*Project Steps:

I tried to keep decorations minimal in the space, and make the focal point the fireplace and beautiful built in cabinetry. Right now, I feel like there's a lot of brown in the space, at least with the bulkier pieces of furniture. I tried to add pops of color with the great coat rack at the front, which I'd love to try and create more of a foyer feel to that small space.

Advice:

Do: Measure the room and decide what type of furniture would fit best in the space

Materials:

Sisal Area Rug - $100.00

Vhbungalow
vhbungalow Atlanta, GA
2 Comments | Post Comment | 217 Views
  • Vhbungalow
    Commented on Oct 18, 2010
    Thanks for the kind words! I actually haven't gone to design school, but I'd love to one day!
  • Share 0
  • Like 0
  • Clip 1
  • See 5 more photos

Guest Room Redesign

Because there are windows on two of the four walls of this room, it makes furniture placement a bit of a challenge. Eventually I do plan to paint this room, but for now the color red and ...»
cream color scheme works with the dark frame of the bed.

*Options I considered for this project:

I positioned the bed in a couple ways, which was a challenge since there are windows on two walls. I prefer to avoid covering up windows, since the light in that room is beautiful in the mornings, and putting a clunky queen sized bed in front of it would detract from the overall aesthetic.

*Questions and unexpected events that arose during the project:

Nothing unexpected, but I am debating what color would work well with these curtains.

*My motivation to do this project:

I rarely use this space, since it's only for the occasional guest, which is why I can't justify spending much money on this project. I do feel like it's still the "black sheep" of my house, so I would love to completely revamp it one day. However, for now, working with the furniture I have already is fine.

*Project Steps:

I moved my red dresser into the room, since it coordinated well with the french style curtain design with red detail. I also hung a mirror over the dresser and hung some extra silver framed art pieces where I could. I would definitely rather purchase something new for this room, but that would depend on what color I eventually paint the walls.

Advice:

Don't: overspend on a room you don't use often.

Vhbungalow
vhbungalow Atlanta, GA
7 Comments | Post Comment | 129 Views
  • Vhbungalow
    Commented on Oct 18, 2010
    Good eye! The dresser is from the Hemnes series of Ikea.
  • Share 0
  • Like 0
  • Clip 0
  • See 7 more photos

Screened Porch Makeover

Being right off of the kitchen, this space makes a perfect location to have casual meals on a warm summer day. The room feels like a part of the home through the use of a comfortable, ...»
yet affordable area rug, a well sized round dining table, and some playful lighting.

*Options I considered for this project:

I had debated between making it a living space or a dining space. Though I still like the idea of having some comfortable seating in the screened porch, I'm happy with my decision.

*Questions and unexpected events that arose during the project:

I've debated putting up curtains in this space to give the room a softer feel. I actually did a very similar installation in my friend's screened in porch, and it turned out great.

*My motivation to do this project:

This is the one outdoor space I can use year round, and being right off the kitchen, it's a great place to entertain friends, so I wanted to make it feel like an extension of the interior spaces of my home.

*Project Steps:

I basically had to find a good indoor/outdoor area rug that was affordable. There are so many great ones out there, but they all come with a matching price tag. Although they are much cheaper than a traditional rug, I wasn't willing to spend $300 on an outdoor rug. I then found great placemats and cushions for the fold up chairs I have, which all tied together really well. Finally, I made a simple tea light holder a little more interesting with the use of some decorative moss as a centerpiece.

Advice:

Do: shop around for affordable materials

Don't: buy anything too expensive, since it is a space that can be susceptible to the elements.

Materials:

Indoor/Outdoor Area Rug - $80.00

Chairs - $60.00

Table - $100.00

Placemats - $20.00

Candle Holder - $8.00

Decorative Moss - $5.00

Cushions - $32.00

Vhbungalow
vhbungalow Atlanta, GA on Sep 16, 2010
2 Comments | Post Comment | 441 Views
  • Gail R
    Gail R on Jan 29, 2013
    How did you make the ties that hold the cushion on the chair?
  • Share 5
  • Like 2
  • Clip 4
Clipped to:
  • DIY to Try
  • moss magic
  • Mostly Moss
  • See 4 more photos

Master Bedroom Redesign

My favorite part of this room was actually already there when I first moved in; the gorgeous custom roman shades. Because they have a very particular color palette, I had to design the ...»
room based on a robin's egg blue, espresso brown and white. At first weary about the combination, I was able to find great curtains, and bedding that brought the entire room together.

*Options I considered for this project:

The walls were this color when I purchased the home, and I've debated repainting them to either a different shade of blue or a different color altogether. However, The room still feels great, so I've held off on painting for now. I also had two sets of bedroom furniture when I moved here, and I had originally placed my larger queen sized set of furniture in this room (note the before picture). Essentially, though the furniture looked fine in the space, the mattress of that bed wasn't working for my back. I decided to swap out the bedroom set for my other set, which is a full size bed, but with a much better mattress. I also wanted to find some great wall art, along with interesting night stands, that didn't look too "matchy matchy" with my other dark wood furniture.

*Questions and unexpected events that arose during the project:

One very frustrating part of this room is the lack of electrical sockets. For my nightstands, I'm currently running an extension cord under my bed to the wall under my windows, because there is no other place to plug in my lamps.

*My motivation to do this project:

I wanted to have a calm, peaceful retreat for whenever I need to get away from the world (and my pets!). It's a small space, and I wanted to keep the elements in the room minimal, so that it would feel larger.

*Project Steps:

I measured the space, and basically moved around the furniture until I found a configuration I liked. I then found great deals on mirros and coordinating seagrass nightstands that gave a great texture to the space. I also hung some dark chocolate curtains to give some extra weight to the window wall, and allow for me to completely block out light when I need it.

Advice:

Don't: buy an entire furniture set that matches. It's completely boring!

Do: move around furniture throughout your house until it suits your space and your needs.

Materials:

Nightstands - $60.00

Lamps & Shades - $40.00

Curtains - $40.00

Curtain Rod - $30.00

Decorative Mirrors - $40.00

Bedding - $50.00

Vhbungalow
vhbungalow Atlanta, GA on Sep 16, 2010
Post Comment | 137 Views
  • Share 0
  • Like 0
  • Clip 0
  • See 5 more photos

Front Porch Makeover

When I first moved in, I only had a few donated chairs, that looked fine, but weren't particularly comfortable to sit in and didn't match well with the home. Being the first thing you ...»
see when entering my home, I knew I wanted something bright and inviting to fill the space. With the mixture of a great piece of furniture, an indoor/outdoor rug and lots of plants, the space has become a great place to relax at the end of the day with some lemonade and a good book.

*Options I considered for this project:

I considered purchasing a conversation set, with chairs and matching ottomans. However, I typically like to have several friends over at a time, and with only two chairs, it really limited the entertaining space. I've always wanted a great sectional, but wanted one that fit perfectly in the space.

*Questions and unexpected events that arose during the project:

I was expecting the sectional to be a bit lower to the ground, so if I had to go back, I would try to find a lower sectional. This is so that my living room window doesn't get masked as much.

*My motivation to do this project:

I've always wanted a great front porch that I could relax at and enjoy. Even though I had furniture on the porch, I wanted something truly comfortable.

*Project Steps:

I took specific measurements of the space, and came up with several configurations of a sectional that would work for the space. Once I ordered the piece, all I had to do was assemble and enjoy! I did add some extra pops of color with a potted herb garden and some classic hanging ferns.

Advice:

Do: plan for the space you have and make sure the furniture fits the space well.

Materials:

Chesapeake Sectional - $1800.00

Outdoor Rug - $80.00

Pots for Herbs - $25.00

Hanging Ferns - $28.00

Decorative Pillows - $30.00

Vhbungalow
vhbungalow Atlanta, GA on Sep 16, 2010
9 Comments | Post Comment | 274 Views
  • James A
    James A on Feb 17, 2011
    Beautiful sitting area. Sounds like you got it together. I always think of my folks back in ...»
    the day before A/C sitting on the porch, drinking lemonade and praying for a breeze. It was more than just a luxury here then, in the deep South.

  • Share 0
  • Like 2
  • Clip 1
Clipped to:
  • Outdoor living at it's be...
  • See 3 more photos

Deck Facelift

Having a fairly large deck, it's a surprise I hardly used it the first few months I lived here. Now, with the addition of a great grill, some fun potted plants, and a cozy seating area, ...»
I use this space all the time.

*Options I considered for this project:

I considered doing a eating area outside, because there's a large enough space for an outdoor dining set. However, my screened porch currently has a dining table, and it seemed redundant to have another dining area. I knew I wanted potted plants and something to plac on the expanse of deck railing.

*Questions and unexpected events that arose during the project:

I lost a few pots to fallen branches and pesky squirrels. I also have to clean my white patio furniture fairly often during the spring months when the pollen here is so high.

*My motivation to do this project:

I typically use my screened in porch much more than I use my deck, mainly because I don't like to deal with mosquitoes. However, in the later fall and early spring months, being out on the deck makes more sense.

*Project Steps:

I cleaned off the deck with a leaf blower and hose. I purchased various plants and pots. I purchased a new gas-charcoal grill, which I definitely use the most often. I took existing furniture from my front porch and used it for this back space.

Advice:

Do: maintain your plants and furniture, keeping everything watered and clean!

Materials:

Railing Planters - $30.00

Potted Plaint Soil - $8.00

Various Pots - $50.00

Weber Grill - $329.00

Vhbungalow
vhbungalow Atlanta, GA on Sep 16, 2010
1 Comment | Post Comment | 90 Views
  • KMS Woodworks
    KMS Woodworks on Oct 18, 2010
    I love a good deck...these are some I have done.. Lucky for us here in colorado blood sucking ...»
    insects are not a probllem.

  • Share 0
  • Like 0
  • Clip 0
  • See 8 more photos

Backyard Facelift

I tried to be frugal about this space, since it's so large and could easily become a major renovation. Through strengthening the lawn, adding a vegetable patch, and creating clean lines ...»
with the use of pinestraw, mulch and some plantings, the landscape is slowly becoming a great asset of my home.

*Options I considered for this project:

I would love to do so much to this space. I have a fairly large yard for my neighborhood, and it's a space I'd like to use more. I would love to install a water feature towards the back, which would ideally help the serious mosquito issue. I also want a lot more color throughout the yard, but at the same time keeping a very low maintenance space. The far end of my yard is overgrown with ivy and spreading bamboo, making it a really challenging area for plants to grow. It's also shaded by three large white oak trees and a smaller dogwood. I would love to get a landscaper for this project, because plants are really not my forte.

*Questions and unexpected events that arose during the project:

Some areas of my lawn have not been able to recover, and I'm not sure what the solution is for these spaces.

*My motivation to do this project:

My backyard was essentially a dustbowl when I first moved in, which caused heavy erosion during any rain storm. My dog also saw the dry, sparse yard a a digging field, which I knew I'd have to address.

*Project Steps:

I identified the type of grass my backyard had and then researched the type of maintenance I'd have to do to strengthen the lawn. This involved purchasing fertilizers for the various seasons and maintaining the lawn with frequent mowing (weekly).

Advice:

Do: be patient with your lawn. It won't turn lush and green overnight!

Do: research the plants you purchase for your space. You want to try and find the plants that are hardy and will withstand the conditions of your soil and space.

Materials:

Time Released Fertilizer 10-10-10 - $25.00

Various Hostas - $40.00

Vhbungalow
vhbungalow Atlanta, GA on Sep 16, 2010
Post Comment | 69 Views
  • Share 0
  • Like 1
  • Clip 0
Loading
Back
to top
Feedback