How to
Clean
Silver
Gutters
Windows
Bathroom
House
Floors
Carpet
Paint
Cabinets
Furniture
Wood
Walls
Repair
Furniture
Electric
Drywall
Appliances
Air Conditioning
Plumbing
Windows
Decorate
Easter Eggs
Rooms
Walls
Tablescapes
Mirror
Pillows & Throws
Build
Decks
Doors & Windows
Fire Pits
Furniture
Planters
Raised Garden Beds
Sheds
Shelves
Walls
Craft
Candles
Centerpieces
Ornaments
Party Decor
Wreaths
Other
Grow
Upcycle
Organize
Tile
In-depth Guides
Product Reviews
Rooms & Spaces
Living Room
Curtains
Furniture
Lighting
Fireplaces & Mantels
Chairs
Outdoor
Garden
Kitchen
Walkways & Paths
Fireplace
Decor
Lights
Porches
Pools & Ponds
Patios
Bedroom
Bench
Closets
Dressers
Furniture
Organizing
Vanities
More
Kitchen & Dining
Bathroom
Craft Room
Laundry Room
Home Office
Entryway
Basement
Outdoor
Windows & Doors
Floors & Ceilings
Staircases
Home Tours
Explore Projects
How to
Clean
Silver
Gutters
Windows
Bathroom
House
Floors
Carpet
Paint
Cabinets
Furniture
Wood
Walls
Repair
Furniture
Electric
Drywall
Appliances
Air Conditioning
Plumbing
Windows
Decorate
Easter Eggs
Rooms
Walls
Tablescapes
Mirror
Pillows & Throws
Build
Decks
Doors & Windows
Fire Pits
Furniture
Planters
Raised Garden Beds
Sheds
Shelves
Walls
Craft
Candles
Centerpieces
Ornaments
Party Decor
Wreaths
Other
Grow
Upcycle
Organize
Tile
In-depth Guides
Product Reviews
Rooms & Spaces
Living Room
Curtains
Furniture
Lighting
Fireplaces & Mantels
Chairs
Outdoor
Garden
Kitchen
Walkways & Paths
Fireplace
Decor
Lights
Porches
Pools & Ponds
Patios
Bedroom
Bench
Closets
Dressers
Furniture
Organizing
Vanities
More
Kitchen & Dining
Bathroom
Craft Room
Laundry Room
Home Office
Entryway
Basement
Outdoor
Windows & Doors
Floors & Ceilings
Staircases
Home Tours
Ask DIY Question
+ Post Project
Ask DIY Question
Join Now
My History
+ Post a new Project
Saved Projects
Notifications
Account Settings
Log out
Support
•
Privacy
Edit profile
Amanda H
52 Followers
IC: homeowner
Find me on
My Projects
DIY Questions
DIY Answers
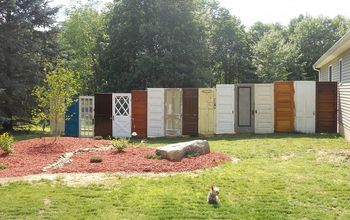
This is my new fence
Amanda H