Asked on Dec 31, 2011
Caulk for chair rail

by
Sherrie S
+10
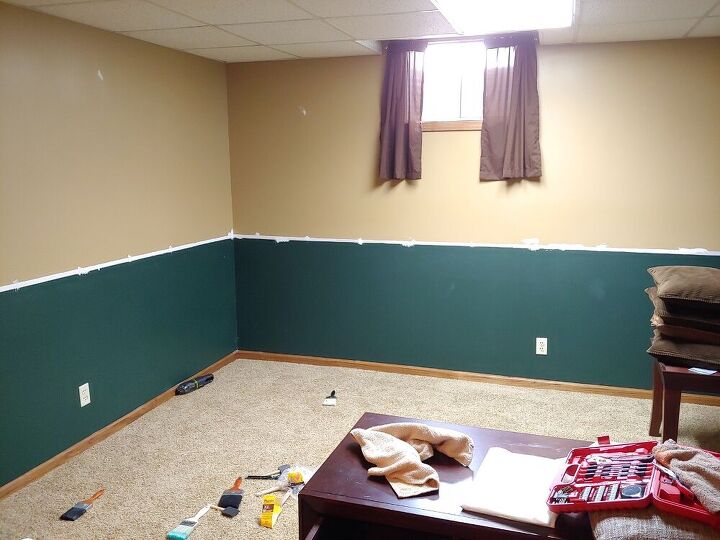
Phew, finally the chair rail & molding are done. Now we need to caulk. How can the painted wall be protected and also what is the best type of caulk for this job - they have tons of choices in the big box stores. Happy & prosperous New Year to all of you.
13 answers
-
Sherrie, sorry for not remembering and asking what may be a dumb question, but what finish is one the railing? That will make a difference as to what type of caulk you should use. As for the wall, the best thing you can do is use a damp rag and wipe off as much of the caulk as possible (and use the minimum amount of caulk necessary to fill the gap). Typically the paint is touched up after caulking, but if you are real careful you might be able to wipe all the excess away.
 Dan's of Central Florida, Inc.
on Dec 31, 2011
Dan's of Central Florida, Inc.
on Dec 31, 2011
-
Dan is right on again with this. If your simply painting then a good quality latex type would fit the bill, Some have a silicone base to them, but I prefer using painters caulk. It drys fairly fast, does not shrink and can be painted. If your planning to stain the railing then you need to use putty that will accept stain as not all do. Take your time, use as little as needed and wipe excess off with damp rag or wet finger in those tight areas.
 Woodbridge Environmental Tiptophouse.com
on Dec 31, 2011
Woodbridge Environmental Tiptophouse.com
on Dec 31, 2011
-
Sherrie, caulking is normally done before the painting but now you can do as Dan suggests. A good quality caulk like DAP 230 will shrink less and be more flexible, less likely to crack. You always want to fill the gap as completely as possible, until the caulk starts to back out in front of the nozzle, like it states on the tube. And Happy New Year too! Best, Charles
 Peace Painting Co., Inc.
on Dec 31, 2011
Peace Painting Co., Inc.
on Dec 31, 2011
-
No Dan, I have all the dumb questions- No finish on railing or baseboard yet The room was painted first, then the railing and the molding was installed. Peace, it appears we do things backwards but we will get it done right because of people like you on hometalk. We bought DAP 230 today. Dan I offered you this job & you turned me down. Come & visit & see how good we do & maybe you can do as good and/or better in less time. I would like the whole house done in a timely period. We only did one room. Happy New Year to all & I want to thank all of you for helping me.
 Sherrie S
on Dec 31, 2011
Sherrie S
on Dec 31, 2011
-
Sherrie, I didn't mean to offend you in turning down the job. Sorry if I did. Debary is just a bit far for me to travel. To be frank, from a business point of view it would not make sense to do the job as the cost of me getting there in gas and tolls would leave very little in the area of pay for me or my guys on such a small job. And of course I didn't want to charge you an unreasonable sum of money with something like this. Also the couple hour drive each direction would make for very short on-the-job work days. No offense meat of course, that's just how this business goes sometimes. I didn't want you to be dissatisfied when we were overcharging and then only on the job site for 4 - 5 hour s a day.
Dan's of Central Florida, Inc.
on Jan 01, 2012
-
Awww Dan I am not offended. It just would have been nice to hire someone from Hometalk that helped me. You helped me a lot. Thank you.
Sherrie S
on Jan 01, 2012
-
LOL, no problem at all Sherrie. Let me know if you need anything else. :)
Dan's of Central Florida, Inc.
on Jan 02, 2012
-
Here is a trick for caulk up next to a finished wall. . . Use the delicate surface (30 day blue tape) and tape a straight line on the wall. When you cut the tip of the caulk, make the hole as small as possible and at a 45 degree angle. Apply the caulk to the gap. Keep a damp rag close by. Smooth out the caulk with your wet finger. You can even use a credit card like a trowel to scrape off the excess and keep it flush against the tape. Remove the tape before the caulk dries. You will have a perfect straight line. Hope that helps.
 WallsTreat Studio/ Kass Wilson
on Jan 02, 2012
WallsTreat Studio/ Kass Wilson
on Jan 02, 2012
-
Thank you Wall Treat. I can't wait till this is done. It already looks nice but we need to finish it now.
Sherrie S
on Jan 03, 2012
-
I always use DAP paintable latex caulk for my finishing. You can use the small tube if it's less intimidating. I personally prefer a caulking gun when I am applying large amounts. Cut the tip of the caulk at the 1/4" mark at a 45 degree angle. Run the bead against the corner of the moulding and wall with an even pressure. If it globs a bit don't worry. If you apply a little thin don't worry. Now that you have applied a section (a whole wall if you want) you can go back and clean it up. I carry a plastic container of water and a roll of paper towel. Dip your finger in to the water and slide your finger in the groove to smooth out the caulk. Wipe away excess if needed. If you get some on the wall just wipe with a damp cloth to remove it but don't let is sit too long. If you missed sections you can pull the excess in to those gaps. Remember to keep cleaning off your finger with water and paper towel. It will get very messy if you don't. After the first wall you'll be an expert. If you have long nails it can get tricky because you may start to drag out the caulk you just applied. DO NOT USE SILICONE CAULK!! It will not come off with just water and most times is not paintable. Good Luck and remember... Every girl enjoys a lot of caulk!! Sorry, couldn't help myself. lol lol
 Jaime L
on Feb 20, 2012
Jaime L
on Feb 20, 2012
-
Jamie L, although we did things a little backward as we painted before caulking it still turned out very, very well. The blue tape recommended by Kass W really came in handy. We did use DAP as recommended. The rest of the rooms should be much easier now that we know what not to do.
Sherrie S
on Feb 20, 2012
-
To add a bit to what Jamie L said - unless you have really big gaps, I cut the tip of the caulk tube to about 1/8th inch. It allows for better control of how much comes out at a time. Also, if you use a razor knife and "snip" the very tip of the 45 degree angle you cut on the caulk tube so it is flat on the very tip, it will help to lay the caulking down flat as you squeeze it out/apply it instead of in a "roll." Also, using one of the "dripless" style caulking guns makes things go a lot easier. Once you have used one of those you will never want to use one of the older style types again.
Dan's of Central Florida, Inc.
on Feb 20, 2012
-
Dan, I keep a list of all of these very helpful ideas. This is starting to be fun. No real bloopers yet.
Sherrie S
on Feb 20, 2012
Sign Up to Answer

Suggested Project Book
