


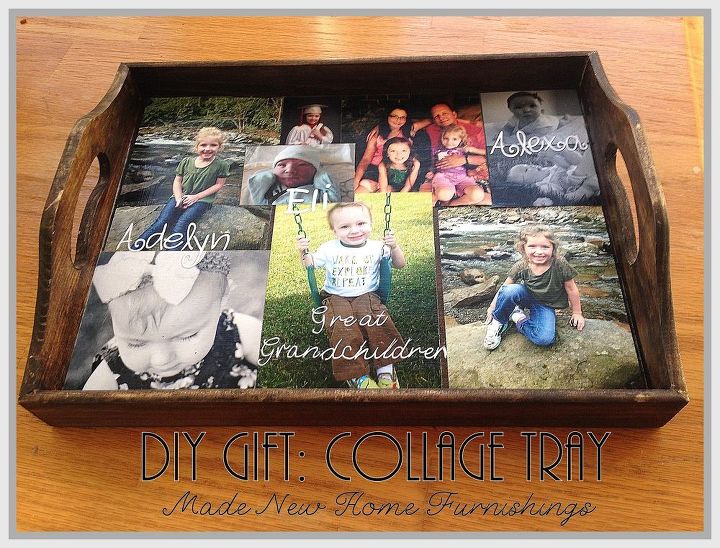
DIY Gift: Collage Tray

by
Tracey
$10
Easy
Every year I try to do at least a few homemade gifts. I think it is more meaningful and it typically helps our Christmas shopping budget. I was so excited with how this gift turned out that I had to share. It is a great gift for that person who doesn’t really need anything yet you want to give them something meaningful. It works for any holiday or occasion and it is inexpensive to boot!
I was at Hobby Lobby and came across some wood trays with handles. The trays in the link are part of a set. They do sell them individually in the store. I picked one up for $5.99 less 40% from my coupon (so only $3.60!). I had the idea that I may paint it (of course, right?!). When I got home a great gift idea hit me though for the grandparents in our family who can never seem to get enough pictures of their grandbabies! I decided to decoupage a collage of pictures to the inside of the tray.
I was at Hobby Lobby and came across some wood trays with handles. The trays in the link are part of a set. They do sell them individually in the store. I picked one up for $5.99 less 40% from my coupon (so only $3.60!). I had the idea that I may paint it (of course, right?!). When I got home a great gift idea hit me though for the grandparents in our family who can never seem to get enough pictures of their grandbabies! I decided to decoupage a collage of pictures to the inside of the tray.
Here is how I did it!
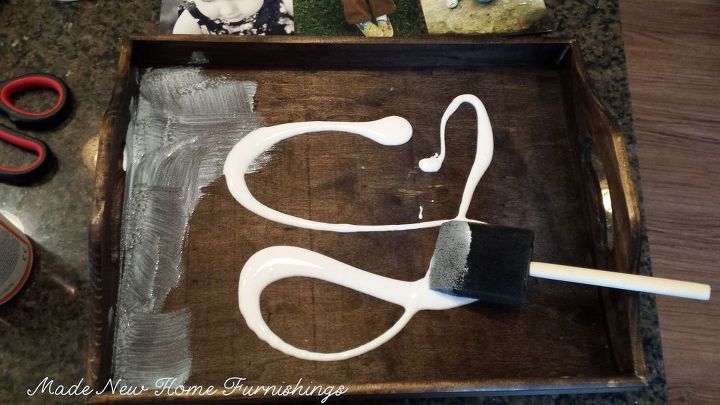
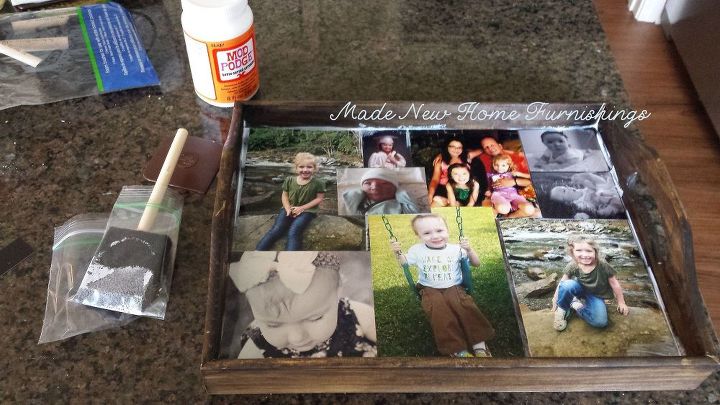
Lay out the pictures and MP in between any places that overlap. Don’t underestimate how fast the MP can dry. You can see I had some unwanted gaps because I waited too long to scoot them into perfect position. Oops!
Once the MP dried I used paste wax to buff all over the stained wood. I did a couple of coats to give it a nice satin finish. I had the wax on hand and once you buff it is pretty dry, I didn’t want to wait another half a day for polycrylic or spray varnish to cure but whatever you have on hand is fine and a finish coat may not be totally necessary. Whatever you think…
Want more details about this and other DIY projects? Check out my blog post!
Comments
Join the conversation
2 of 8 comments
-
You could also make a photo quilt. You can buy photo fabric that works with a color printer, or t-shirt transfers work, too.
-
I love this idea, thank you


Frequently asked questions
Have a question about this project?
Don't the photos have to be printed on a laser jet printer so the picture is not messed up and the tray be safe to use without destroying the pictures? Thanks.Love it. Going to make a couple if I can ever get my photos together.
What did you paint over the pictures so they are clear? Love your idea.
going to try this, but what do you put on top of the pictures so they don't get wrecked when using it's being used as a serving tray for drinks?