Asked on Apr 09, 2013

Stair treads/risers separated, no access to underside

Nancy Evans
by Nancy Evans
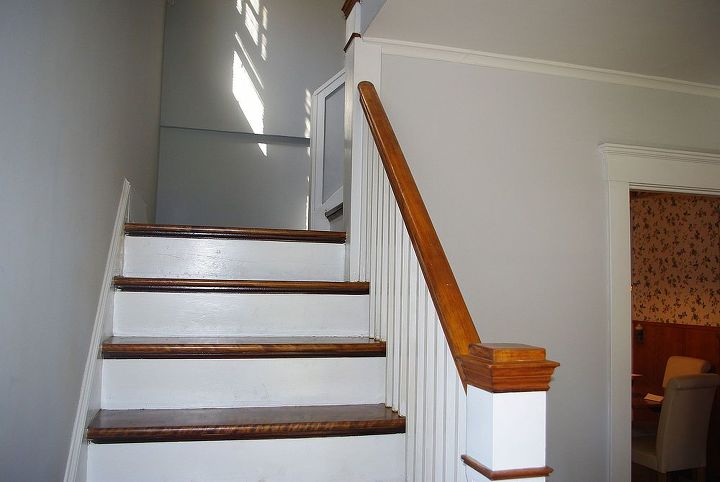
Does anyone have advice on how to pull several stair risers back into contact with the treads where they have separated? I just bought a 1920's house and a few of the risers appear to have been "kicked inward" for lack of a better descripton. There is NO access to the underside of the staircase. The area underneath is finished plaster and lathe. The stair treads feel solid, but the 1/2 inch gap is unsightly. This would likely be a DIY project so any descriptions would be gladly welcomed! (attached pic does not show gaps, just for reference of enclosed staircase)
  19 answers
  • Has it always had a gap, is it just because the house is really dry, or was it kicked? Can you grab a picture of the actual "kick" as I am not sure exactly what you mean by it? Top, bottom, one side, whole riser? As for a real fix, without knowing how everything is connected, the actual issue, etc... no one can really give you one. I understand you don't want to cut into the plaster, but how about a small 3/8 hole drilled into the area allowing a snake camera access to look?
  • KMS Woodworks KMS Woodworks on Apr 10, 2013
    If the riser is set on top of the tread below lifting it will move the gap from the top to the bottom. If the riser is behind the lower tread it may lift. But I doubt it...chances are the risers are nailed to the stair stingers. I recently did some work on an 87 year old house. Here the stairs risers have a small piece of cove molding installed where your gap is.
  • C & K Custom Remodeling C & K Custom Remodeling on Apr 10, 2013
    One solution is to have a carpenter put a veneer over the top of the riser. A thin piece of wood that fits perfectly and fills the gap will make this look perfect again. Then it's just a matter of painting to match. For a good carpenter this is not a difficult repair.
  • Historic Shed Historic Shed on Apr 10, 2013
    I am not really clear on where the gap is, but was going to suggest quarter round or cove molding trim like @KMS Woodworks suggested. That is a typical detail from the 1920s between the riser and tread.
  • Nancy Evans Nancy Evans on Apr 10, 2013
    Thanks! I don't know how thw separation occurred as I just bought the house. It was an elderly owner who died. The gap is where the tread meets the riser, right at the bottom. I will take a puc and post it.
  • Nancy Evans Nancy Evans on Apr 10, 2013
    Thanks for th suggestions of the molding. That was one option I have been considering but didn't want to do a cosmetic fix if the problem actually needed more attention. The stairs are solid, no squeaking, no movement, no softness, so maybe the molding is the way to go.
  • Well is it is at the bottom of the riser & separated away from the tread a piece of molding is the last thing you want to put on there as you are shrinking up the tread width which is probably narrower than most modern stairs already. You could possibly see if you can pull it back in place & then use specialty screws to help hold it where it belongs, but not knowing the method used for attachment / what's behind it.
  • Nancy Evans Nancy Evans on Apr 10, 2013
    I guess that's what I was trying to figure out - how to pull the riser back in line with the tread. The riser does not sit on the tread, but behind it. On one side, the riser is pushed away from the tread, but since there is NO access under the staircase, how would I go about pulling the riser back into the correct alignment?
  • Nancy Evans Nancy Evans on Apr 10, 2013
    For reference, in the pic above, it is the top 2 steps that have this problem and the separation is on the left hand side of the staircase at the base of the riser where it should abut the tread. The reason I think they appear 'kicked in" for lack of better wording is that it is only on one side of each riser/tread combo.
  • Nancy Evans Nancy Evans on Apr 10, 2013
    Sheila, possibly so. My question then would be how to secure them once (if) I pull them into alignment?
  • DIY / Handyman fix (i.e. lets hope this works & see how long it lasts) A little bit of glue in the open areas & a brad shot at an angle for holding it @SheilaG, Plum Doodleshas the right idea for pulling it out. You might try using an eyehook instead which might make it easier to grab / pull
  • Nancy Evans Nancy Evans on Apr 10, 2013
    Excellent! I will try this and report back on how it goes! Thanks so much!
  • Laura walker Laura walker on Apr 10, 2013
    pull them up and flip them over refinish them
  • The method of stair construction varies as the many methods there are of building a home. If the risers are falling, you risk the issue of the stairs coming loose later in time. As many stair builders rely on the top of the riser to help hold the front part of the stair in place. While the stairs currently appear to be fine and this is only a cosmetic issue there are often wedges of wood placed into routed out groves in the stringers that secure the steps into place and also hold the risers in place as well. If the wedges begin to loosen up which would allow the risers to drop, you risk the steps coming loose as well. This appears to be a very nice stair case, I would bite the bullet and open up from underneath even if its plaster and lath and do the repair the correct way and not try to hide the gap with moldings, paint, calk etc. The plaster repairs can be done easily and once complete the stairs will last another 50 or more years before they will need to be tightened up again.
  • This sketch is an example of what you would perhaps see when opening the back of the stairs. the reason I was told they used wedges was to provide a way for the stair builder to tighten up the stairs as they dried out over time in the owners home. As we know wood shrinks which results in the loosening up of stair treads and risers. When this happens all that is needed is to drive the wedges which will come loose easy as the glue used has dried out from age and breaks free once the back of the wedge is driven. Then simply glue again to hold them into the new location or use a tiny finish nail just to keep them from moving back out again. Hope this helps you out. This sketch shows a routed grove in the front side of the riser that fits into the back side of the step board, Some are tacked into place, some use these mortices, some are simply left alone.
  • Lorraine Edwards Lorraine Edwards on Apr 13, 2013
    I can't tell from your pic where the gap actually is. But your stairway looks like a clone of my sister/brother in law's house (also a 1920s center hall gem). When they removed the carpet from the stairs, they planned on refinishing the wood and leaving them bare wood (great move). Except there was about a half inch gap where the stair met the wall. I told them the only fix I could see would be to affix small pieces of quarter round moulding and just miter the edges where they meet and then paint the moulding against the wall and the new pieces all white to blend. It was really the only fix and it looked pretty good when finished. As I said, can't tell where your gap is, but would running some small moulding against the gap and nailed in work?
  • Grizbird Grizbird on Jun 10, 2014
    Your staircase looks exactly like mine-- and I am suffering from the same issue. I'm curious, a year later, what did you do to resolve this issue?
  • Deb Tarr Sinasac Deb Tarr Sinasac on Sep 14, 2017

    I'm having the same problem. It's not as if you can get behind the stairs to hammer in the staples that have pulled loose. Yes, mine are just stapled. Guess the contractor never intended for the stairs to be exposed and finished. I am putting a strip of cove molding that is stained and varathaned to match the step but there is that one step where the riser is pushed back and I can't figure out how to pull the riser back towards the step to reduce the gap. Or do I just try to cut the staple....it's a dilemma.

  • Stephen Rider Stephen Rider on Dec 19, 2018

    I have a similar issue where the bottom of the riser on the top step has been locked in and become detached from the step. It appears to be old damage, but until now was covered up with carpet.


    I’m having the floors refinished, and the steps will be stained but the risers painted. Here’s what I’m going to try:


    1) drill a small hole in the riser near the bottom. Screw in a metal loop. Now I can pull on the riser with a thin cable (?).


    2) apply some glue, pull the riser into place and clamp overnight


    3) drive a small finishing nail into the step at an angle to reinforce the glue. Still using the loop and clamp to hold riser in place


    4) remove loop, fill hole and paint riser