Asked on May 07, 2016

How do I remove the top from a dresser to be used as a vanity?

Margaret E
by Margaret E
The dresser is probably 40s-50s maple, solid as a rock. Everything I've found in a Google search assumes the piece is falling apart; just slip a utility knife in between the top and the frame and cut the finish. NOT my problem! I don't want to butcher this, so I haven't gone for the recip saw yet. I've removed the front screws; trying to find a short-enough screwdriver to get the back ones out. Any suggestions - from someone who's done this, please!
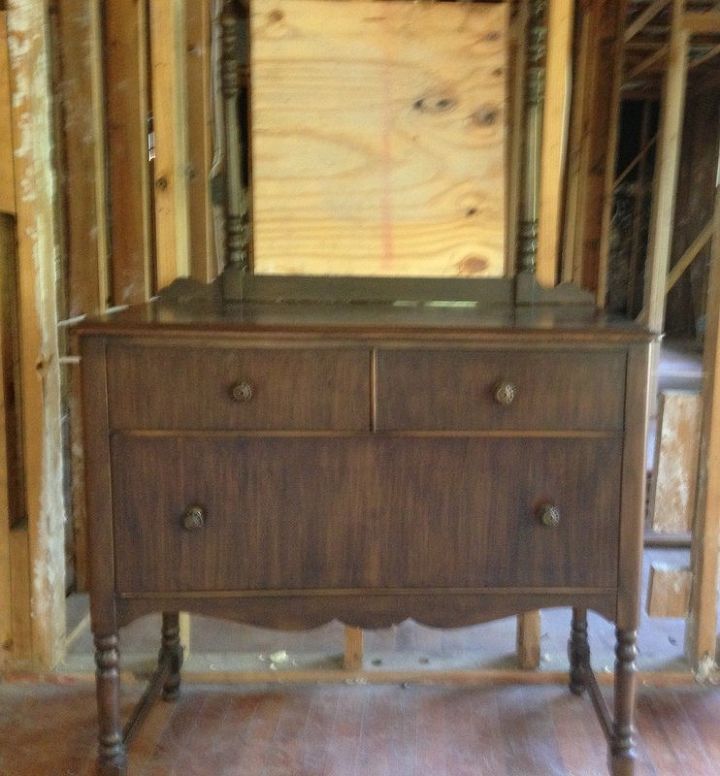
The dresser before sanding and two coats of stain. Yes, there is a mirror, but it's not safe on the job site!
  9 answers
  • William William on May 07, 2016
    Run a utility knife along the perimeter at the underside of the dresser top where it meets the main body of the dresser. This will break the seal created by the finish and make for a nice, clean break once the top is removed. Remove the drawers. Look through the drawer opening and locate the screws that hold the dresser top to the main body of the dresser. Use a screwdriver to remove the screws. Gently tap the underside of the dresser top with a hammer to dislodge it from the main body of the dresser.
    • See 2 previous
    • Margaret E Margaret E on May 09, 2016
      @William I've gone over it several times, but have yet to make much of an indentation. Will keep trying! It has to come off before the granite can be installed. Thanks!
  • Trisha Hardy-Atkins Trisha Hardy-Atkins on May 08, 2016
    You could instead set a bowl style sink on top rather than cutting into this piece! Of course I'm assuming this is for use as a bathroom vanity?
    • Margaret E Margaret E on May 08, 2016
      @Trisha Hardy-Atkins Yes, this will be a bathroom vanity, and I'm using a vessel sink. However, it will be too high if I put the granite slab over the current top. The vessel sink is large so I need the current top removed to accomodate a slightly larger top - it's a very unusual sink and I looked far and wide to find something so beautiful and special for this special bathroom I'm designing. The dresser has to be cut into anyhow for the plumbing. I need to remove the top as carefully as possible so as not to damage the rest of the piece.
  • Country Design Home Country Design Home on May 08, 2016
    OK, so I am reading that you are not trying to remove the veneer, but the actual top of the piece so you can replace it with a stone or granite top? The top would typically be screwed or nailed into place, depending on the age of it. But it might also be glued. You need to get to those back screws and loosen them, but if it is impossible, you could try tipping it sideways and then try to loosen the top screws by lightly hammering from underneath. Sometimes that will be enough to allow the top to break free and expose the screws so you can remove them. Last straw would be to saw it off, but very difficulty to get a clean line when you do this.
    • See 2 previous
    • Margaret E Margaret E on May 12, 2016
      @Sandra Thank you for your suggestions. The drawers are dove-tailed but not the top - it's been glued and screwed -and probably clamped, made back when furniture making was an art. I'll take another go at the back screws - I need to get an idea where the plumbing will be coming through the back - possibly cutting a hole for that will open up enough space for me to access those screws. Here's hoping!
  • Pri4759878 Pri4759878 on May 08, 2016
    I used glass tiles on my up cycled vanities. Just make sure that you seal the grout to waterproof it.
  • Marie Marie on May 08, 2016
    I used an old wash stand for a vanity, having the opposite problem...to low. So I added legs, stained to match, for the right height, had a marble top put on and a copper vessel!! Love it. Why don't you lower it by cutting the legs down enough or even replacing the legs if necessary. Actually, the wash stand I used did not have legs originally...... sat flat on the floor! It is a beautiful piece you have and would be a shame to think it could be damaged.
  • Freida Freida on May 11, 2016
    I did a vanity from a buffet and it looks great. I never removed the top. My husband removed the top drawer and cut the whole for the sink. A skilled carpenter cut a square U shaped part out of the bottom of the drawer and stabilized it with 3/4 inch pieces of wood around the square U, so the drawer would slide around the sink drain. I had someone that cleans furniture to refinish the buffet and he used an oil base finish. It looks fantastic!
    • See 4 previous
    • Pam Johnston Pam Johnston on Sep 14, 2022

      I would love to see the finished product of any vanity projects. I am planning to make this into my bathroom vanity and canā€™t decide to remove the wood top and replace with granite or leave wood and apply marine varnish. Any suggestions would be welcome.

  • Marie Marie on May 13, 2016
    Thats actually smart. I still haven't given up that idea. I'm at 'the older end' of things/ have downsized!!! Hard to do after a lifetime of 'keeping' things!! Good luck with all you take on. Love the chats here!
    • Margaret E Margaret E on May 14, 2016
      @Marie I'm on the "older end of things" too - cancelled retirement to get the little bungalow I'm renovating, so I'm splitting time between where I live (and the house is) and Atlanta, where I still work. Yes, bad as it sounds. But the house is in a prime location and will be income property for my son when I'm no longer able to care for it. It's just getting it to the point where I can move in that has been a drain. One day at a time!
  • Margaret E Margaret E on May 18, 2016
    The top still hasn't come off the dresser, but I'm closer. All screws holding it on have been removed and I can slide a putty knife under each corner. Not all the way to the other side of the frame yet, but I'm going to try my brother's suggestion of using a heat source (such as a hair dryer or heat gun) to blow on the underside and possibly warm the glue enough to loosen the top from the frame. Thanks to those who took the time to respond.
  • Annette Annette on Feb 28, 2017

    Well what finally worked?

    • Margaret E Margaret E on Feb 28, 2017

      I started sawing at the corners till I could slide in screwdrivers and then a pry bar. It took a couple hours of sawing and prying till it finally came off. I hope to post the "after" pictures of the project soon - it's finally finished, except to swap out the faucet for another that's more appropriate for my vessel sink.