


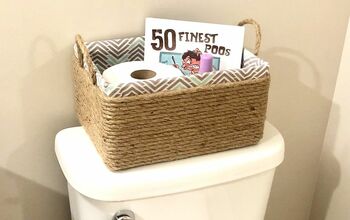
No Sew Fabric Basket

7 Materials
$10
3 Hours
Easy
If anyone knows me well, they know I have a small obsession with baskets. I haven’t always had this slight obsession but in a past few years – primarily since preparing for our son to be born and setting up his nursery – I have a newfound love for them and how they make storage and organization more fashionable. I’m all about no sew projects and this particular one was totally me since, just about every project I do that involves attaching one thing to another thing, I’m armed with a hot glue gun. Though this project took some time to complete, the end result was worth the time I put in.
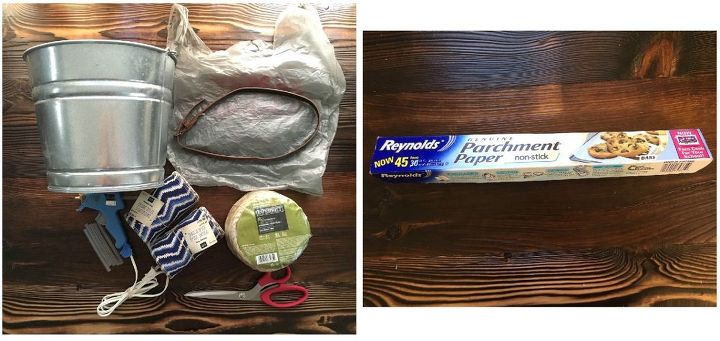
Supplies: -bucket/bowl -parchment paper -fabric (I found these fabric rolls on clearance at Michael's.) -3/8" sisal rope (or you can use cotton piping cord) -hot glue gun/sticks -scissors -leather (I used an old skinny belt I had.) *Note: I used the entire roll of sisal rope but hindsight I would have gotten a second roll of it because I was a little short on rope. However, I was still able to complete the project with what I had. For the fabric rolls, I used an entire fabric roll and then one strip of the second roll.
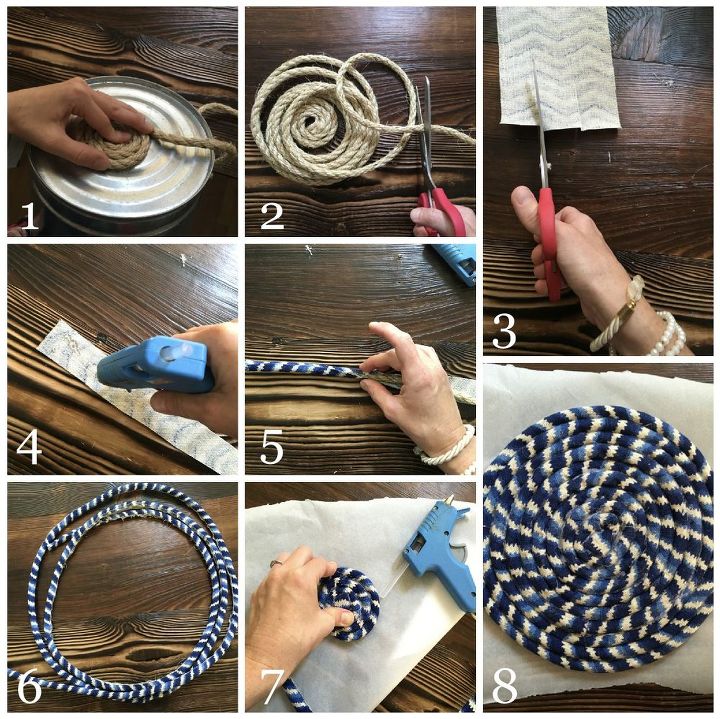
STEP 1: Make bottom of basket I don’t think it matters whether you make the bottom first but that’s what I did. I started by taking the sisal rope and coiled it on the bottom of the bucket so I could figure out how much rope I would need. Then, I cut my fabric roll (it was 5.25” wide) into thirds. *Note: I didn’t use any formula or calculation for this part—only realized that cutting the fabric roll in half was still too much fabric for wrapping the rope. I put a line of hot glue down the middle of the strip of fabric and laid the rope on it. Then, I did the same for the excess fabric and wrapped it onto the rope. After the rope was covered in fabric, I coiled it around itself, applying hot glue as I went around and pressing the rope on itself to allow the glue to hold it together. Once the coiled basket bottom was finished, I laid it to the side to complete the rest of my basket.
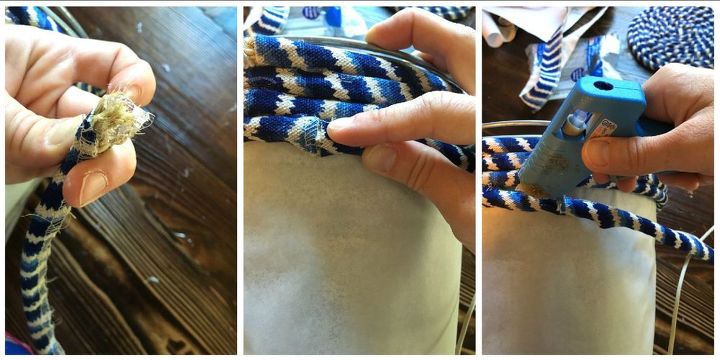
STEP 2: Make basket To make my basket, I first covered my bucket with parchment paper. I originally tried putting the bucket in a plastic grocery bag, but goof-troop me realized quickly that hot glue melts plastic {insert eye rolling here!}. I used a little packing tape to help hold the parchment paper on the bucket. Then, just like I did for the bottom of the basket, I used long strips of fabric to wrap the rope. I didn’t bother with pre-wrapping the rope around the basket to figure the dimension because I knew I had a lot of fabric wrapping to do and I had a lot of rope so I just dove right into gluing the fabric around the rope. Once I had a completely wrapped section of rope, I started wrapping the fabric-covered rope around the prepared bucket. The hot glue doesn’t stick to the parchment paper so I held down the start of the rope and once I came back around with the rope, I started hot gluing the rope to itself. Make sure to keep a tight hold so there’s no spacing in the wraps. *Note: make sure you cut even strips of fabric for adhering to your rope or yours will end up like mine with some of your rope exposed. I wasn’t too worried about it because it’s on the inside but if you’re making this for someone else, I’m sure you’ll want the entire basket to be perfectly covered.
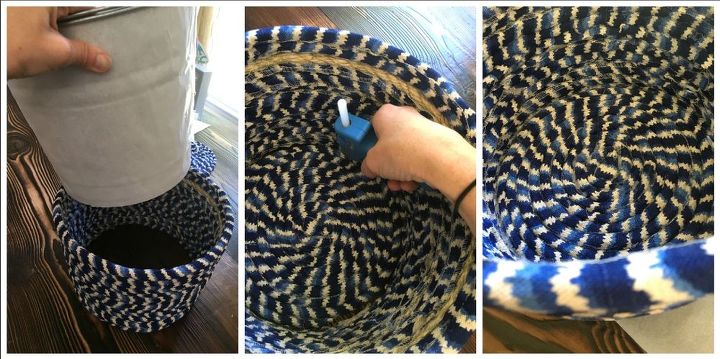
STEP 3: Attach bottom Once the body of my basket was finished, I attached the bottom. To do this, I removed the bucket from the wrapped fabric rope and sat it on the coiled fabric-rope bottom I made in Step 1. Then, from the inside of the basket, I hot glued the bottom to the basket around the bottom edges. I hot glued a little bit at a time and applied pressure to each section I glued in order for the bottom and the body of the basket to stick/bond together.
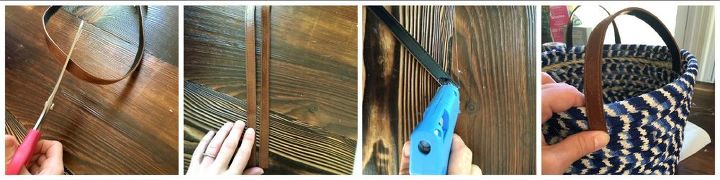
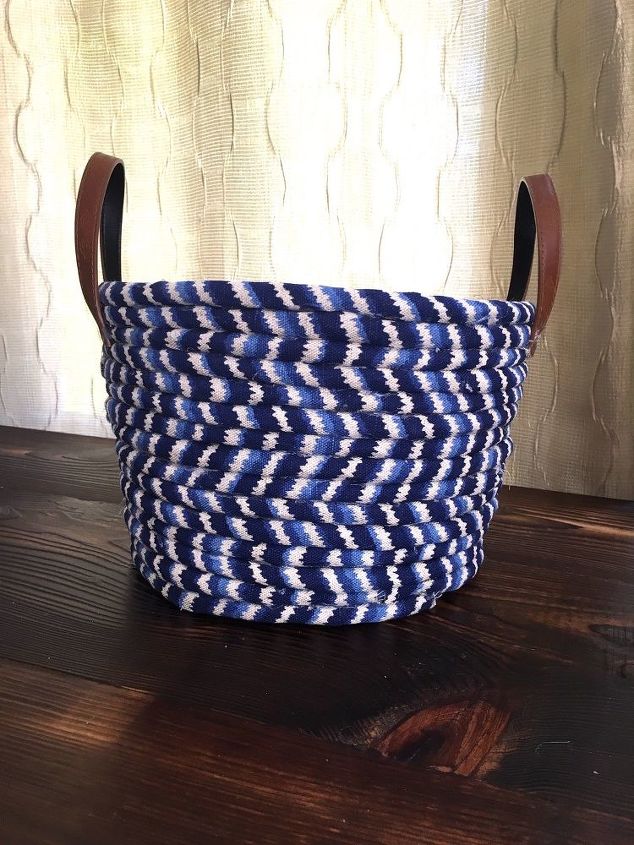
STEP 4: Attach handles Finally, I added handles to my basket. I was going to order some thick leather online but it I just so happened to have a skinny pleather belt in my closet that I never wore so I thought it was perfect for the handles. What’s even better is the belt had some detail to it—even though no one will probably even notice, I know it’s there and I felt like it added something extra to the whole look of the basket. To attach the handles, I simply eyed-up where and how big I wanted my handles to be, then cut two sections of my belt off and adhered them to the sides of my basket with hot glue.
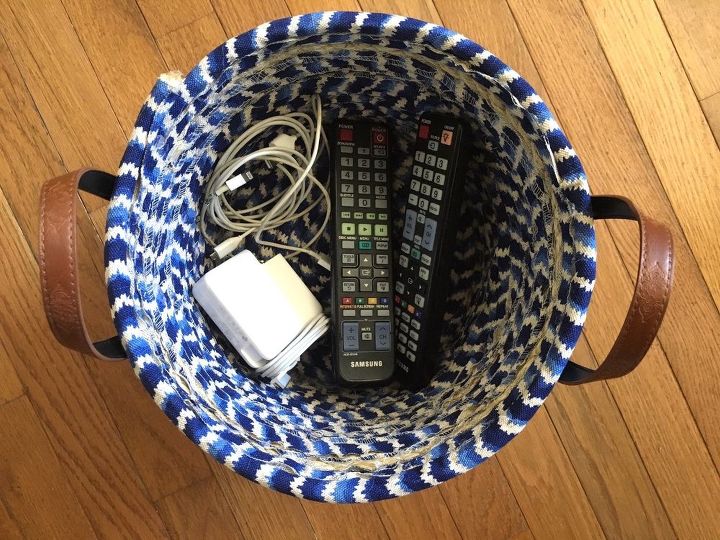
Even though this was a very time consuming project, I am really happy with how this fabric/rope basket came out. The most time consuming part was wrapping the rope with fabric—I know I could have easily and quickly completed this project without the fabric but knowing that no one else has a basket like mine, with this fabric, makes it a very special and unique piece so the added fabric was worth it for me.
I've seen the fabric roll I used for this basket a zillion times at Michael's over the summer and wondered what in the world I could use it for. I'm so happy that I finally came up with a use for it!
{
"id": "4092936",
"alt": "",
"title": "",
"video_library_id": "8220",
"thumbnail": "https://cdn-fastly.hometalk.com/media/2017/07/31/4092936/no-sew-fabric-basket.jpg"
}
{
"width": 634,
"height": 357,
"showRelated": true,
"noautoplay": ""
}
Resources for this project:
See all materials


Any price and availability information displayed on [relevant Amazon Site(s), as applicable] at the time of purchase will apply to the purchase of this product.
Hometalk may collect a small share of sales from the links on this page.More info
Comments
Join the conversation
2 of 64 comments
-
This is awesome creativity, better looking than items at most store with high mark-ups.
-
You'd be better off making a braided rug


Frequently asked questions
Have a question about this project?