Mission Impossible: Dilapidated Vanity Into Nursery Changing Table!

P.j. C
by P.j. C
6 Materials
$150
6 Weeks
Advanced
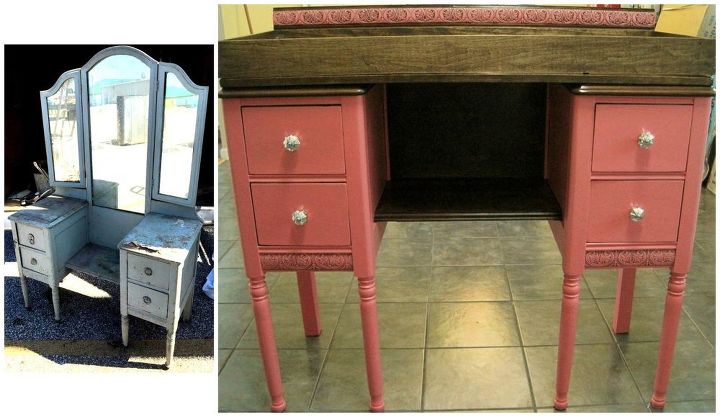
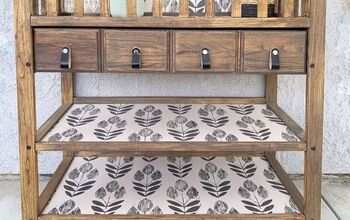
With help from my multi-talented spouse, I converted a forlorn vanity into a changing table for our 1st granddaughter's nursery! Once she outgrows Phase 1, the tray top will be removed, new veneer applied to the top surfaces, & trifold mirror restored, allowing the vanity to return to its original purpose.
Shortly after learning our 1st granddaughter is expected to arrive this October, the Mama2B pinned a Pinterest project of a vintage buffet used as a dressing table. A few days later a local resale shop posted a photo of a VERY shabby vanity that appeared to have come from the same home as an antique chifferobe I'd bought for the nursery just a couple of weeks earlier.


Unfortunately, pictures alone couldn't reveal all this old girl's issues---half her 6 legs didn't even contact the floor, & the other 3 were badly rotted! Not only had several decades exposed to a damp environment caused her "skin" (veneer) to blister & peel, her right "shoulder" was slightly warped. The left mirror was badly streaked, & the other 2 were loose in their frames & would also require new backing. But even with a new top to span both sides, the vanity would still be several inches too low to serve as a changing table.


When I couldn't reach Mama2B to break news that the vanity in even worse condition than we'd feared, I decided to look for other candidates. A few minutes later I came across a box of furniture legs. Even though they were too sleek for a vintage piece, the cogs in my brain began to turn. I went back to look at the vanity, & quickly reconfirmed that it was well beyond hope even with replacement legs. Earlier shoppers had obviously reached the same conclusion, or she would've already been rescued.


Over the next half hour I still didn't find what I had in mind. Then I spotted a shopping cart full of what appeared to be antique table legs, & sorted through the lot to find a set of 4 perfect matches. Since I didn't have a tape measure on hand, I used a scrap of paper to compare their dimensions with the vanity's legs. I also had to determine how much taller the vanity could be with legs made from what I realized were staircase spindles. After much deliberation, I approached the cashier with 4 spindles & explained that I would also take the vanity. Whether or not he thought I was crazy, I could already envision how this piece would look after a major overhaul.


During the next few weeks many hours of labor were devoted into transforming what my husband, aka The Incredible Mr. Fix-it, agreed was the worst hunk of junk I've ever dragged home---which is quite a statement, considering my nickname is The Eternal Optimist! But thankfully he was willing to perform several delicate surgeries on our old girl---remove her "face" (mirrors), amputate her diseased limbs, create prothetics from salvaged spindles, & enhance her already-gorgeous figure to prepare her for nursery duty (back panel, full-width top, safety rail, & salvaged trim to match embossed moulding above legs). My own contribution involved peeling damaged, WALLPAPERED, & painted veneer from the top & center sections, stripping 2 layers of paint, sanding, staining, sealing, & painting, as well as overseeing each step of our old girl's rehabilitation.


This idea could be used with a vintage desk or dresser, or even a different style of vanity. If preferred, salvaged lumber could be used to create a new top & safety rail. One tip is to check measurements of a purchased changing pad before making the temporary tray style top. Fortunately, we were able to make minor adjustments to fit a 16" x 32" contoured pad, with room at each end to store items like baby wipes & lotion. At 12" D x 18" W x 12" H, the lower middle shelf can easily hold a large basket of diapers.


Just in case someone in the future prefers the old girl au natural, i.e. sans paint, I took time to protect her stripped/sanded/"tanned" complexion with 2 sprayed coats of Zinsser Sealcoat before applying her new makeup. I was also careful not to allow any paint to flow into the joints, & also used a dry-brushing techinique on the embossed trim---all of which would make stripping the vanity again much easier than it was this time!
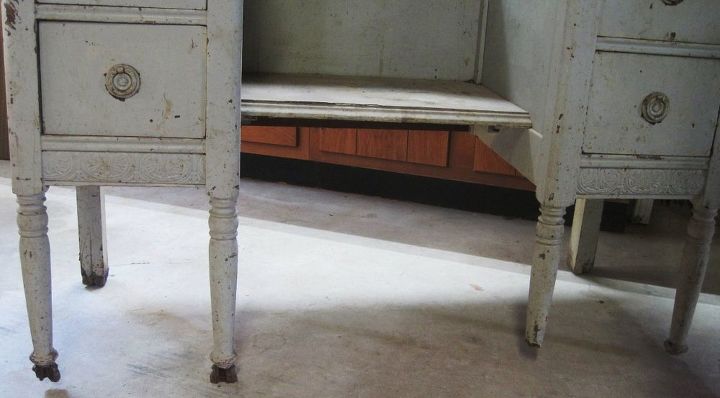
Not only were the bottom sections of 3 legs gone, the remaining 3 were seriously rotted!
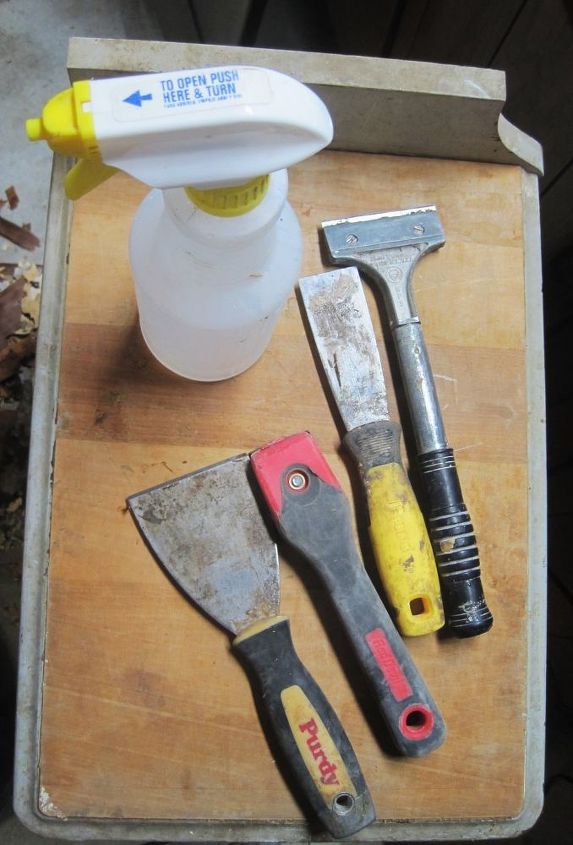
Tools used to remove damaged veneer: 2" stiff blade Purdy scraper, razor blade style wallpaper scraper, spray bottle with water, old steam iron & LOTS of muscle! Any remaining glue residue was removed by sanding with an orbital sander.
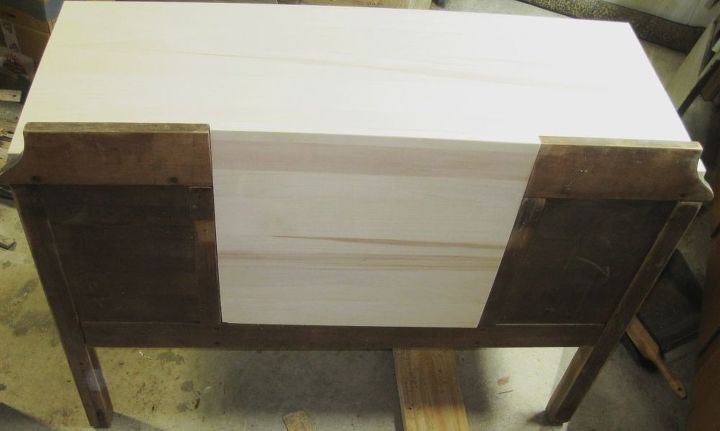
New top & back panel made from 1" x 20" x 48" apsen board.
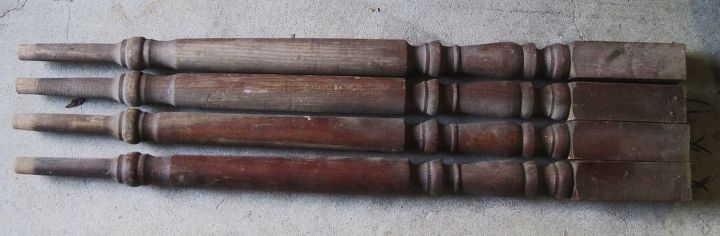
Replacement legs were cut from the center sections of salvaged staircase spindles. The top & bottom parts can be used in other projects.
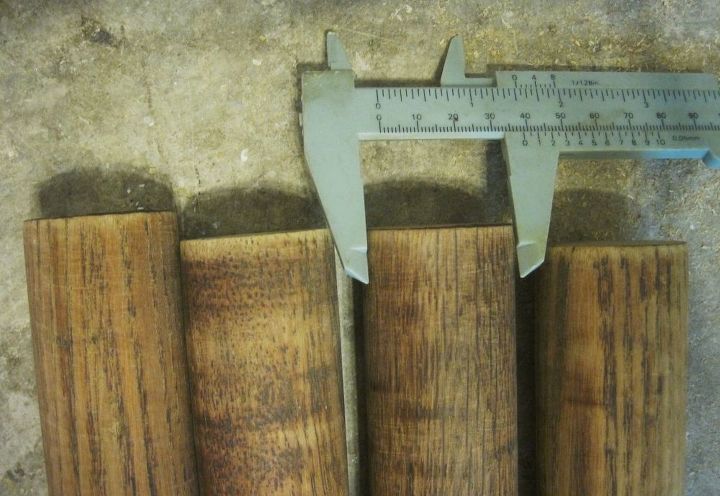
Diameter of replacement legs were measured with calipers. Spindles were cut & sanded, then drilled to join with dowels & glue.
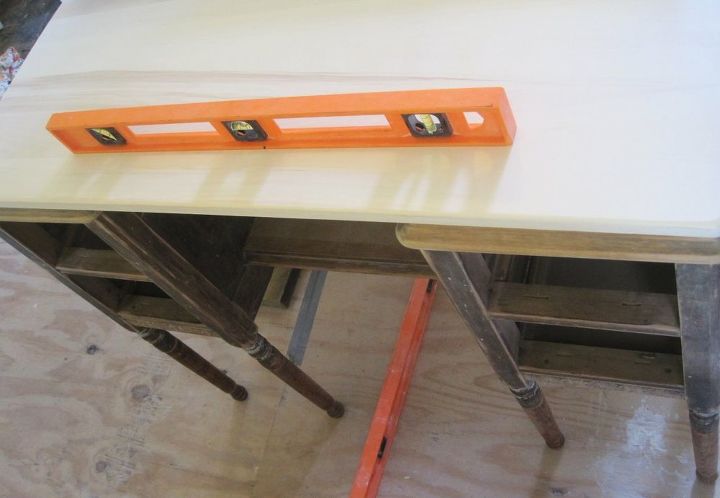
Checking diameter of the damaged legs. Since I wanted to preserve as much of the original profile as possible, we decided to cut them 3" below the cabinet. In order to raise the top surface to 36", the new legs needed to be about 6"longer than they were originally.
One of the trickiest steps was cutting off the legs 3" below the cabinet, trying to make sure they were as even as possible. There's probably a better way, but we eventually achieved this goal by sanding & checking with a level multiple times.
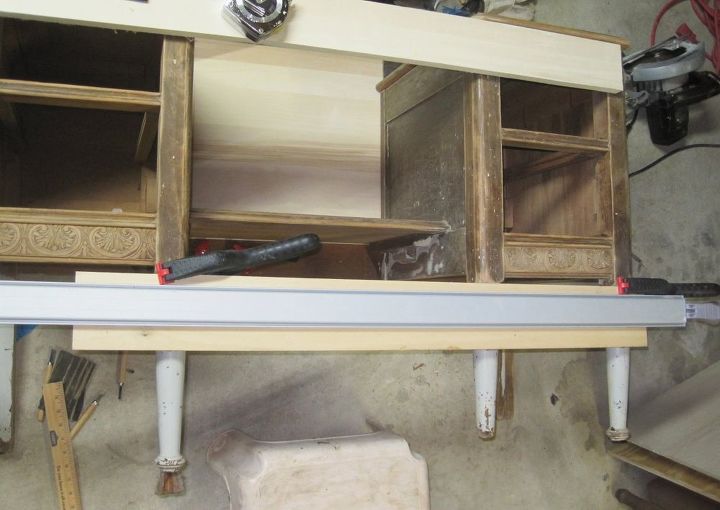
With new top & replacement legs.
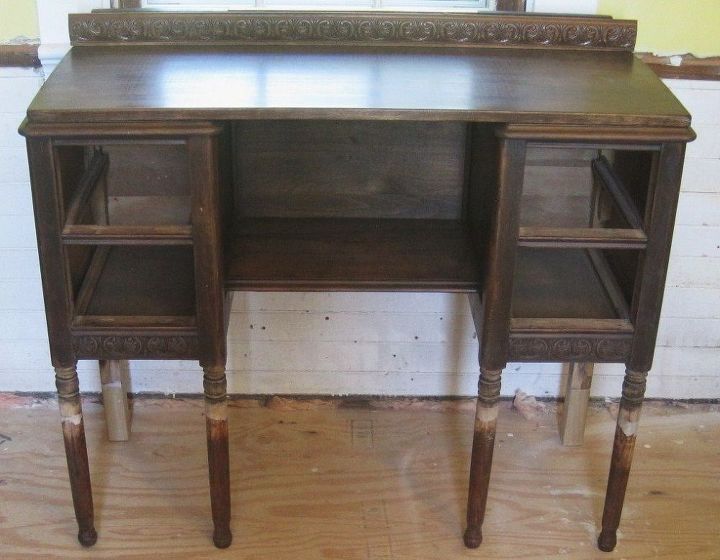
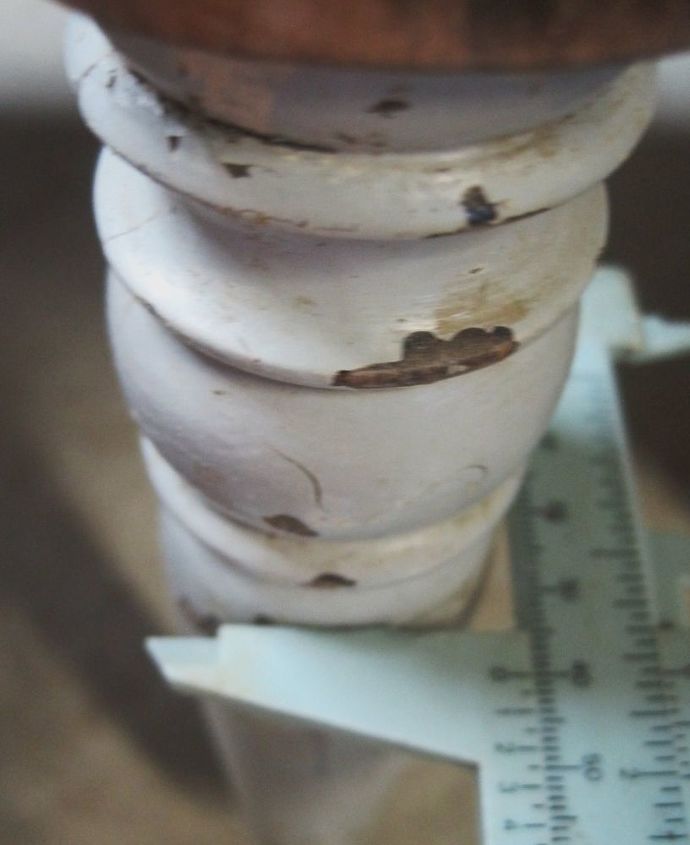
Cabinet & new top were stained with dark walnut Varathane gel stain, then sprayed with 2 coats of Zinsser Sealcoat (shellac). Stain didn't color the epoxy that filled the joint between the original legs & replacements. We later removed the moulding meant to disguise where the back panel was inserted. Another strip of wood was added across the back to allow the embossed trim to extend above the tray's safety rail.
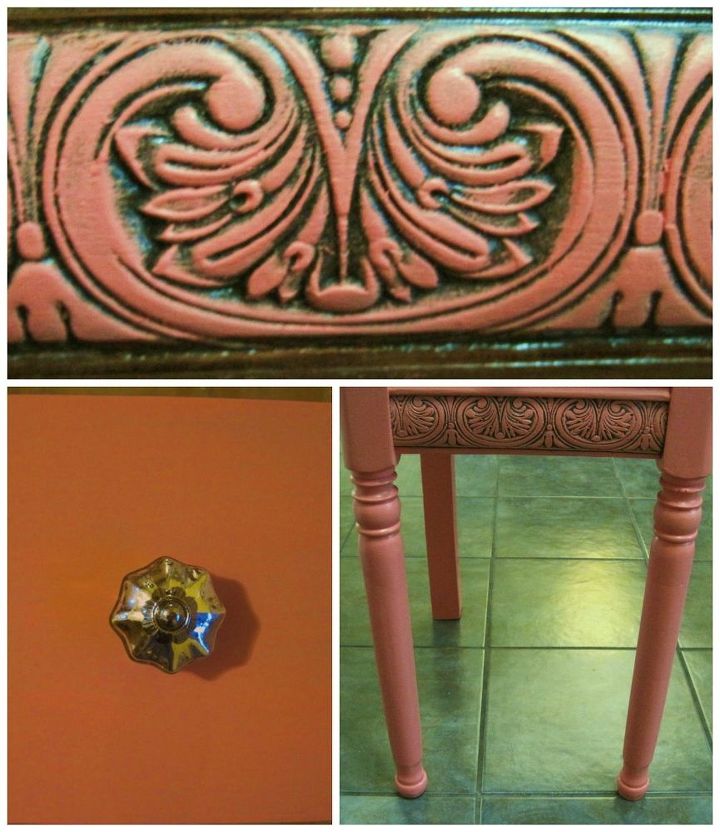
Close-ups of the top rail, mercury glass pulls, & embossed moulding below the drawers. The paint is "Dishy Coral", matched at Petersburg Do It Best from an outdated Sherwin-Williams color wheel. I used a dry brush technique on the embossed trim to allow the darker stain to show details.
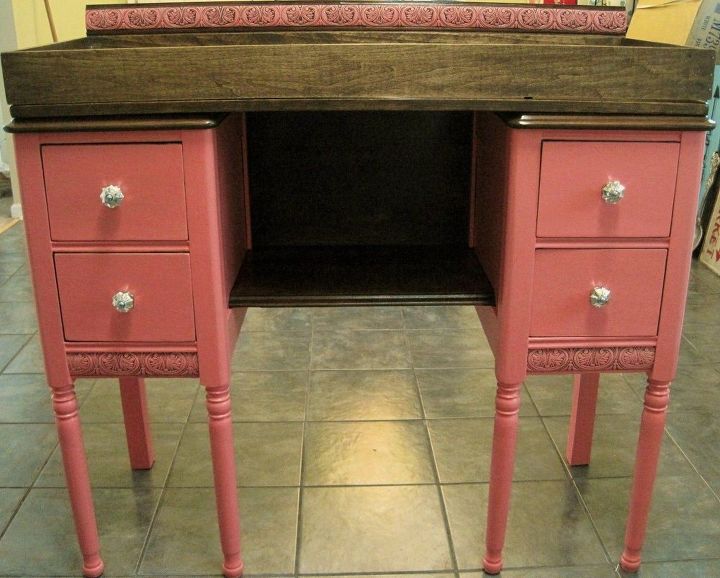
Phase I complete: temporary top & safety rail, attached with screws & brass L-brackets
Check out our REALLY big project here: www.facebook.com/MorganManorBedandBreakfast
Suggested materials:
  • Vintage vanity & salvaged staircase spindles   (Anything Collectible, Huntingburg, IN)
  • Paint, sandpaper, glue, Zinsser Sealcoat spray, hardware   (Petersburg Do It Best, Petersburg, IN)
  • 1" x 20" x 48" aspen lumber   (Mastercraft Co.)
See all materials
Frequently asked questions
Have a question about this project?
  1 question
  • The10389833 The10389833 on Oct 27, 2016
    How did you get the legs to stay on and be sturdy and tight
Comments
Join the conversation
3 of 45 comments
  • Vicky Corey Vicky Corey on Oct 30, 2016
    It turned out beautiful! CONGRATS on the new grand daughter! I have a 6 yr old grandson and 5 year old grand daughter. NOTHING like it!!
    • P.j. C P.j. C on Nov 02, 2016
      Our granddaughter was just born 4 days ago, & we're planning to go meet her soon. We also have a 3-yr-old grandson who visits every 2-3 weeks. Thanks for your kind words!
  • P.j. C P.j. C on Nov 02, 2016

    -----

Next