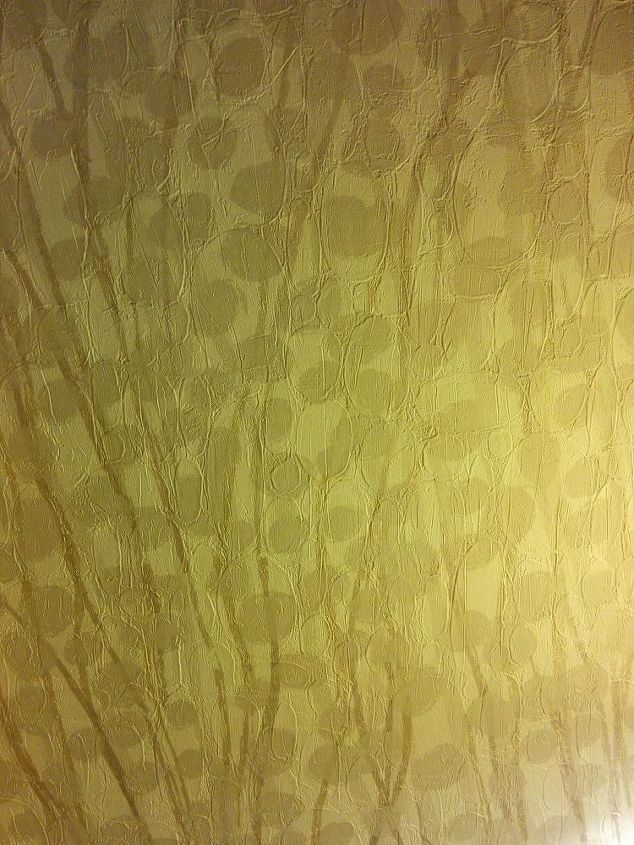
Can you help me replicate this wall design?

by
Cori Widen
+29
This is wallpaper at a hotel, and I'd really like to replicate this textured effect on one wall in my room at home, perhaps with different colors. Any suggestions in terms of method? Once I have the background color, what would be the best way to get that textured effect in a similar shape?
Thank you, lovely Hometalkers! 


tissue paper
I've seen some lovely texture from brown paper bags. Like in this website: http://www.thriftyfun.com/Brown-Paper-Bag-Wallpaper-Technique.html
You could create a stencil of the design you want, then put the stencil on the wall and pull some plaster/patching compound over it. When you remove the stencil the plaster/patching compound will be in the raised pattern you want. I did this on the front of dresser drawers and liked the effect. I painted the flat surface first and the raised areas later after letting the patching compound dry. Be careful because if you do a whole wall and then later want it smooth again you will have alot of work to do. Alternately you could put up plain paintable textured wallpaper - paint the wallpapered wall the background colour - then stencil your design over that.
I would take a picture of the wallpaper , send it to your email address and edit the pic to print out , make a copy and then you could inquire to a wallpaper manufacturer to see if they can match it ! If it's just one wall , then the cost would be too high so then perhaps a boatload of copies of the paper on photo film paper (you can edit the color as well) , and actually wallpaper glue each 8 1/2" x 11" paper to the wall providing it's smooth as a new sheet rocked wall !
Looks like crumpled tissue paper glued on the wall then painted. These are things from the 70's and 80's. Rag rolling, crumpled brown paper, crumpled tissue paper, plastic kitchen wrap, etc.
Got it. Thank you!!
Cori, if I wanted to do this, in a not too big of an area, I would use stiff paper not as thick as card stock but thicker than writing, cut many, many,many of the shapes out, stick them all over the wall, helter skelter or however you want, let them dry then paint your base coat over that. That will give you the slightly raised pattern, then free hand the stems, and cut some foam in the darker shapes and sponge over top. Did you understand that?
Interesting wall paper Cori. You could use un-sanded tile grout. Smear it on the wall as if you were plastering the wall and then while the grout is still a bit wet, you can use a tooth pick or skewer and draw the shapes to get that textured look. Once the grout is fully cured, you could stencil your design on top or use foam as Lori suggested.
You're welcome Cori. Hope this works but if you are determined to do it, I hope you have lots of friends to help if you ever decide to change it. :) This is a good place to have a practice board, see if you like it. Cheers!
I agree that the tissue paper technique would work here, but I would stencil or freehand a design in a very dark color BEFORE applying the white tissue. I would test the paint and paper on a board before going ahead on the wall. Good luck.
Cori, if you do this, hope you will post a photo. Good luck.
Yes Tissue paper...Decorative Paint Technique: Crinkle Paper Painting Instructions: http://fw.to/8Ejbe8N
Hope this helps...it is especially nice for hiding flaws you may have in your walls. My friend used this technique on her walls and they turned out beautiful.
If it were me, I would size the wall first then cut out ovals to glue to the wall with wall paper glue. Re add glue and then top it off with tissue paper. Rub the paper until it all stays put. Then paint the base color. Then you could use a picture printed of the pattern on a projector to the wall and trace the design you wanted and paint it on with diluted laytex paints or acrylic. But before you start the wall try it on a piece of poster board with the technique done to it. Then when you have your design you like on the wall then seal it with either a spray or roll one sealer. Best of luck, and remeber its only paint and wallpaper, it will come off if you use wall size.
Oh, I honestly hadn't thought of paper glue! Thank you!
I would purchase textured wallpaper and freehand or trace the design on there(use a screen projector). Graham and Brown has a great selection of textured wallpaper https://www.grahambrown.com/us/wallpaper/collection/paintable/
Thk you have all the advice you need with the tissue paper technique. Great choice... its gorgeous... anxious to see result. I think I may use this pattern for a painting on canvas.
Have you thought about using Plaster, or redi-mixed "joint compound"? Do a small section at a time, using a few different sizes plastic scrapers to make the shapes, give it 3 to 5 mins to "set up a bit", then go over it with a tile trowel to "knock down", or flatten the shapes. The timing will be a little " trial & error" on your part, depending on the humidity in your home. If you do this, ( I am SURE you will use a drop cloth) Bring a piece of drywall to the room you intend to do, with your supplies to "acclimate". Especially if using a "tub" of joint compound. Hope this will work for you! Happy Spackling!