Asked on Dec 10, 2013

How to refurbish 47yr old custom made cupboards?

Donnalee1002
by Donnalee1002
in 47yrs they have only been washed down and polished, now I can't get down to the finish. I love them and refuse to paint them. Do I have to strip, sand and stain or is there something else I can try? I've used Murphy's, degreaser detergents and orange cleaner. They are now multi color because some areas come cleaner than others.
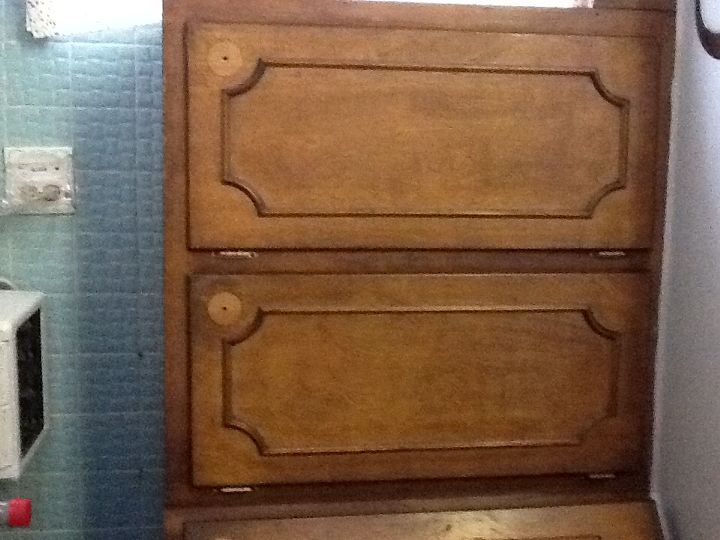
Notice the different shades other wise in excellent condition!
  33 answers
  • You may want to try to wash & wipe them down with vinegar & sponge or wash cloth. Then try a paste of baking soda and water to gently scrub away any leftover tougher residue. It will be abrasive enough to remove any build up without damaging the cabinets. Then wash & wipe with hot water to clean off the baking soda. By then they should look evenly cleaned up. I hope that helps. Good luck!
  • Sherrie Sherrie on Dec 10, 2013
    TSP, will clean the oil soap off. Because you have used Murphy's soap it has left a build up on it. When you clean the finish on wood you are cleaning the protective coating. Murphy's soap is oil based. And leaves a firmly build up. TSP will take it off. Then decide if you want to paint. I would rough it up with sand paper before I would paint it, this way you can see if all the oil soap is off. Just a small spot test it. If it is off I would spray it with lacked to keep any bleed through from showing, just in case. A couple of thin coats. Then paint, I would also seal it to protect it. Never use Murphy's again! My arch enemy on wood.
  • Jodi Stevens Jodi Stevens on Dec 10, 2013
    I HAVE SAME ORIGINAL REAL WOOD CABINETS IN OUR KITCHEN, WE HAVE LIVED HERE 33 YRS. I DECIDED TO REDO OUR I WANTED TO PAINT THEM BUT REAL WOOD IS SO UNCOMMAN I LEFT THEM PLAIN, CLEANED, SANDED AND STAINED AN ADDED POLYURETHEN. SANDED BOTTOMS,THEY TURNED OUT AWESOME.
  • Paper, Patch & Paint Paper, Patch & Paint on Dec 11, 2013
    UGH. Time to say goodbye...
  • Kathleen M Kathleen M on Dec 11, 2013
    I love the molding detail on the cabinets, and want you to keep them! Howards Restor a Finish should work for you. I've used it many times on furniture and I just checked the website and they recommend it for kitchen cabinets too. The website gives you more info than the can does, so take a read through so that you have all the supplies that you need. It's so much easier than sanding and refinishing and much cheaper! I suggest you buy one can and do one cabinet and see how well it works. If you like the results do the whole kitchen. Please post the results and let me know what you think :o) http://www.howardproducts.com
  • Maine Country Home Maine Country Home on Dec 11, 2013
    They are lovely wood. I think Kathleen M and the Howards Restor a finish is on the right track if you want to keep them wood. I used it on a desk two years ago, came out great and have not done anything to it since, except wax it to keep it clean. If not paint does work wonders:)
  • Catherine Smith Catherine Smith on Dec 11, 2013
    They are gorgeous. Painting them would be a sin! I agree I think Kathleen M and Howards Restor are on the right track. These type of cabinets are rare and should be treated like the "art" form they are.
    • See 4 previous
    • Catherine Smith Catherine Smith on Dec 15, 2013
      @Paper, Patch & Paint That might be, but you are certainly lacking in good manners.
  • John John on Dec 11, 2013
    @Donnalee1002@hotmail.co, We are just finishing up our kitchen renovation where we took our solid oak cabinets and did an antique white paint on them. We were told to stain them we needed to go darker due to the penetration of the stain into the wood. The cabinets are solid oak so replacing them would be very costly. Painting was not cheap doing the antiquing which was a five stage process. Getting them professionally done by a guy who is and thinks himself as an artist was worth it in the end. We removed wall paper, re-texerized the walls, and painted them. We got new counter tops, sink and hardware, and windows, and will soon sand and re-stain our oak parquet floor. (recommended by the factory). As soon as I can figure out how, I submit pictures and a short article on the before and after renovation. Sometime paint is OK. I love the look of wood, but it must flow with the rest of the house. We've lived here 36 years and it has been a constant renovation.
  • Diane Navarro Tippetts Diane Navarro Tippetts on Dec 11, 2013
    I have the exact ones in my kitchen. I stained the middle darker and then sanded the outer edge to original light wood color, then polyurethaned the sanded part. They look awesome and the different wood colors give them depth.
  • Redoux Interiors Redoux Interiors on Dec 12, 2013
    If you have done all the cleaning, I would try Restore a Finish. It is an awesome product that can be applied to tired old wood, even scratches, etc. It comes in different shades, very easy to work with. It can be found at many Home Improvement centers in the paint departments. It's been around for a long time, tried and true. Good luck!
  • Jeanette S Jeanette S on Dec 12, 2013
    Be real careful about using vinegar on wood...it can cause terrible damage. As far as soda being a good scrubber, perhaps Bon Ami might work better. It is a slow process which ever way you go!
  • BeazerBea BeazerBea on Dec 12, 2013
    I would remove each panel from hinges, sand each one down to the bare wood, wipe all the dust off with Tacky cloth, then complete with a paint wash or natural Danish oil finish. Easy Pizy with a sander and some creative flair. Sand the cubard frames to match. Some new hardware.....Habitat for Humanity is a Great place for Knobs, Hinges, and Hardware pulls. Paint wash is One Part Paint- Latex...mixed with 3 parts HOT Water- apply with a brush, cloth or sponge.
  • Matina V Matina V on Dec 12, 2013
    I like the patina old wood gets after years of finish. If you want it new again I would go with the sanding or Restore a Finish. I think you have more control with sanding although it can be tedious. Good luck and post a picture when you're done!
  • Karen Hart Karen Hart on Dec 12, 2013
    Mineral spirits on a rag works great on old finishes to clean them up a bit and then I use a paste wax to buff them up or for something more durable you could seal with polyurethane.
    • Linda Linda on Dec 17, 2013
      @Karen Hart Polyurethane is not compatible with all finishes; it could end up flaking away. You would have to be certain that all the previous finish has been stripped away.
  • Paula barsamian Paula barsamian on Dec 12, 2013
    I have a really different approach. I use de-greaser (used to de-grease cars and cycles). It will dissolve e the old finish, spread it out, spread out any stain, and remove all old grease and residue.
  • Gail lichtsinn Gail lichtsinn on Dec 12, 2013
    formbys used to make a stripper that only removed the old varnish but left the stain..I wouldnt use standard stripper on them unless someone has polyed them..I THINK it was ethol alchohol based...Its fast and it will remove the old finish and the wax and at that point you can either put a new sealer or restain it or whatever you choose..I wouldnt paint them either..I like the wood..If you cant find formbys look for one for antique furniure.
  • Christine Christine on Dec 15, 2013
    I have to tell you that I currently have 4 of these cabinets sitting in my living room. Reuse center material! :) My plan is to simply Citristrip them. It's painless, brings the wood back to bare, and doesn't damage anything -- including me, since you don't even need gloves and can do it in your own living room. I'm here to tell 'ya! I would not, ever waste my time and wood damage sanding something to get a finish off. In days gone by when stripping was a life-risking effort? Probably. But not any more. Tell me. For the shelves, do yours have little cut outs in the corners to go around the frame? I'm thinking these were a very popular type cabinet at one point, since I really did pick mine up in 3 different places.
  • Rossa D Rossa D on Dec 15, 2013
    try painting ,staining and stenciling. Love the molding. After completing try using glass or unique knobs,,, I see a blue white color theme
  • Donnalee1002 Donnalee1002 on Dec 15, 2013
    i have all the original hardware which was beautiful but in an attempt to clean them the finish bubbled up. I have painted them white for now until I think of something better.
    • Brendalee Perryman Brendalee Perryman on Dec 27, 2013
      @Donnalee1002@hotmail.com fuming them..i use plastic ice cream containers...put in what u want gently cleaned, add couple inches of ammonia seal..leave a day or longer.. take soft tooth brush, dip in the ammonia it has been fuming with... brush if needed ..then rinse, and wipe with white cloth.. repeat as needed...some things were fast ..others ..weeks but doesn't harm anything..doesn't take a lot of work!and everything looks so good!
  • Margie*Lee Margie*Lee on Dec 16, 2013
    I also have custom kitchen cabinets that are too well made and would be very expensive to replace but they need something done to them. I refuse to paint them because I know what happens when that is done. They will need to be repainted every few years. Instead, I'm looking into the Rustoleum stain kits you can get at any big box store like Home Depot, Lowe's, etc. The process takes about 4 steps and I'm choosing NOT to do the job myself but will be hiring it done by someone who has done this process before. I'm sure it will be costly but much less expensive than replacing all our cabinets.
  • Lisa Lisa on Dec 17, 2013
    i have these exact cabinets in my kitchen , they are veneered and i am considering painting with chalk paint also removing the (dinky) trim insert and adding a solid border around, i have already tackled the bathroom cabinet, all the cabinets in this house have the same thing ugh... but there are 48 doors and 15 drawers and it will be quite an undertaking ..
  • Donnalee1002 Donnalee1002 on Dec 17, 2013
    Mine are solid wood no veneer.i watched our most popular carpenter in our area build them in my grandmothers back yard when I was a teenager.
  • Christine Christine on Dec 18, 2013
    Mine aren't veneer, either. Interesting, though, that you saw THE originals made, yet they're everywhere. Being family, it's a nice thing to restore them. I was still curious about the corners of the shelves...?
  • Pat Baize Morales Pat Baize Morales on Dec 21, 2013
    i used Rust-Oleum Cabinet Transformations® no sanding great product can get the kit at home depot
  • Karen Hart Karen Hart on Dec 21, 2013
    @ Linda I should of worded my comment better. If you take mineral spirits and fine steel wool with a little elbow grease it removes the old finish without having to strip to bare wood then you can polish with paste wax or reseal. I have a old buffet I picked up at the thrift store and the bottom edge was scuffed from what looked like repeated bumps by a vacuum. I did the above and it worked very well. :)
  • Betty W Betty W on Dec 23, 2013
    Amonia on a rag or soft pot scourer will take any stickey deteriorated finish then paste wax and buffing.
  • Sweet Peas Charm Sweet Peas Charm on Dec 24, 2013
    If you're amenable to painting them, you could use chalk paint, or possibly even plaster paint. There isn't any prep work required with either of those two types of paint.
    • Nancy Nesbitt Nancy Nesbitt on Aug 02, 2015
      @Sweet Peas Charm Before painting with any type of paint, the surface should be CLEAN. While you may not have to sand the surface for chalk paint, you do need to make sure it is clean. I consider this prep work.
  • Sherrie Sherrie on Dec 25, 2013
    I love chalk paint, a Plaster a paint, DeCe, Annie Sloan....but I also do the pre work to get a professional finish. I always clean with TSP and rinse it. If you don't oils, furniture polish can hamper your finish. If it is a large piece extra steps assure a professional finish. I also always use a practice piece when doing anything new, it is worth the effort on a large piece to rough it up or sand and strip it. This assures me it will look professional. Small pieces you can get away with it, larger pieces the extra time assures me of a prefect finish. Cabinets, tops of anything takes at least 30 days to cure. Wax takes 30 to 60 days depending on what you use.
  • Kathleen M Kathleen M on Jan 10, 2014
    I love chalk paint on furniture, but DON'T do it on the kitchen cabinets! It just doesn't hold up well around food or kitchen cleaners. I had it on my kitchen table top and stripped it back off. There is a post on here from a woman who was asking advice on how to strip the chalk paint back OFF of all her kitchen cabinets-ugh.
  • Lisa Salerno Lisa Salerno on Jan 26, 2015
    my best friend's father refinished the same type of cabinets years ago.. stripped and painstakingly refinished with two-tone stain...I really like how they look! here's a pic of me in her kitchen
  • Nancy Nesbitt Nancy Nesbitt on Aug 02, 2015
    In 47 years, a lot of grease film & hand oils/dirt can build up on kitchen cabinets. You will need a stronger degreaser/cleaner than Murphy's or orange. I use TSP with care (gloves, old clothes, etc.) when cleaning old furniture/cabinets (you also have to rinse off), or ammonia with Dawn dish-washing liquid and water. You could also sand or use a stripper and light sanding. Then you can re-stain any color you like, or just apply a protective varnish (polyurethane, etc.). If you decide to change the hardware/knobs, be sure to fill in the original holes (if necessary) before staining/varnishing.
  • PainterNoni PainterNoni on Aug 02, 2015
    clean well with TSP....then use a gel stain.
  • Mary Susie Westermeyer Mary Susie Westermeyer on Nov 29, 2016

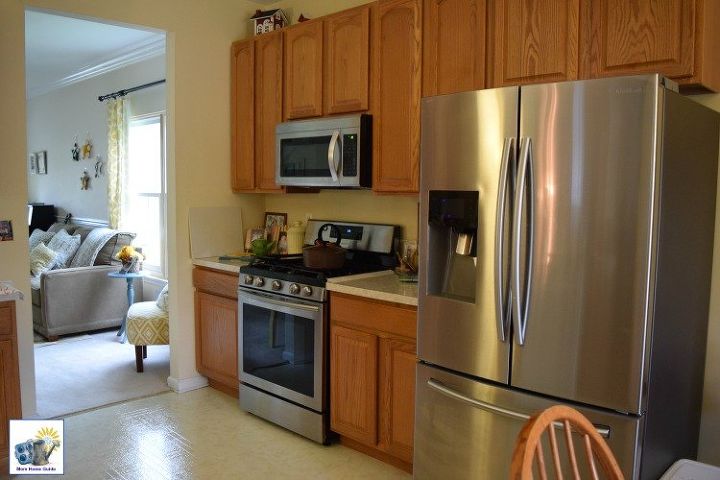
    I found a product called " Restorz-it" online that I used on my old oak cabinets. You simply wash them very well to remove grease and dirt ( I took the doors off and washed them outside and let them dry) then you simply wipe on a couple coats of this product--letting it dry dry between coats--and, WOW. It covers the scratches and imperfections and shines them up like new! I was sceptical, but so glad I did it!