


An Update on Painted Kitchen Cabinets and Counter Tops

3 Materials
We've had so many people wondering lately about painting their kitchen cabinets and wondering about outdated counter tops, I thought I'd write a post documenting what we did with ours around 2014. We had practically a new kitchen for less than $300 and couldn't have been happier. Both the cabinets and counter top are holding up well and I still love them. This post even shares things I've learned since and would do differently now.
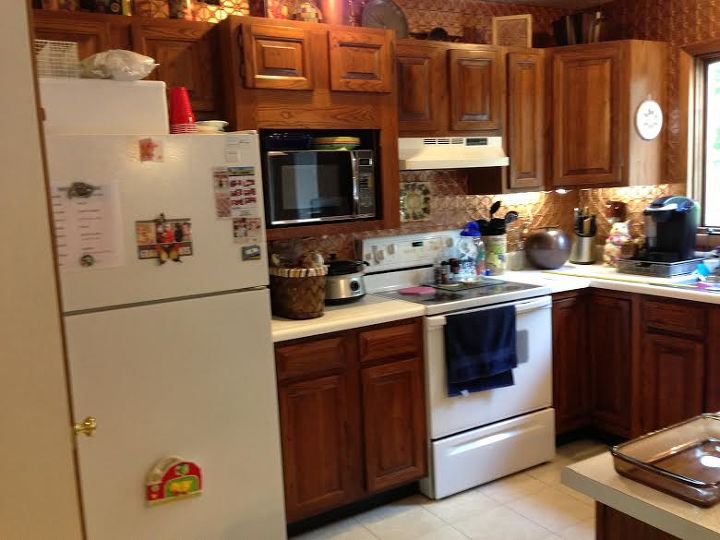
The original builder grade cabinets - 1985
We used Annie Sloan chalk paint on the cabinets….Annie Sloan was my introduction to chalk-based paint and I was in love. I still like the Annie Sloan line. At the time, I didn’t even mind the price as it does go a long way. The nearest retailer is about 40 miles from me, though, and there aren't a lot of color choices unless you mix colors and that can get expensive. Later, we stumbled across Missouri Limestone Paint Company’s chalk-based paint, founded in the Missouri Ozarks, and the rest is history. We are now established distributors of this line, selling paint and painting to sell, and I am more in love with chalk-based paint than ever! You'll have to visit our website to see our bathroom vanity created from an antique buffet we painted with the paint we sell. That's another Hometalk post for the future. http://sharsumpaint.com. I highly recommend chalk-based paint for painting cabinets. These days I naturally recommend using the product we sell, Missouri Limestone Paint Company chalk-based paint. The quality and price of our product is outstanding. We also recommend Varathane water-based polyurethane in satin finish and when using wax (but not on kitchen cabinets anymore) we recommend toulene-free Briwax. It goes on like butter and in about 10 minutes you can buff it out without a lot of elbow grease for a nice light sheen.You may think Annie Sloan chalk paint would be too expensive at almost $40 a quart, but it goes a long way. I painted all the cabinets in my kitchen (3 coats) with just about 1 1/2 quarts of paint and about one can of Annie Sloan's clear wax (1 coat). I used an electric buffer on the wax. I did no sanding or priming on the cabinets.
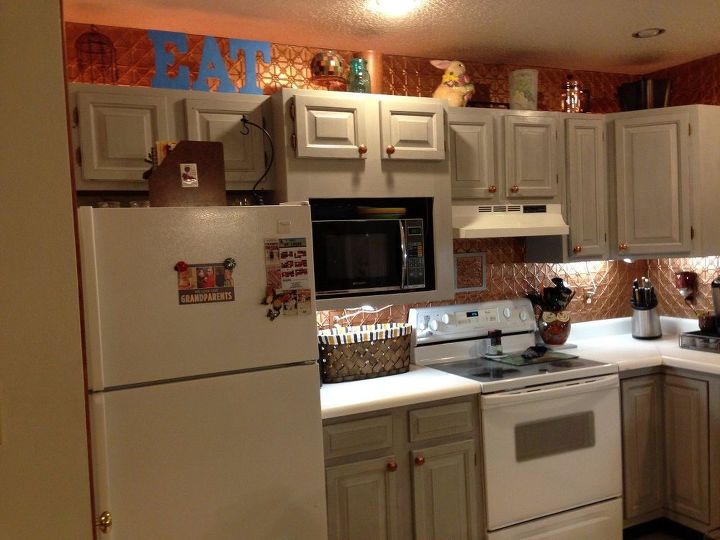
After 3 coats of paint and wax
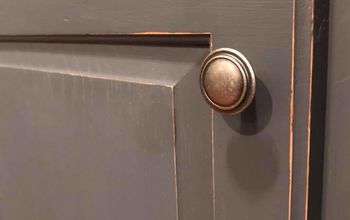
I'm not going to lie. This was a big project and even though my kitchen is not large, there were a lot of cabinet doors and drawers. But all the work was definitely worth it! I did learn a few things since, which may help others.1. Bleed through: I had painted my first coat and everything was going as expected. I then put on the second coat and after it dried, I noticed several cabinet doors by the stove had spots all over them. I called the retailer and she told me it was more than likely due to grease from cooking or the fact I had used Old English on my cabinets through the years. I had cleaned them thoroughly with TSP before I started, but I guess I must have missed some. I suspect it was the Old English, because I seldom cook if I don't have to and even when I do, I don't cook with a lot of grease on the stove. The retailer told me to get some shellac and paint it on, let it dry, and then paint another coat. That worked! I did some research on shellac and found Zinsser Bulls Eye clear Shellac. It also dried in about 15 minutes. I then put on the 3rd coat and the shellac had effectively blocked the grease. Note: We have used this shellac on many projects since. It will block odors on old furniture such as cigarette smoke, it will keep the tannin from raw oak from seeping through, if a piece has a knot hole, it will keep those from showing through, if a piece has a red finish such as mahogany, it will keep your paint from turning a pinkish color, and if you put a coat on a piece of raw wood, it will help keep your paint from soaking in and you will use less paint. There you go. You're welcome.2. Waxing kitchen and bathroom cabinets: This was the second thing we've learned through the years. Due to the problems of cooking grease in the kitchen and humidity in the bathroom, many no longer suggest using wax in those areas. If you remember, I don't do much cooking so I haven't had the grease problem and my waxed cabinets have held up very well. It is even recommended that you re-wax every 6 months or so. Ha! That hasn't happened in my house and the cabinets still look great! However, if I were to do it over, I would use polyurethane instead of wax and have now started recommending that to others. Our poly of choice is Varathane water-based polyurethane in satin finish. I love this stuff. There is a learning curve when using it as it dries so fast, it can gunk up if you try to go back over it, so you have to work in small sections, and don't go back and forth with the brush.3. Primer: Due to the hidden spots that came through on my cabinets, I have since started recommending using a water-based primer such as Kilz for large projects (and especially when using lighter colors such as white or off-white). Then you don't have the worry of bleed through and you will probably save paint, too. I might have gotten by with two coats instead of three on my cabinets if I had used a primer first.So those are the tips and tricks of painting kitchen cabinets I've learned through the years. However, my waxed cabinets sure did turn out nice as you can see in the closeup.
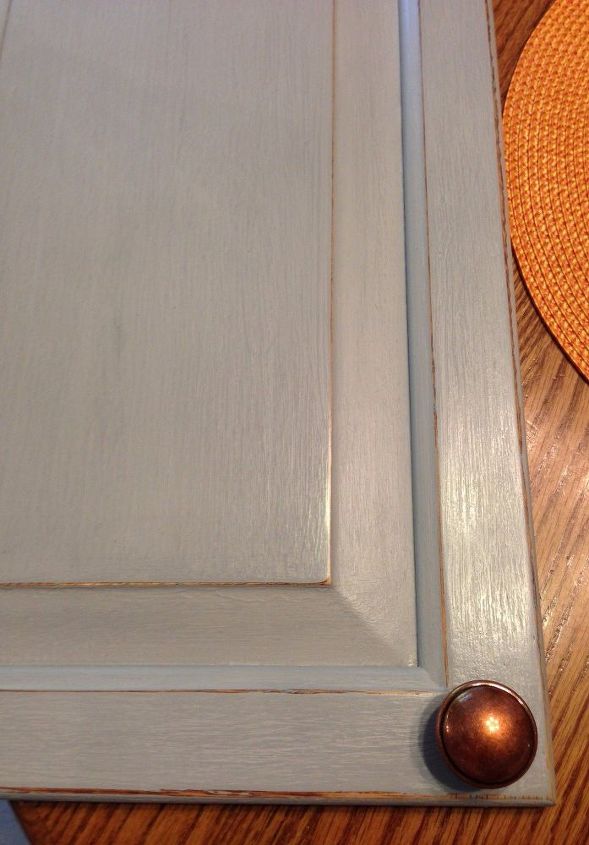
Waxed kitchen cabinet door
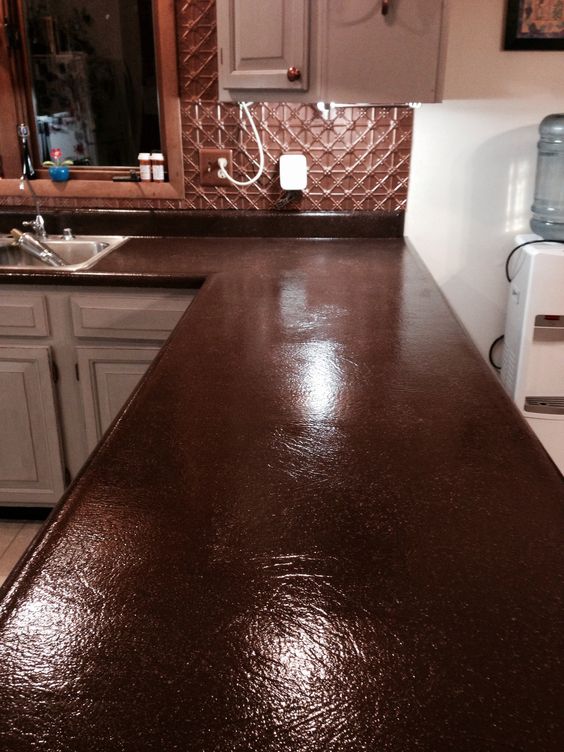
Then, it was onto dealing with my counter tops. Remember, this was the 1980's style. My counter top was a white leather-look laminate which I had pretty much hated since Day 1. We just didn't have the money to spend on new cabinets or new counter tops so I started researching ways to make these counter tops look new again. The product that intrigued me the most was Daich Coatings Spreadstone Countertop Finishing Kit. We used the coffee bean color and this product was and still is amazing. It was a long process but well worth it in the end. To this day, it looks pretty much the same as the day we finished it. It is wearing very well and I am very happy with it. I do not use harsh abrasive cleaners on it, but do use a very light bleach/water solution every once in awhile and liquid kitchen counter cleaners the rest of the time. I am not affiliated with this company at all. I just loved the product and the videos provided to help us use it. Our kit at the time was $125 and we had enough left over to also do a laminated table top we had at the time. I've since noticed they have another type that produces a granite like finish called Mineral Select and I think our choice is even less expensive now than when we purchased it.I thought we would be able to sand it down, but that was wishful thinking. That laminate is tough stuff. So, underneath my lovely counter tops with flecks of colored stone, is an interesting “leather-look”, but it really doesn’t detract from the looks of the counter top at all. Read more about our counter tops on my Pinterest Board. There are more photos available there that really show it off.
We did one last step for our kitchen/dining room. We put down a new floor. We are still loving it. What is really nice about this flooring (Raskins Elevation Vinyl Flooring), is that it is vinyl planks and it is a floating floor. There is no adhesive. The planks just fit together and hold each other in place. We can lift them up and replace one, if needed. We laid them right over our old vinyl flooring. It was not that hard to put down. The worse part was measuring around corners and butting up to walls, but the planks were pretty easy to cut. You just scored them and then broke them off. Hard work again, but worth it.
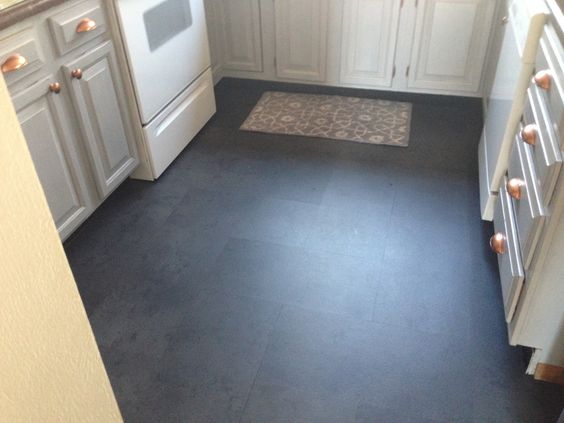
So, for less than $300 plus the cost of a new vinyl floor (which we also are still loving) we had a practically new kitchen that still amazes me to this day. The one thing I didn't mention was our back splash and trim above the cabinets. This is a very unique feature we created some time before our cabinet/counter top project and was quite the project itself.This material is true tin panels. At the time, you could only get this real deal from a factory in Missouri and I think even now. They are hand stamped with a huge press just like they used in the old days. We toured the factory and it was really neat to see. They wouldn't allow photos, though. The tin used in almost every ceiling in the US probably came from this factory. I was originally going to do a white wash, distressing type of thing on it after we put it up, but at the time I couldn't figure out just how to do that. Sooooo, we taped paper all over everything, including the ceiling. Then we spray painted it copper. What a mess! Lesson learned - spray paint before putting up tin. We had over spray everywhere but with some elbow grease removed it. Also, when working with this and cutting with tin snips you have to wear gloves as the edges are very sharp. My husband had many cuts on his fingers (even though he wore gloves most of the time) before the project was over.The last photo shows the kitchen in all it's glory before we put the floor down. You'll notice the original tin color behind the missing oven we took out while doing this project. : ) And, since it took awhile, no cooking at all for me for a couple of weeks. That's my kind of project! : )Be sure to visit our website for more blogs for more step by step tutorials on projects we've finished and many other tips and tricks when using chalk-based paint. http://sharsumpaint.com
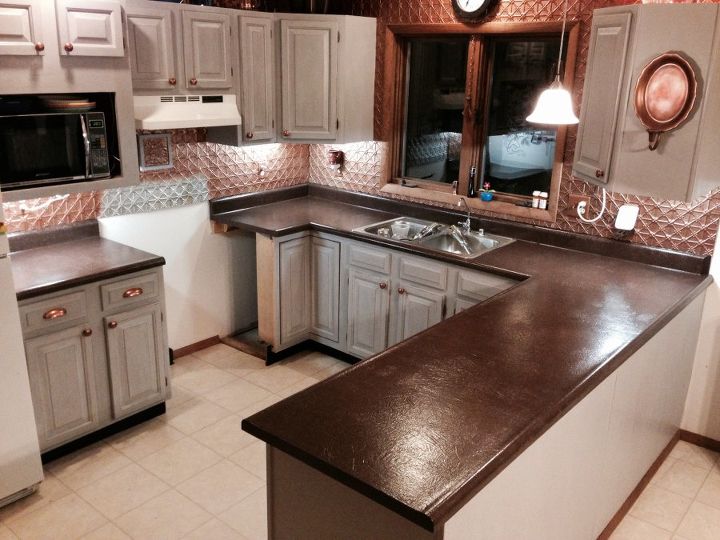
Completed project minus the new flooring
Comments
Join the conversation
4 of 35 comments
-
Definitely inspired..
Thank you...
Denise
-
SIMPLY BEAUTIFUL. YOU ARE VERY TALENTED.


Frequently asked questions
Have a question about this project?
What specific flooring product did you use?
I need to refinish or paint my kitchen cabinets that have polyurethane top coat. How do I remove the polyurethane?
Do I use special paint to cover counter tops?