


How to Create a DIY Outdoor Solar Chandelier

The outside of the house is often neglected when it comes to creating pieces to wow our friends and family. So, this solar powered chandelier is the perfect addition to any summer’s evening sat outside. The project is simple and quick to make and self-sufficient to run. You’ll be able to show off your creativity with the innovative design and actually use the solar chandelier to keep your nights illuminated. It’s perfect for evenings with friends outside.
The materials can be sourced easily and affordably and transformed into something that really adds the wow factor to the outside of any home. Or, you could even mix things up and hang it inside, provided that the solar powered light could be charged. The best aspect of this project is that the items can be found at Dollar Tree, so costs could be as low as $3 for the entire thing.
Tools & Materials
For this project, I used:
- A wire hanging basket from Dollar Tree
- A solar light from Dollar Tree
- Glass gems from Dollar Tree
- A glue gun

Step 1: Gather Your Materials
The first step when creating this innovative and dazzling outdoor solar chandelier is to collect the materials and tools you’ll be using. This is mainly just an idea of how to create the solar powered chandelier and could differ for you depending on any substitutes you make for these materials. So, to begin, I collected a hanging basket for holding flowers, a solar light that would fit into the gap of the hanging basket, and some glass gems.
When selecting a hanging basket and solar light, there needs to be a hole in the hanging basket that can fit the solar light into it. You’ll also need some glass gems or an alternative decoration that might act like the glass gems. You’ll need a glue gun to affix the hanging basket chain, the solar light, and the gems into place – though other strong glues could also work. The best aspect of this particular project is that aside from the materials needed, there is very little in the way of extra tools or extra elements to bring the chandelier to life.
Step 2: Thread Chain Through Basket
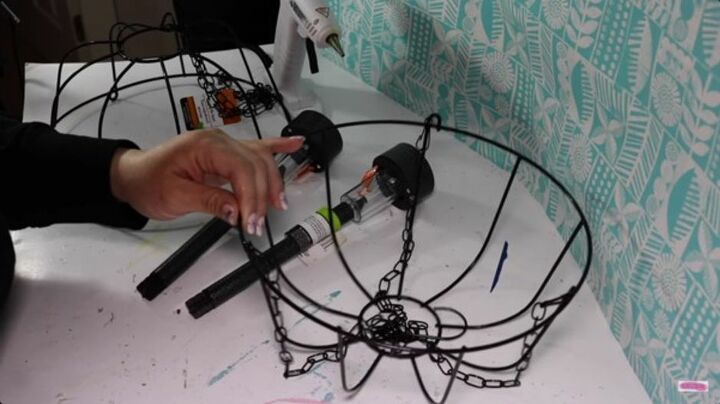
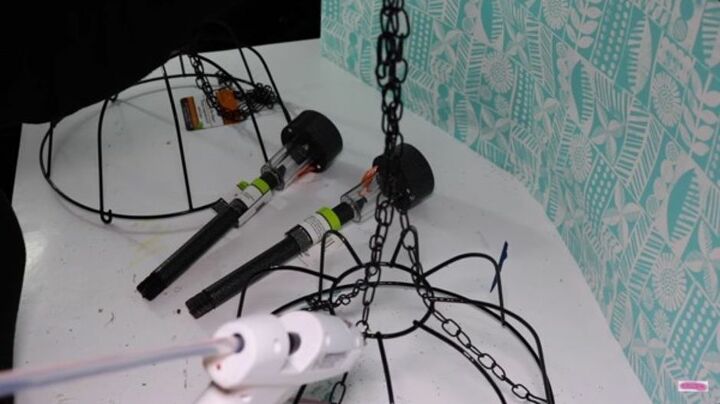
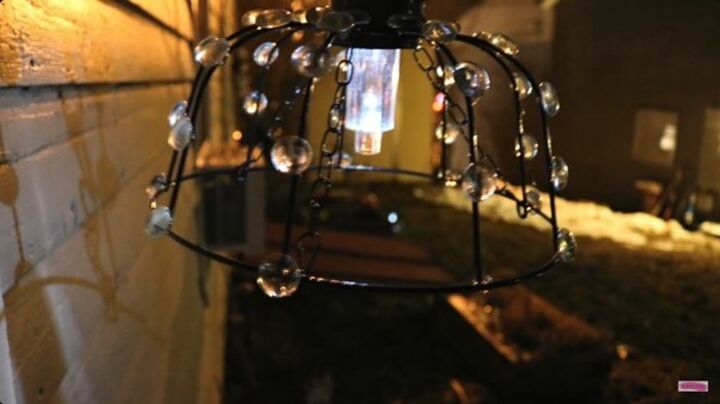
The first step when making the solar light chandelier is to work on the hanging basket. These kinds of projects help show us how simple objects can be given completely new uses. So, to begin, I took a standard hanging basket, that you might expect to plant flowers in, and turned it upside down. The first step is to make sure you have the chain fed through the basket, so it is able to hang upside down, without skewing off to one side.
Simply take the chain and thread it through the bottom of the basket. Make sure that there is no tangling of the chain and that the links in the chain are facing the right way. It should look exactly as it would hanging the right way up, only going through the underside of the basket. To keep the chain in place, I used a glue gun to fix the chain to the basket, which would ensure it didn’t shift in place while the solar chandelier was hanging. Depending on the kind of hanging basket that you get, you might have to change where you glue the chain to. But, it’s important to ensure it is secured in place to give the full effect of the solar chandelier.
Step 3: Attach Solar Light to the Basket
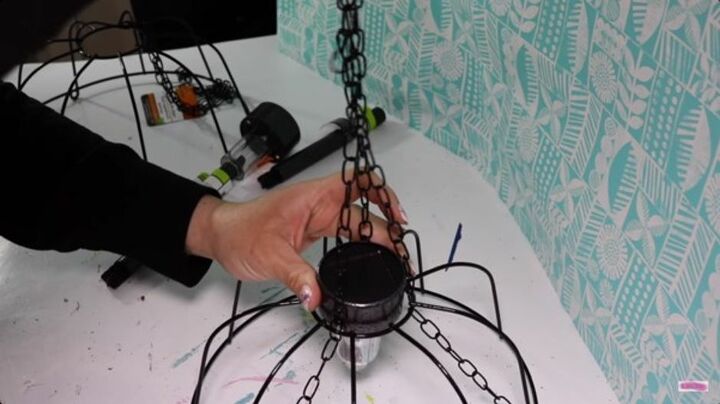
The next stage was to attach the solar light to the upside-down basket. Each basket is different, so when sourcing one it's important that you have this hole in the bottom or at least a gap that could fit the solar light through it. I found a solar light that fit perfectly with the hanging basket. The solar light might have been slightly big for the hole, but that wasn’t a problem.
I used a glue gun to fix the solar light in place. Make sure you go around the entire edge of the solar light to ensure that it doesn’t move once the basket is hanging. The basket will be outside so might be subject to slight winds and rain, so making sure it is properly fixed in place is critical. Once the glue was all around the outside edge of the solar light, I slotted it into the hole of the basket and held it there so that it was fixed firmly in place. The glue shouldn’t take too long to dry.
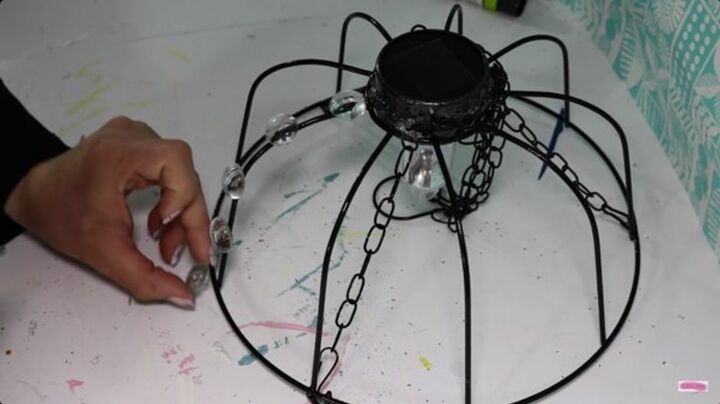
Step 4: Glue Glass Gems onto the Basket
The final stage for this outdoor solar chandelier project is to decorate it. I chose glass gems from Dollar Tree. There are several reasons why they work well. Firstly, they look as though they could be the jewels from a chandelier, so complete the chandelier effect well. Secondly, when the light is on, they help reflect and refract it so that the whole thing looks illuminated. This furthers the effect. Finally, they’re easy to source, fit the hanging basket perfectly, and can be easily glued down. They’re muted enough during the day to also look aesthetically pleasing. Other decorations could be used instead, but glass gems really complete the look.
To affix the glass gems to the basket, I used a glue gun and placed them evenly apart. You could always add more or fewer glass gems, depending on the look you want to go for. To really complete the solar chandelier look, its best to have a selection of glass gems evenly spaced on the basket. Clear glass gems gave the chandelier effect for me, but you could use different colors and mix and match. This could especially be effective if the area you are planning to hang the chandelier in has a dominant color scheme.
Step 5: Hang and Enjoy!
Once you have fixed the glass gems in place and allowed them to dry, it is time to hang the basket and marvel at your creation. The best place to hang it would be where it would attract lots of eyes, but also where you could enjoy it too. This project provides a nightlight at night to add something extra to a garden or porch setting, whilst also providing something stunning to admire during the day. The glass gems work perfectly to catch the light of the sun.
To really impress friends and family, you could make several of these chandeliers in varying colors and with varying colored solar lights. You could string them up in an outside area where you might otherwise hang fairy lights. Alternatively, you could even just hang one outside your door where you might hang the basket anyway. Make sure that the solar light is in a good spot to soak up the sun’s rays so that it stays charged and emits the light at night that makes the chandelier such a special and unique creation.
There are many ways you can personalize this particular solar chandelier project. You can opt for a different kind of basket, perhaps one with more holes for lights. You could change the decoration from glass gems to anything that catches the light. You could even use plastic flowers to give the chandelier a country garden look during the day. The customization will come from whether you intend to use it solely as a chandelier for nighttime, like I did, or you want to use it as a more versatile decoration. The world really is your oyster when it comes to this design, especially with the Dollar Tree’s range of items.

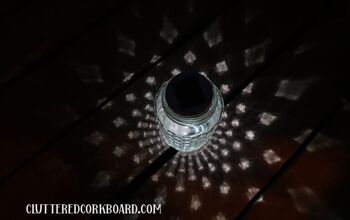
Check out how cool it looks at night!


Comments
Join the conversation
-
I made it shortly after posting and it is hanging over my backdoor (hung it from the gutter). It provides enough light to see to unlock the door. Kept it simple, but, still looks great!
-
I wonder how this would turn out if you wrapped it in rope. I might try this. Making sure not to wrap it tightly but with some small gaps to allow the light to filter through. I have another tutorial saved in which you cut the rim off of 2 of these $Tree planter baskets, join the prongs of both baskets together with electrical tape or black duct tape, wrap the basket in the black poly rope (also from $Tree) or any other rope of your choosing and then use the bulb shaped lights on a small lanyard (from $Tree) . They were for inside lighting but could work on a covered porch as well. They turned out pretty amazing! So I don't see why this wouldn't work outside but with solar lights. If anyone wants to check out the other tutorial I mentioned check out Megan @ Glue Guns and Roses on YouTube. She creates some AMAZING things with mostly $Tree items. Thanks for the inspiration!


Frequently asked questions
Have a question about this project?
Yes I might try this. Just wondering if the hot glue would melt outside in the sun?