


How to Create a Beautiful Decorative Wall Light in Five Easy Steps

Every room needs a piece that jumps out at those who enter it. This decorative wall light is that piece. Not only is it functional, but it can be used to add excitement to almost any room in the house. Friends and family will be impressed with your creativity and even more impressed with how easy and affordable this project was to make. Taking some items you might have lying around, you can add some DIY magic and create this starburst decorative wall light.
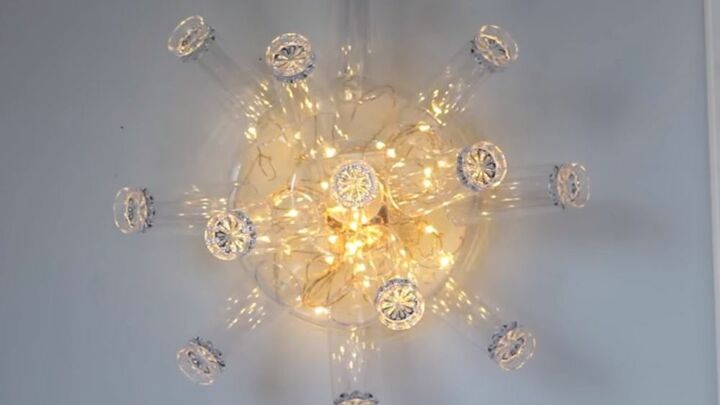
For this piece, I used some LED lights, a plastic bowl, and some glasses to create a chandelier-style decorative wall light. The piece draws attention from anyone in the room, and shows just what you can create if you put your mind to a project. I love projects that get me thinking about how to best put to use things I could already have in the house!

Tools & Materials
For this project, I used:
- Plastic garden/terrarium bowl
- Three packs of six mini cordial glasses
- Glue gun
- Rapid Fuse adhesive
- Magic Night LED string lights
- Picture hook
- Double-sided sticky backing
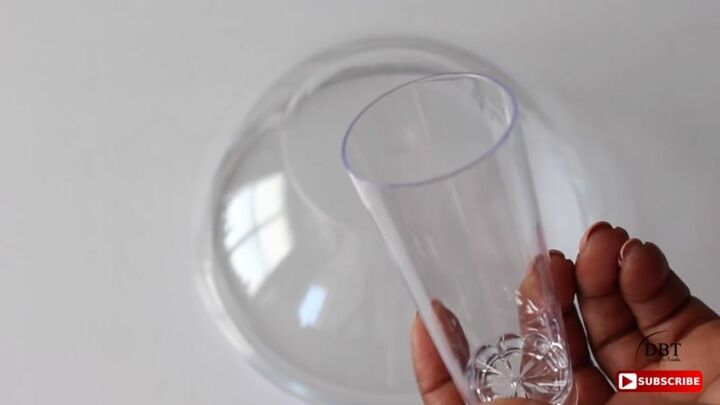
The first step for this exciting project is to source your materials. Depending on where you are, you might end up with different items to me, which would give you a unique and personalized take on the decorative wall light that I have made. Or, you might decide to take a different avenue and choose other items to add to the finished piece or to swap. Essentially, you’ll need a large plastic bowl – I found a garden bowl that is used for terrariums – and some plastic glasses. I chose three six-packs of plastic cordial glasses.
The people at Magic Night were kind enough to send me a remote-controlled LED light. It works perfectly for the piece I am creating, especially as it has a remote, several settings, and has a long-lasting battery pack. This is the key functional part of this project as the light will determine how effective the rest of the piece looks. The light I have has different settings and the ability to be set on a timer, but any string light that is battery powered would do. I opted for a regular string light, but you could choose colored bulbs or even use colored glasses and a colored bowl. That part is totally up to you and your tastes and the room the wall light will go in.
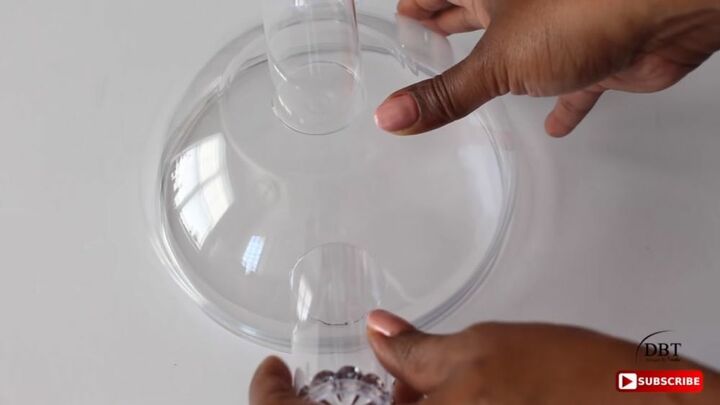
For this step, you’ll be fixing the glasses to the terrarium bowl you have found. So, start by flipping the bowl upside down, so the flat side is facing upwards. The first thing I did was take the glass to be used on the center of the wall light and glue it down to the bowl with Rapid Fuse adhesive. This worked well, but the adhesive wasn’t strong enough to secure the other glasses to the side of the bowl, especially with the angle of the bowl.
So, I fired up the glue gun and layered each glass rim with glue. I began by gluing down glasses at all four compass points of the bowl and then filled in the gaps around them. You can be as particular as you like about this – some bowls might provide space for more glasses. The trick is to place enough glasses around the bowl, but not too many that it overshadows the entire piece. I decided that I wanted a nice symmetrical array of plastic glasses around the edge, but you could place them, really, however you want to. There is a lot of opportunity for personalization with this project!
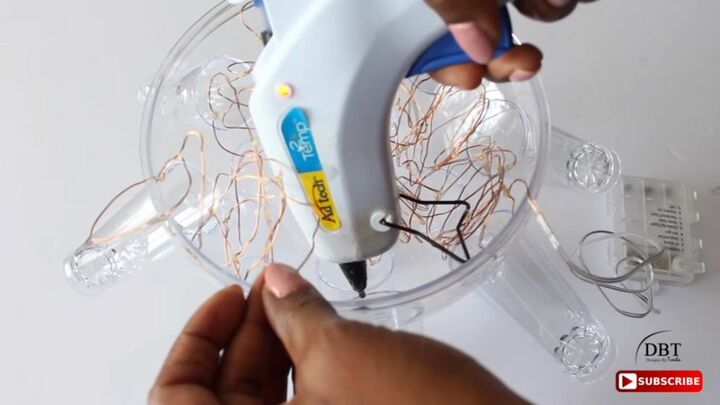
This next step is fairly straightforward, but it is quite final, so you’ll need to make sure you’re happy with the lights you are using. Try testing them inside the bowl in both light and dark environments to ensure that they are bright enough. Find some lights that have a long-lasting battery and preferably some that can be controlled remotely. This stage involves gluing the lights inside the bowl, so there’s no going back after this stage. It goes without saying that it's best to make sure you're 100% happy with your choice!
I liked the way the copper of the string of these LED lights looked inside the bowl. White or black string lights would work too, and it all depends on whether you like the look of them as the project is very subjective.
Get your glue gun heated up again as you’ll need it to glue some of the bundle of lights to the bowl. This helps spread them out once they are inside the bowl, and prevents them from clumping up around the bottom. This also makes it easier to reach the battery pack, by spreading the wires out, should you need to replace the batteries. Make sure that you leave this out of the bowl so that you can access it separately.
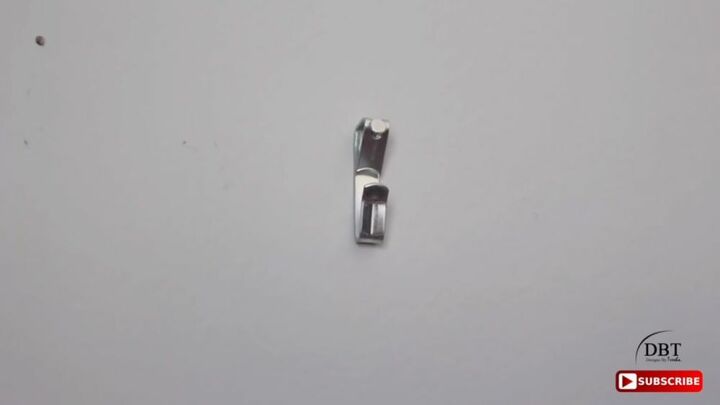
Once you are happy with how the plastic glasses look and are convinced they are securely attached with the glue, it’s time for you to mount the whole thing onto the wall. The steps for this that you might take will differ from mine, depending on whereabouts you decide to place the piece. It can even be hung outside. The best thing is that the edge of the bowl is naturally good at hanging from most picture hooks, so you should have no trouble. Depending on the bowl you chose, you may want to place it differently. The wall light would even work placed on a table or flat surface, or you could even lean it against something.
But, as I created it as a wall light, I decided to attach it to the wall to really show it off. Mount the bowl onto a hook and ensure that it clings to the wall. A nail wouldn’t work unless you could really ensure the bowl wouldn’t be dangling away from the wall, which could ruin the effect of the piece and you also risk it falling and becoming damaged. You’ll also need to accommodate for mounting the battery pack for the lights next to it. I used a strip of adhesive to stick the battery pack to so it would stay fixed on the wall. The trick is to place this so that it doesn’t steal any of the attention away from the decorative wall light.
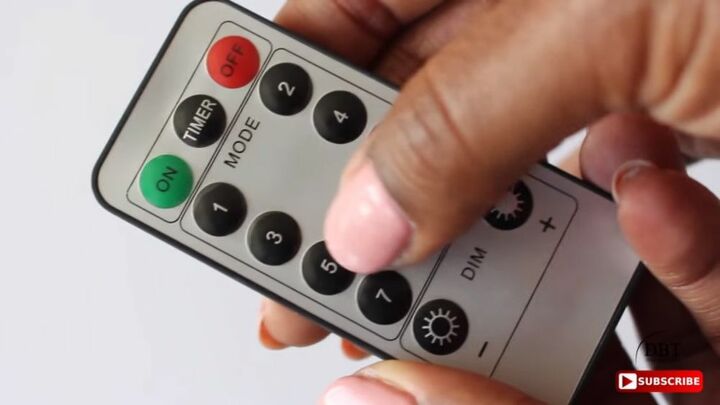
One of the best aspects of this project is that, depending on the type of lights you end up getting, the wall light can be modified to be different depending on the situation. So, if you want to spice up a drinks party, choose a disco-style flashing setting, or you could have it on sporadically for a summer evening outside. You can leave it on a low setting while you relax in the room, using it as a mood light. It would probably work best if the other lights were minimal. The best thing is that, with the remote control from the lights I chose, and the settings available, I could alternate how I wanted it to flash to suit the mood of the day.
For a holiday aesthetic, for example, you could choose colored lights. Halloween, for instance, would benefit from orange or purple bulbs. These lights could then be timed to flash along with any music being played. For Christmas, you could wrap some tinsel around the bowl and the lights could even be made to match the ones on your tree. There is so much scope for this project. It makes a perfect gift and you can even make one for rooms and areas that might not usually have much light, such as your closet or a cupboard somewhere.
This project, in particular, is good for two reasons. Firstly, it provides you with a cheap and affordable alternative to other kinds of lighting. The project is fully functional and can be used in many different settings. The project is also very creative. It shows off your innovative abilities and can be easily replicated. If you were feeling it, you could change almost all the aspects and create something truly unique to fit your mood. You could even enhance the lights or the glasses or bowl to match a holiday, such as Halloween or Christmas. Ultimately, this project is both incredibly creative and yet so simple to create.
If you enjoyed making this project, feel free to show us how yours turned out. Did you follow the steps or did you add elements of your own to make it yours? If you know a friend or family member, or even a fellow Hometalker, who would love to create this piece, feel free to share this project with them!
Resources for this project:
See all materials


Comments
Join the conversation
-
Love this. Could even glue two bowls together at the rims to make a sphere for a hanging lamp. Would look nice in a corner or over an end table or sofa table or even an entranceway. Perfect mood light in the bedroom.
-
Looks great and I have a hallway with NO electrical outlets so a perfect spot for this!


Frequently asked questions
Have a question about this project?
How to pressure wash moldy cement patio to paint
Were you going for the "CoronaViral" look or was that just a something that I saw in it?