


Easy DIY Yarn Macrame Curtain or Wall Hanging

by
Makeful
2 Materials
Macrame has been having a major moment this year! Woven hangings give a texture and warmth to a room that you just can't get with a traditional framed picture or canvas. We decided to do our own take on the macrame movement and DIY a chic macrame curtain using two kinds of knots that look way harder than they actually are in real life.
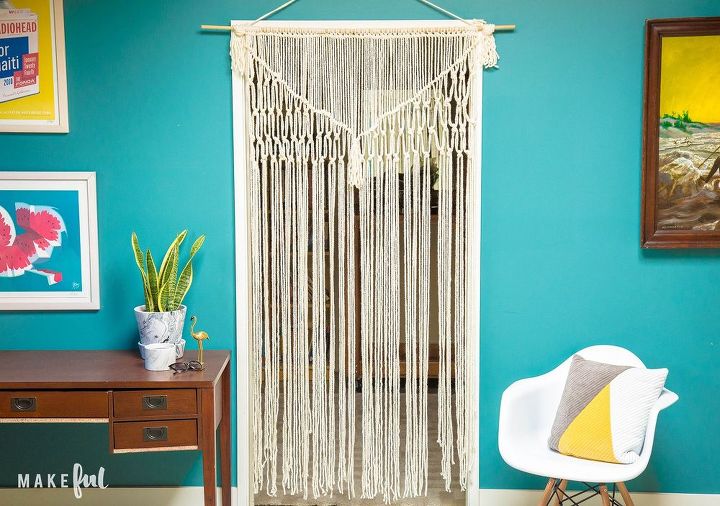
For this project, we swapped out the traditional macrame cord for a softer, thicker natural yarn we had in the studio. We loved the texture and feel of the thick fiber, but an extra plus was that the thickness made the weaving go faster. Although, full disclosure, this project did take a couple hours to complete. But man oh man was it totally worth it!
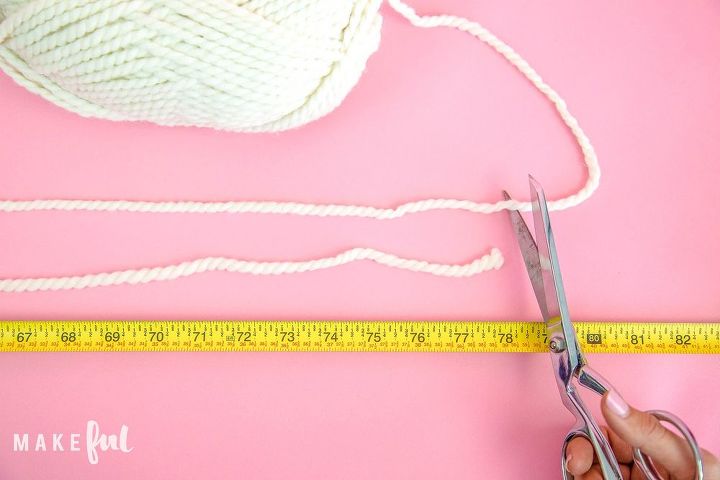
First, measure the doorway or window where your curtain is going to hang. Once you have your measurement, cut a length of yarn twice as long as the length of the doorway. For example, our doorway measured 78 inches tall, so each piece of yarn we cut was 156 inches. You're gonna need a lot of yarn to fill your curtain rod; with our thick yarn we fit about 16 pieces of yarn into one foot of curtain rod and ended up tying about 4 ft, or 64 pieces of yarn. Like we said...you're gonna need a lot of yarn.

Thread the yarn onto the curtain rod by folding each piece in half, tucking the folded loop under the rod, then pulling the ends of the string all the way through. Repeat until the whole curtain rod is covered! (Yeah, it takes a while, but it's SO worth it!).
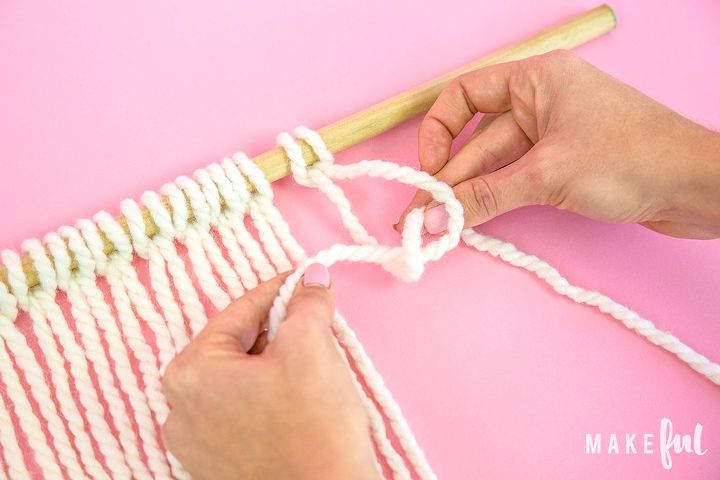
Now were' going to weave the pieces of yarn together across the top of the curtain using what's called a "horizontal double half hitch" knot. It sounds WAY more intimidating than it actually is! If you've ever double knotted your sneaker laces, you can do this knot. All you do is take the outermost string over and under the next cord in to tie a knot. Then repeat so it becomes a double knot.
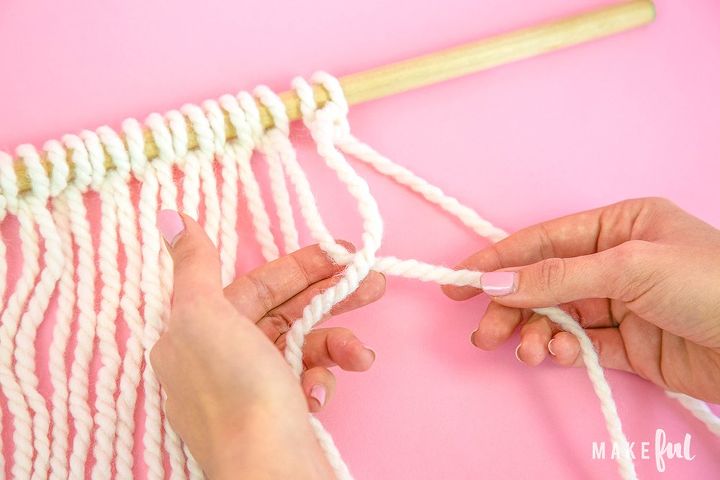
Take the second string over and under the third string in and tie a knot. Then repeat so THAT becomes a double knot. Keep going one by one until you've double knotted the whole length of the curtain.
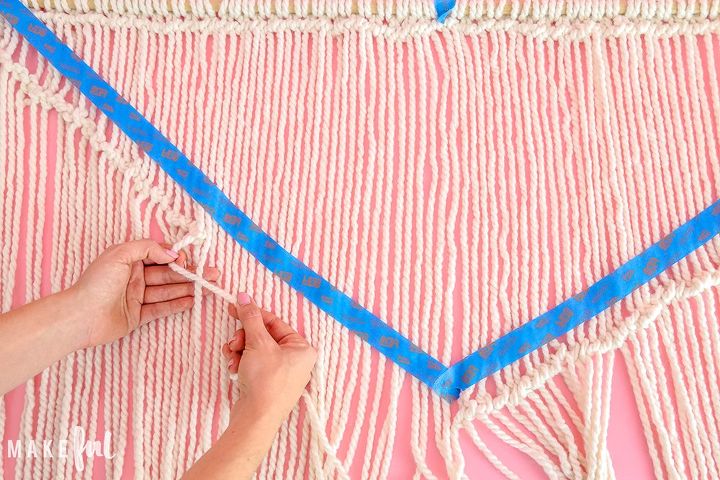
To make the "V" shape in this curtain we're going to do the same exact horizontal double half hitch knot! Use masking tape to give yourself a guide for exactly where your knots will go. The only difference here is that we're going to work from the outside in instead of just straight across. From the right, you'll take the outermost string and loop it over and under the second string. Double the knot and repeat till you get to the middle. Same thing from the left; take the outermost string and loop it over and under the second string. Double knot it and repeat till you get to the middle. Tie it off with a double knot and remove the tape!
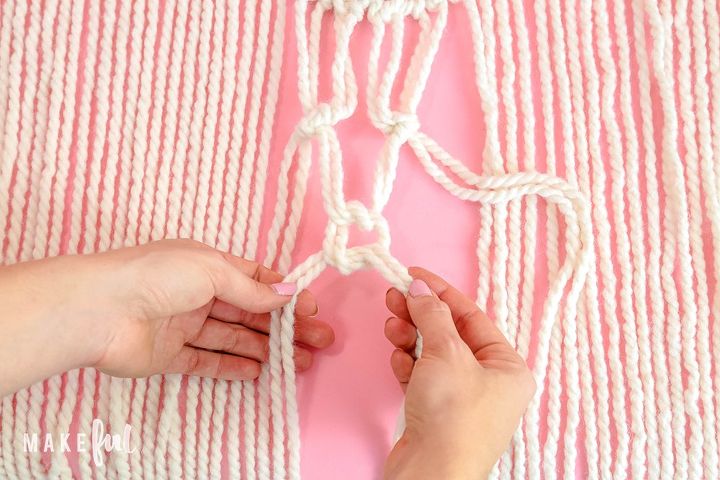
The last knot we're doing is a normal double knot (just like double knotting your shoe laces), except you're going to tie the knots in an "x" pattern". Part the yarn right down the middle so you know your pattern will be centered. Beginning left of center, count four pieces of yarn. Take two pieces in your left hand, two pieces in your right hand, and double knot them about 3 inches down from the "V" shape you made. Then repeat that on the right side of the middle of the curtain; count out four pieces of yarn. Take two pieces in your right hand, two pieces in your left hand, and double knot them so the knot is on the same level as the knot on the left.
You now have four rows of double yarn. Take the middle two rows and double knot them to meet in the middle of the curtain. See the "X" pattern beginning to form? Keep repeating the above of counting out yarn in groups of 4 then joining them to each other and you will soon have this awesome criss-cross pattern without having to get a girl scout badge in knot tying! Continue this pattern for as much of the curtain as you'd like, but do keep in mind that you want to be able to walk through the curtain once it's up, so don't weave too far down.

Time for the finishing touches! We hung our curtain to see how the criss-cross knots fell and then went through and adjusted a few of them to make them nice and even. We trimmed the bottom of the curtain a bit to get rid of any straggly long pieces. Finally, we added large tassels to both sides as well as the center to "tie" the whole look together (oh, geez, I did it again).
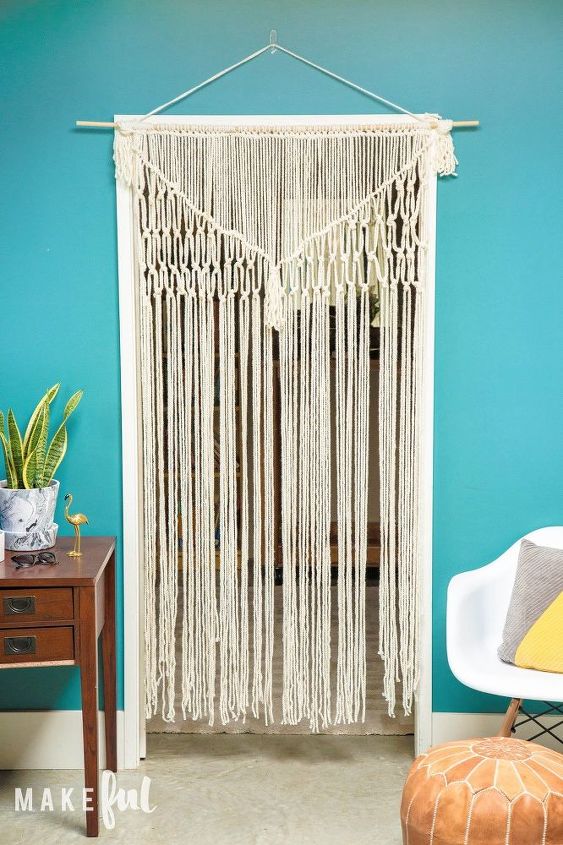
We love our new macrame curtain! Even though it did take awhile to make, it was super affordable and really elevates the whole room. It brings a softness and texture we love and it's a nice twist on the very now design trend of macrame wall hangings. Check out our link if you'd like to see additional pictures of all our steps!


Any price and availability information displayed on [relevant Amazon Site(s), as applicable] at the time of purchase will apply to the purchase of this product.
Hometalk may collect a small share of sales from the links on this page.More info
Comments
Join the conversation
2 of 16 comments
-
Very pretty, I imagine my cat will go nuts with this
-
Going to try for kitchen


Frequently asked questions
Have a question about this project?
It looks like the bottom knot is only about 5'5" from the floor. Is this intended for a child's entryway?
I would love to do this & i too miss the macrame hangins. It will fit my semi-modern mode. How many things of yarn are needed for the measurements you gave? Thanks
So how many skeins of yarn do you need for this project?