


How to Stencil Textured Walls With Embossing Roller & Gold Leaf

6 Materials
Nothing gets us going like some stenciled style and creativity! With stencils, the sky is the limit and the wall is your canvas to create, mix, and layer to your fancy. You can even use a variety of wall finishes to create one magnificent look! Here’s one that we’d love to show you how to do yourself: Customize your wall treatments the affordable way, with rich texture painted any color you like and gilded pattern accents. Click play and watch this DIY stencil tutorial to see how to create this wall finish using Royal Design Studio Wall Stencils, embossing rollers, and gold leaf…
{
"id": "3873103",
"alt": "",
"title": "",
"video_link": "https://www.youtube.com/embed/pKr4-p1T1LA",
"youtube_video_id": "pKr4-p1T1LA"
}
{
"width": 634,
"height": 357,
"showRelated": true
}
Click play to watch this VIDEO tutorial!
Supplies:
- Funky Fibers Wall Stencil
- Royal Stencil Size in Black
- Gold Leaf
- Behr flat interior paint in Merino
- Pure White Eggshell latex paint
- Aquaglaze latex glaze by Faux Effects™
- Large 3” Stencil Brush
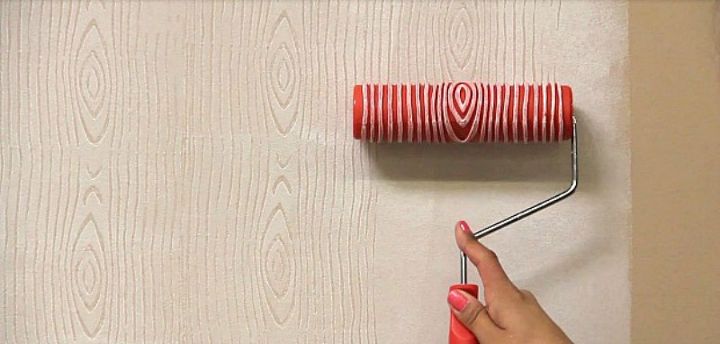
- Woodgrain Art Roller from Artistic Painting Studio
- Painter’s tape, lamb’s wool, foam roller, and 3” chip brush
Step 1: Apply the Behr base color on the wall with a foam roller. Let dry.
Step 2: For this step, you will be working in small 2 feet wide sections over the base color. Use a foam roller to apply 1 part white latex paint and 4 parts Aquaglaze.
Step 3: Use the woodgrain art roller to create a textured pattern on the glaze mix painted section. Leave a wet edge before moving on to the next section to avoid overlapping the texture. Use a chip brush with light pressure to soften the texture as you go. Allow the glaze mix to dry after completely all the sections.
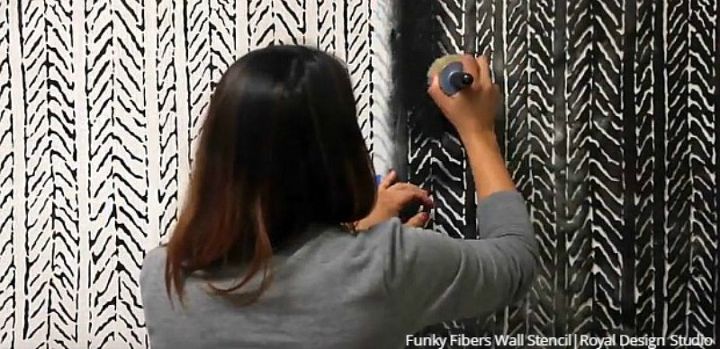
Step 4: Place and secure the Funky Fibers Wall Stencil using painter’s tape. Load your stencil brush with Royal Stencil Size and offload the excess onto a paper towel, then stencil the first repeat.
Step 5: Follow the registration marks built onto the wall stencil to reposition it and repeat Step 4 until the entire wall is stenciled.
Step 6: Repeat Step 4 and Step 5 for a second coat of Royal Stencil Size.
Note: If you are working over a large surface, it’s better to work in small sections to keep the size from drying too much. We recommend applying the second coat on no more than 3 or 4 repeats at a time. You can return to apply a second coat to the other repeats later.
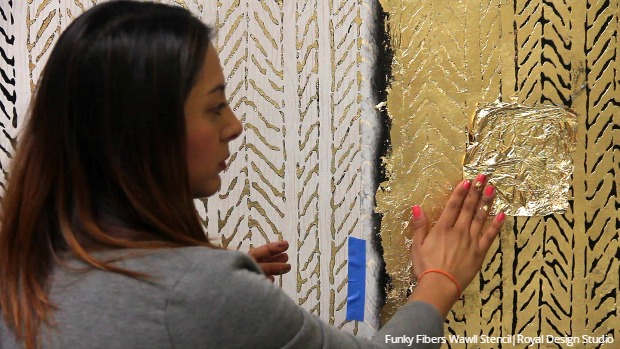
Step 7: Place the wall stencil back onto the very first repeat area, which should now have 2 coats of size. The second coat of size should become tack/sticky in about 15 minutes. Once it is tack, apply loose gold leaf through the stencil design. It’s okay to leave some areas open and without gold leaf.
Step 8: Burnish the gold leaf area using lamb’s wool.
Step 9: Repeat Step 7 and Step 8 until the all the stencil repeats that you’ve applied 2 coats of size. Clean the wall stencil with a scrub brush and dry it before continuing.
Step 10: Return to the repeats that you skipped in Step 6. Repeat Step 7 and 8 so that the entire wall is completed.
Note: If for any reason you feel the size has dried too much and lost its tackiness, you can always apply another coat before applying the gold leaf. Just make sure you give it enough time to become tack/sticky before applying the gold leaf.

“Roll with it” and recreate this exact wall finish yourself OR mix and match other wall decorating techniques to create a unique look! Change up the wall stencil design, wall color, or wall finish… the pattern possibilities are endless!


Frequently asked questions
Have a question about this project?