


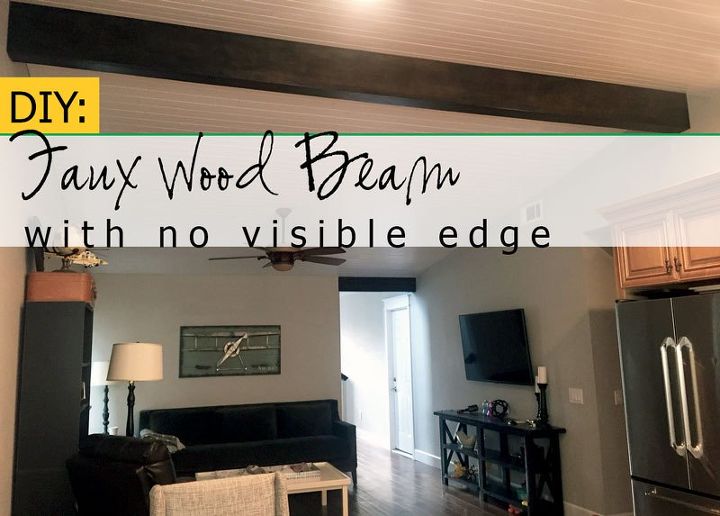
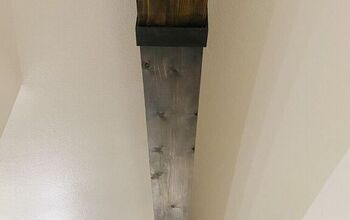
DIY Faux Wood Beam Without a Visible Edge
$50
1 Day
Medium
I’ve seen a lot of tutorials on faux wood beams – there are some great ones out there – but I didn’t see any of them build a beam the way that I did with a veneer. Very few diy’s have dabbled into the world of veneers with edge banding and I’d venture to say most diy’s don’t think of using veneers at all. It’s a shame because they can elevate your end result from just the typical diy grade “home-made”. Using a veneer on your faux beam will get rid of the edges you normally expect when you join the three sides together. I buy mine at www.veneersupplies.com
They are very simple to work with – as long as you are working indoors where the moisture and temperature is controlled.
My veneer was $26 and I only used half of it to make a 14′ x 5″ x 10″ beam. So $13. I’m going to use the other half to make a faux beam over our fireplace. Guess what else? That wasn’t even their cheapest veneer – they have $13 birch veneers – so my cost would have been $6.50 for the faux beam – that’s cheaper than a big mac and fries.
I’m going to write this tutorial as though you are making a 16′ beam – even though mine was 14′ – because the cost is the same and you can adjust your own measurements accordingly.
What you will need for the beam:
1 – veneer at least 11″ x 96″ x 1/42″- you can use the entire veneer for one beam this way
1 – sheet of 3/4″ 4 x 8 PureBond Plywood with a Maple, Oak or Birch Veneer (just buy whatever matches the sheet of veneer you bought) I get my PureBond at Home Depot
1 – 2-3″ wide cheap paint brush
6 – 1/2″ wood dowel or whatever you have around the house cut into 8″ long pieces (this isn’t totally necessary if you have an extra hand to help you when you are putting the veneer on your wood)
1 – quart of DAP Weldwood Contact Cement (you can also use the spray but I think painting it on is cleaner. But if you opt for the spray you don’t need the paintbrush) You don’t use much and the quart will probably last for all of your veneer needs.
KregJig with 35-40 1 1/4″ screws OR 1 1/4″ finish nails and 4 packs of 4″ metal mending plates if you do not own a KregJig.
A bunch of heavy books or weights … you get the idea.
Finishing:
Sander
Sandpaper 150 grit
Stain/paint
Poly or finishing paste
Sharpie – similar color to your stain/paint
To attach the beam to the ceiling:
2 – 2x4x8
16 – 4″ long lag bolts (Mike used 16 I would have used half that…)
2″ long 18 gauge finish nails
whew! Long list but I swear it's takes longer to buy the stuff than build the frame of this beam!
Step 1:
Rip your sheet of plywood to 4 – 10″ x 8′ long boards. This will leave you with a 8″ remainder. Rip that to 2- 3 1/4″ or 2 – 3 3/8″ boards if you’re feeling confident. The 4 – 10″ x 8′ long boards will create the sides of the beam and the 3 1/4″ boards will create the base for the veneer. If your finished beam is shorter than 16′ cut your boards now to finished length.
Step 2:
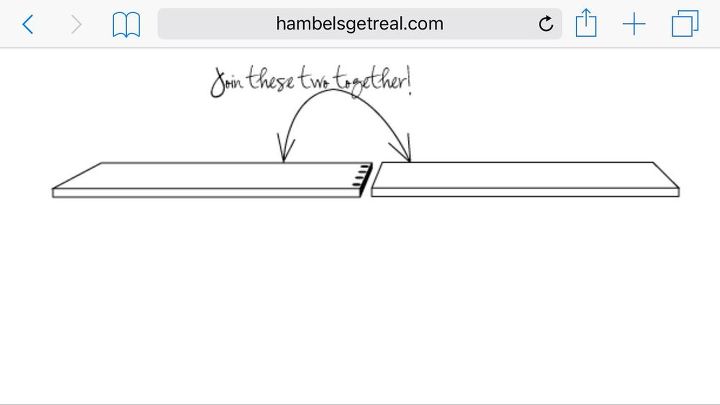
Take one of your 10″ x 8′ long boards and KregJig 3-4 holes on the short end. Basically you are going to butt-join your 8′ boards together to make a 16′ long board. Make sure you used clamps to get as flat of a seam as possible. This seam isn’t visible once it’s in the ceiling but if it bugs you – you can always add some bling to it and cover it up.
Repeat to other two boards.
You should have two 10″ x 16′ long pieces now. Be careful moving these pieces around they aren’t very strong until all three sides of the beam are together. Work on a flat surface – preferably elevated. I put two 8′ long folding tables together in my garage with some plastic sheeting on top.
If you don’t own a KregJig then use 3 mending plates – butt-joining two ends together – use clamps and be careful not to screw all the way through to the other side.
Repeat.
Step 3:
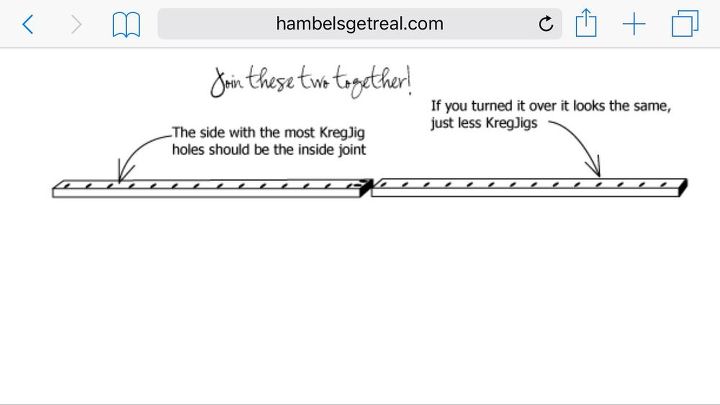
Working along the long edge of one of your 3 1/4″ long piece drill KregJig holes every 8-10″ starting 1″ or so from the end.
Turn it over and do it to the opposite long edge.
Goal: KregJig holes along both edges but on opposite sides. So that if you turn it over the top and bottom of the board look the same with holes along one edge but no holes on the other…clear as mud?
Here’s an illustration to demonstrate:
Step 4:
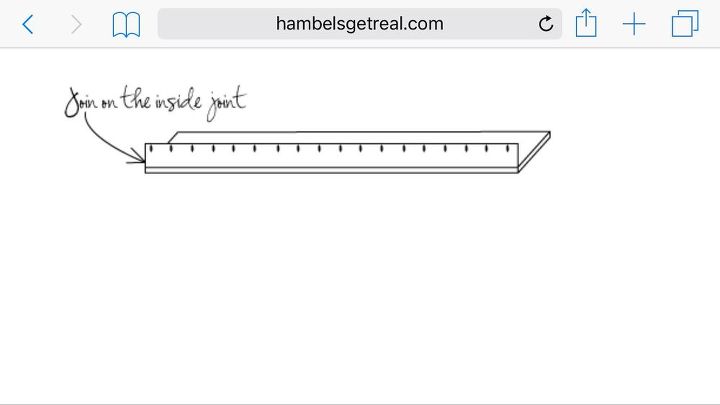
Do the same thing to your other 3 1/4″ board but at the end KregJig two holes to butt-join it to the other board. See how the board on the left in the above illustration has KregJig holes on one end? Go ahead and join them together so that you have 1 – 3 1/4″ x 16′ long board. If you don’t own a KregJig join the two ends with 2 mending plates using the same process as before.
Step 5:
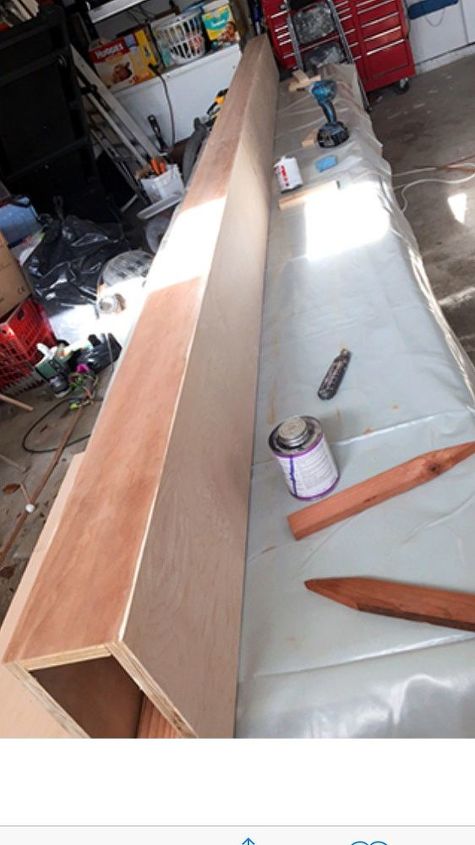
Lay one of your 10″x16′ long board flat on the table. With the KregJig butt-join on top (this way it is inside your beam not on the outside). Place your 3 1/4″ board perpendicular to your other piece to make a long “L“. Make sure you align your KregJig holes to be on the inside joint. The ones on the outside should be in the air on the top. Join the two pieces together at a 90 degree angle being careful to make your seams line up as flush as possible. I used my Kreg 90 degree corner clamp for this – but you can do it without one if you are patient (I guess I’m not patient). This will give you a 16′ – “L“. If you don’t own a KregJig finish nail the two sides to the 3 1/4″ piece so that their exposed sides are flush with the top edge of the 3 1/4″ piece and the 3 1/4” piece sits inside the two – then skip to Step 8.
Step 6:
Lay your other 10″x16′ long board, again with the KregJig’d butt-join up, flat on the table, parallel to your other piece. Take your 2×4’s and line them longways on their short edge on top of your 10″x16′ piece. This will give you support when you carefully – hopefully with another person, flip your “L” on top of the 10″x16′ long board. You are literally just flipping it over 180 degrees – not rotating, just flipping it like a pancake so that the joined 10″ x 16′ long “L” is on top and the unjoined 10″ x 16′ long piece is on the bottom and the KregJig holes on the 3 1/4″ x 16′ long piece are on the outside bottom. Do you see how the 2×4’s act like a resting support for the joined pieces? This keeps the top from sagging and putting pressure on your joints – although it is pretty sturdy at this point.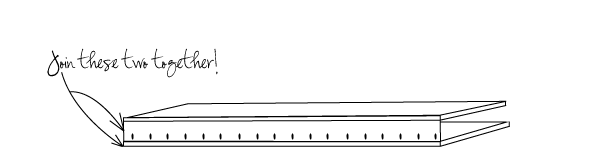
Step 7:
Join the two together. Be sure to get the outside edges flush. When I join long pieces like this I start in the center and work my way out – moving my clamps as I go – checking for flushness (is that even a word?) by running my hand along the seam I am making.
Step 8:
Grab your sander and sand all three sides. 150 grit is good enough. End with the 3 1/4″ x 16′ long section on top. It should be resting on the table like staples in a stapler. This is where you will apply your veneer. Don’t worry about filling your exposed KregJig holes with wood putty the veneer will go right over them – you won’t be able to see even a shadow or outline of them when you are done. Mike’s got the hose of our shop vac attached to my sander with gorilla tape. It’s the worlds best vacuum attachment. Wipe everything down with a tack cloth.
Step 9:
You are now ready to use that veneer! Size your veneer panel up to your 3 1/4″ x 16′ long piece. You will want your veneer to overhang 1″ or more on either side of your beam. Mine was 96″ long so, I cut it in half long ways and laid the other half on top of the beam – butt-joining the two edges of the veneer together and lining the grain patterns. You can use painters tape to hold the two cut edges together. Get your can of contact cement and your paint brush and brush it onto the side of your veneer that will attach to the beam. This stuff is sticky – your veneer edges may curl as the grain expands – don’t worry – just use some scrap wood to keep them from touching. Follow the directions on the can – you are going to let this dry. I used my 2×4’s as a “platform” for the veneer to dry on – you do not want any glued edges to touch anything – your veneer will stick to it then pull apart when you try and remove it from whatever it’s stuck to.
Step 10:
While it’s drying, paint the contact cement onto the 3 1/4″ side of your beam. Wipe up any drips quickly with a damp cloth and make sure to keep dust out of your glue. Let it dry.
Step 11:
When enough time has lapsed for the glue to cure and the surface is just the tiniest bit tacky – not sticky – dry and satin – you’ll know. It is time to join the veneer to the beam. If you are doing this alone use the dowels. Evenly space them along the 3 1/4″ long beam – perpendicular to the beam. Take your veneer and with the glue side down line it back up on top of your beam. Working from the center out, remove your first dowel and press the veneer onto the beam centering as you go and making sure not to create any voids. Do not try and re-position it after you’ve connected the two surfaces together – it’s too late. That’s why it’s so important to center it first, work slowly and be patient. When all the dowels are removed and the veneer is completely attached run your hand over it using a good amount of pressure as you go paying special attention to the edges and curving the veneer over the edges to really seal the two pieces together. You kinda want your veneer to bend over the edges a little to help create a nice “straight edge”.
Step 12:
Lay your “weights” on top of the veneered beam and let it sit overnight.
Step 13:
Using your sander, remove the excess veneer from the edges. Just rest it at an angle over the edge and run it back and forth over the edge until the excess comes off and you are left with a smooth edge. Run your sander over the veneer a couple of times to smooth it out and get it ready for your stain.
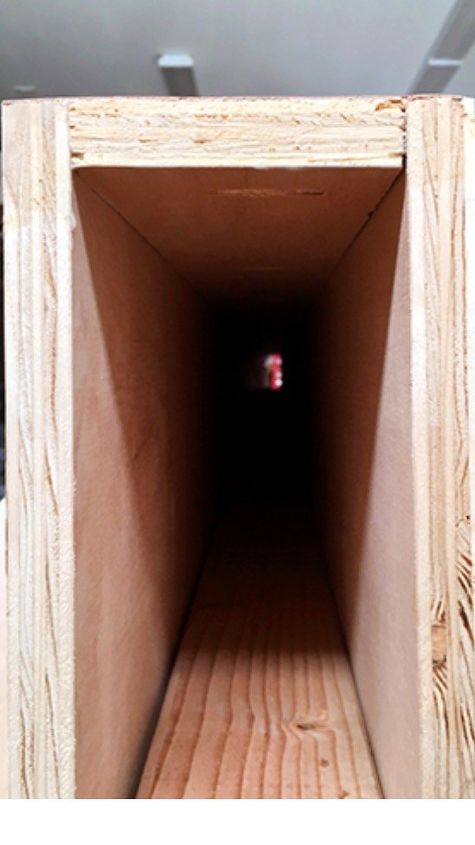
Here’s a close-up of the end after sanding the veneer down. You can see some of those KregJig holes from the inside joint too.
Step 14:
Finish it however you like. I use Rustoleum or Varathane stain. I like to use a brown and a black to get a really multi-dimensional or “rich” black. The two stain colors I used were Dark Walnut and Ebony. I finished with their brush on poly in a satin.
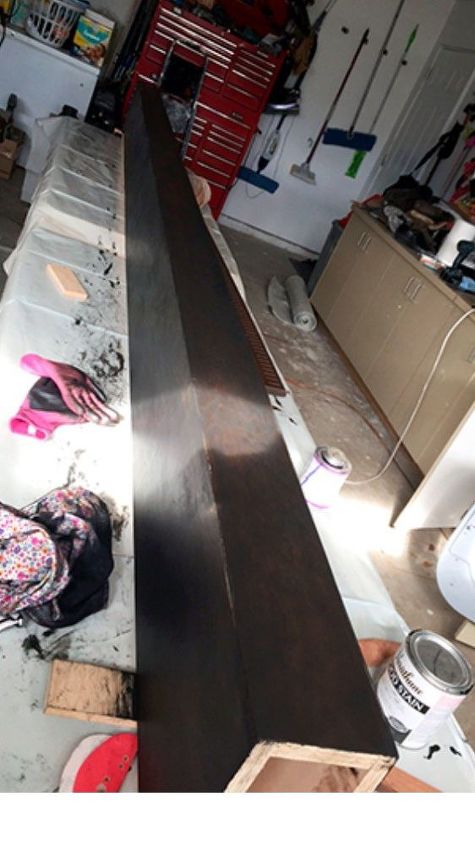
After the stain

After the poly.

Step 15:
Attach the beam to the ceiling. Using a stud finder, locate the center point of your ceiling joists or trusses and note the measurement. Then predrill your 2×4’s with the lag bolts so that when you lift them into place they will line right up with your ceiling joists or trusses (whatever you have). Mike used 2 lag bolts per joist, I would have only used one.
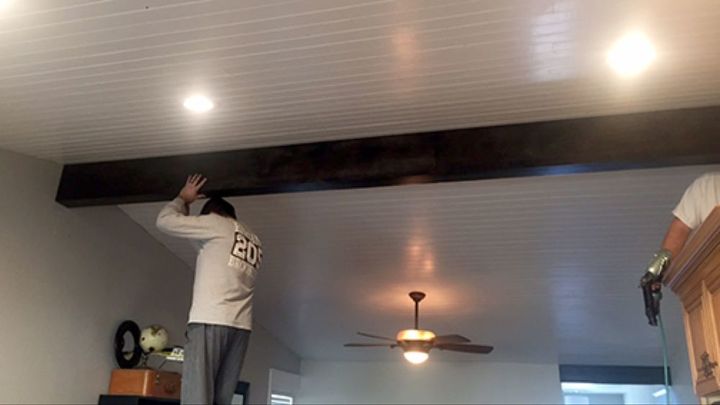
It took three people to lift our beam into place. Two people on either side holding it up and me with the finish nailer nailing it into the 2x’s. Before I put the nails into my gun I colored the nail heads with a black sharpie. I put a nail in about every 4-6″. You can’t even see them. I used 2″ long 16 gauge nails.
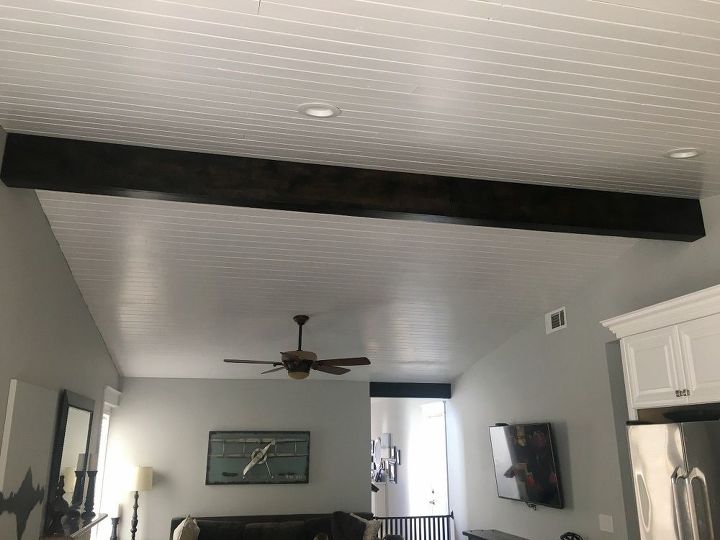
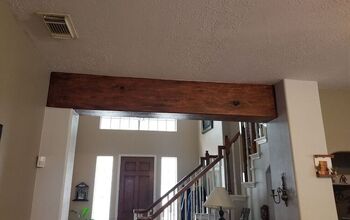
Now stand back and admire your work. I know there are a lot of steps involved – but honestly this is a very simple and quick build. I did the whole thing in two days – including finishing and hanging the beam. Good luck and tell me how it goes!!!

Want more details about this and other DIY projects? Check out my blog post!
Comments
Join the conversation
2 of 4 comments
-
looks so nice!
-
Thank you, it looks great. Thank you for this idea! I was planning on buying some. But now we can make our own and save money. Great job!


Frequently asked questions
Have a question about this project?