


Make Your Own Caged Orb Chandelier, an Easy DIY!

5 Materials
$75
2 Hours
Medium
When my husband and I moved into our Victorian home, the light fixture in our kitchen was very plain and less than to be desired. A light fixture is the 'jewelry" of the room and can quite literally change the entire mood of a space. I knew I wanted to add a sparkly antique chandelier over our kitchen island, but with a modern twist.
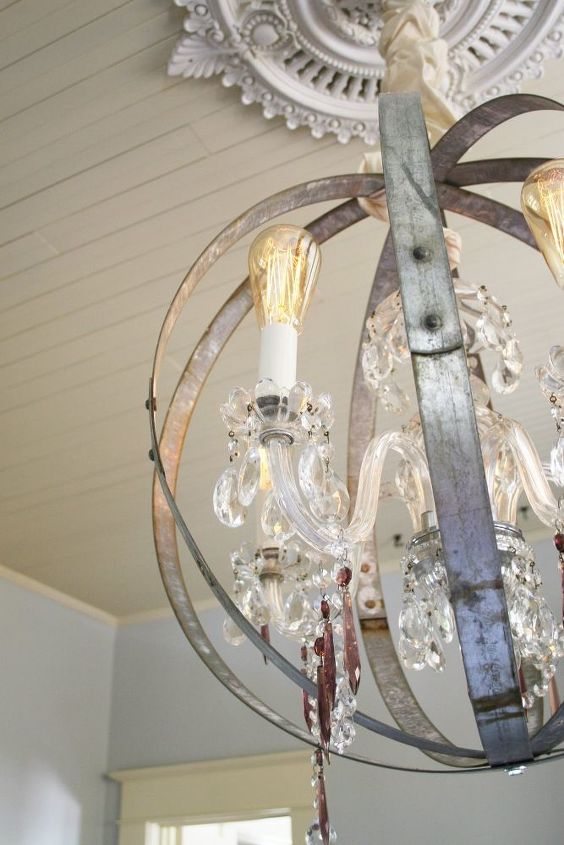
I'm sure you have seen the Caged Chandelier trend in many home decor magazines. It's a unique marriage of Industrial-Steampunk-Glam, and I love it. This look is available at many big box home improvement stores as well as high-end home decor chains, but it can set you back $300-$900 depending on the retailer and materials used.
In this tutorial, I am going to show you how you can create your own unique Caged Orb Chandelier for under $100!
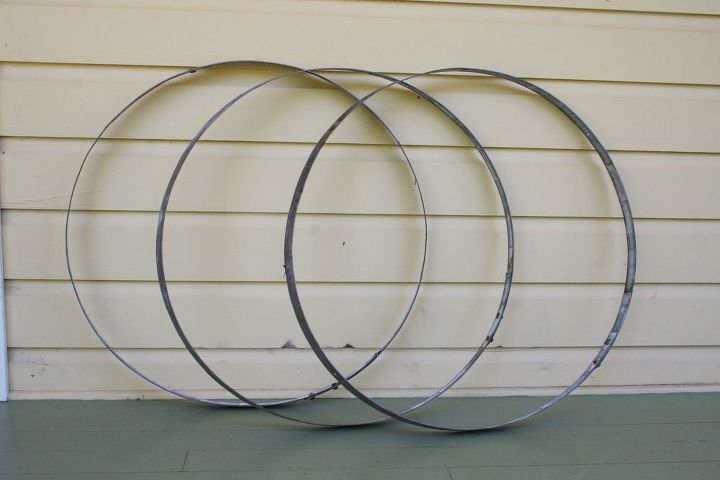
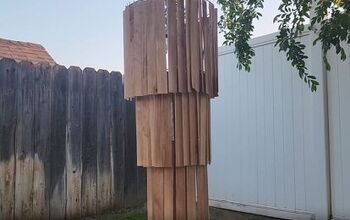
1. Drill a single hole in each wine barrel ring.
-Gather all of the rings and hang them by a secured string.
-Hang a single counter weight from the hanging rings to find the center of each one and mark with a Sharpie. Then drill the additional hole in your marked center.
*I was lucky to have a family friend gift us some vintage wine barrel rings. Although most vineyards part with the cool rusty ones because they can no longer be used, and can be available to purchase!
2. Assemble the orb!
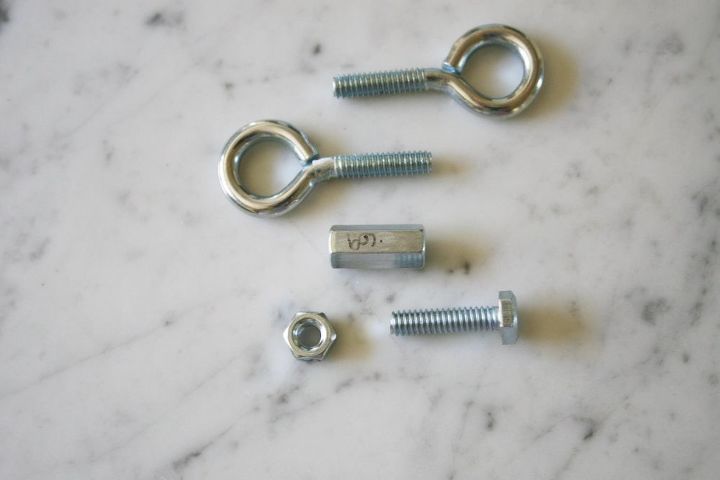
-Now you are ready to put your orb together. All you will need for the top portion are two Eye Bolts and a coupling nut that serves as an adapter for the two bolts.
-Line up the drilled holes and slide your eye bolt through the inside of the orb, then secure with the coupling nut. This will be where the actual chandelier will hang.
-Where the coupling nut is located, at the top of the orb, secure the other eye bolt. This is where you will affix the electrical chain for hanging.
-Line up the bottom drilled holes and secure with a regular flat bold and nut. Once the orb is secure, you can hang the chandelier inside and evenly space out the rings!
3. Wiring the chain light kit.
-Wiring a chandelier is much easier than you might think. Chain light kits are available at most hardware stores for under $15. In this kit, you will find everything you need to electrify the chandelier!
-Match up the positive and negative wires, twist them together and secure with an electrical wiring nut. Then wrap each secured nut with electrical tape, just to be extra safe!
-To hang the light inside the orb, open up one of the chain links with pliers and secure it to the inner eye bolt.
You are now ready to hang your orb! You can cover the electrical chain with a cloth cord cover, if you like. I scored my beautiful crystal chandelier at a yard sale for only $30! I chose to hard wire my light fixture because I wanted to incorporate this beautiful ceiling medallion I purchased from Architectural Depot. I am warning you, this website is a DIYers heaven!
For an easy step by step tutorial, please watch my video below.
Want to see more repurposed DIYs and thrifty decorating tips?
Subscribe to my YouTube channel, The Vintage Bombshell: https://www.youtube.com/channel/UCBE39BZlBFLFdCPsAeb0rsA
Link to Architectural Depot ceiling medallion: https://www.architecturaldepot.com/CM29HY.html
{
"id": "4095263",
"alt": "",
"title": "",
"video_link": "https://www.youtube.com/embed/EyvlGXPfRjo",
"youtube_video_id": "EyvlGXPfRjo"
}
{
"width": 634,
"height": 357,
"showRelated": true
}


Frequently asked questions
Have a question about this project?