


Create RUSTic Textured Designs Using This Technique!

14 Materials
$10
2 Days
Medium
By Peggy Cole of Sandy Porch Studio- WWW.CRAFTINGWHILEADULTING.COM
Have you ever wanted to learn how to add some texture to your wood signs or furniture, but didn’t know where to start? Don’t worry. I have you covered.
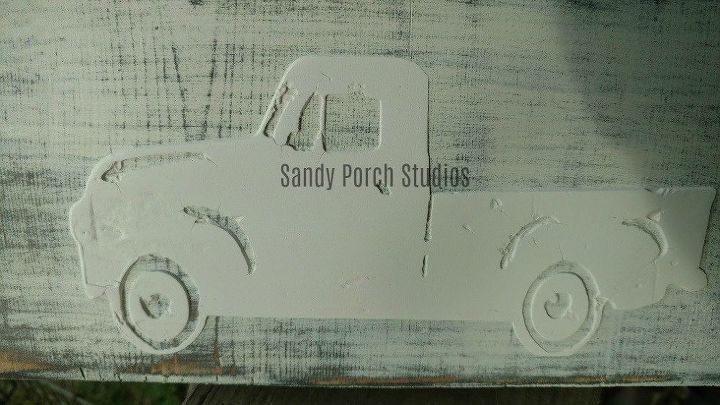
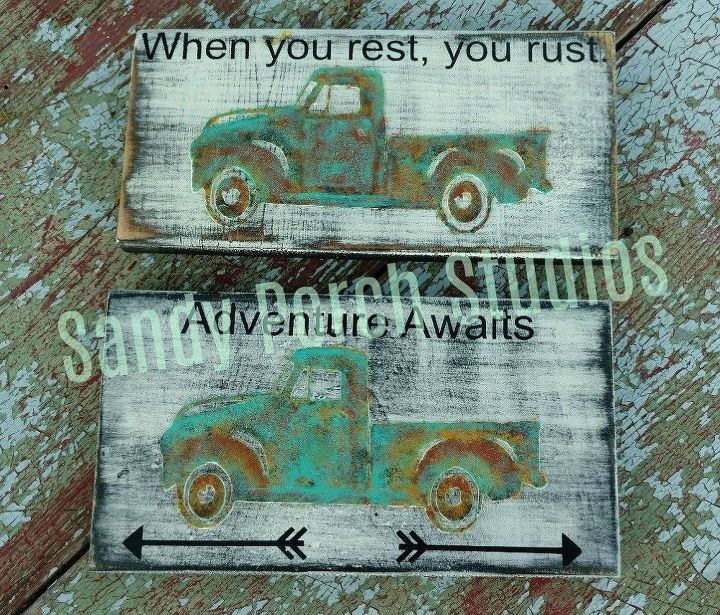
Today, you will be learning how to make your own textured signs using a few simple products! The photo below shows what we will be working on today, but instead of red, we will be working on a turquoise truck! The truck actually has a raised texture, and I will be showing you step by step. Check out the Image Tutorial and Supplies List below!

Supplies List:
Vinyl (or as I use, Contact Paper)
Silhouette Cameo or other Vinyl Cutter
Joint Compound
Soft Sanding Block
Large Fluffy Paint Brush
Turquoise Acrylic Paint (or whichever color you prefer)
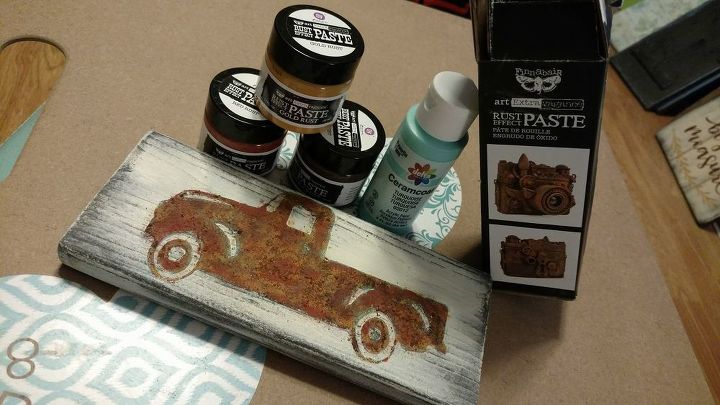
Art Extravagance Rust Effect Paste (Brown, Gold, Red)
Rethunk Junk Gunk
A Few Old Paint Brushes (that you aren’t afraid to ruin)
Good Ole’ H20
Old Gift Card (or Credit Card that you no longer need)
Your Wood Sign Blank
Weeding Tool (or as I use, A Straight Pin)
Transfer Tape/Paper (or as I use, Glad Press n Seal, Yes, I am that cheap, alright?)
Tutorial
Step 1: Cut your stencil material with your cutting machine and weed your stencil. (For those new to cutting machines, that means to remove any parts of your stencil that you won’t be using. I have created my stencil with my Silhouette using contact paper. I use contact paper for creating all of my signs. Yes, I am cheap and will use any hack I can find and make work. I even use Glad Seal and Press instead of transfer paper.

Stencil Medium Applied
Step 2: Apply your stencil to your wood sign using your transfer tape! Try to keep the weeded part of the stencil so that you can use it later see the inner pieces you will need to remove later after the joint compound is applied. Yes, you will have to dig them out with a pin! Sorry, pain but has to be done. Make sure that the stencil is smoothed down to the wood to create a good seal.
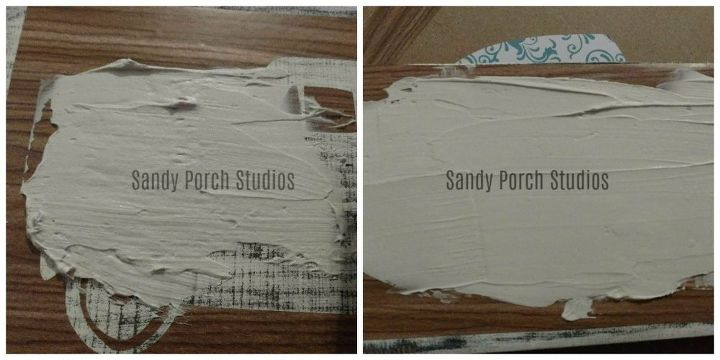
Applying Joint Compound
Step 3: Begin applying your joint compound. I use an old credit card or gift card to apply and smooth as I go. Add a little at a time. You don’t want it to be too thick but not too thin either. This has been trial and error for me. I did start out experimenting with a small square of wood with a simple Christmas Tree. Practice makes perfect, sort of! Cover your design completely with the joint compound. . Don’t worry about the ridges. You will take care of that later.
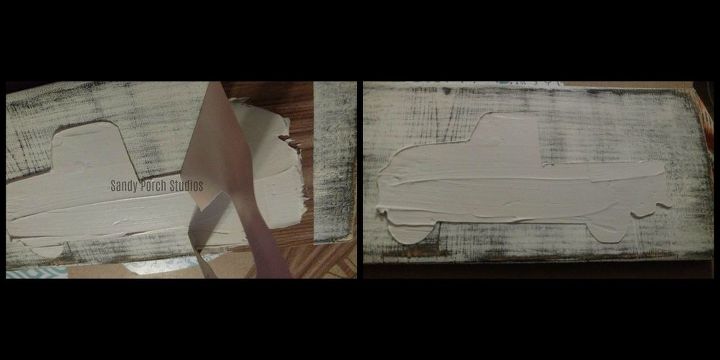
Removing Stencil Medium
Step 4: Now it is time to remove the stencil carefully. Try not to drag the stencil across the design while removing.
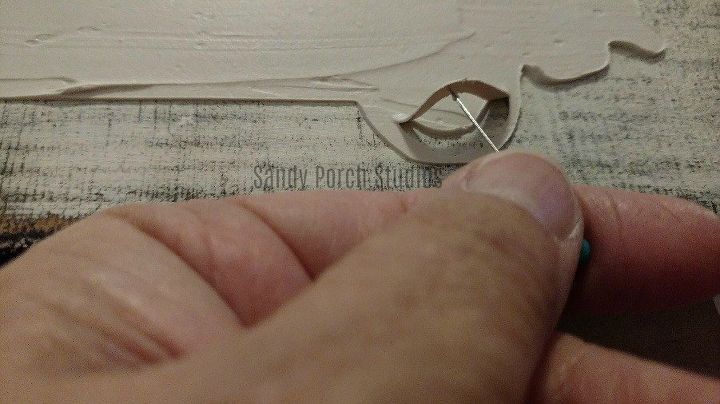
Creating the Small Details
Step 5: Now it is time to weed out the inner pieces. (I apologize ahead of time, as this part can be messy and sometimes frustrating.) I use a straight pin to do this carefully, and yes, you have to dig for them. This is where that piece you saved from the stencil will come in handy to give you an idea of where to dig. Some pieces are harder than others but no worries, mistakes can be fixed later. On top of removing any pieces of your design, you can also add some details, for example, if you check out the photo below, you will see some of the details that I added, such as the separation between the cab and the truck bed. I made the line with a toothpick. You can see the rough edges where I removed the weeded pieces. No worries. That will be removed later.
Step 6: Now it is time to be patient and allow the joint compound to dry. I usually do this overnight. Sometimes you will get cracks in the joint compound as it dries. You can lightly smooth them together if this happens, although a lot of times, it adds to the character of the piece. Humidity can have an effect on the amount of time needed for drying. It is all about “trial and error”. I first started working with texture techniques back around Christmas time when the weather was different. No two signs are exactly the same.
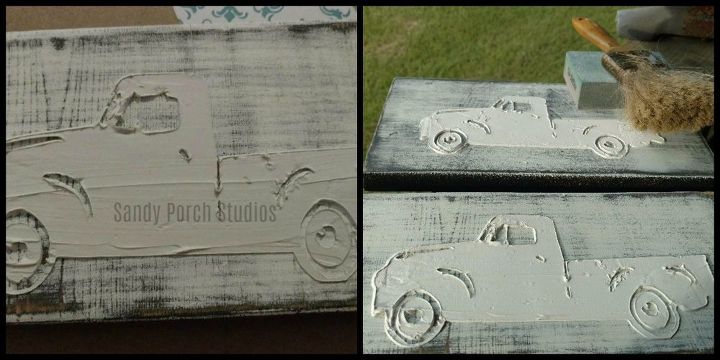
Step 7: After allowing to dry completely, I sand my design with a soft sanding block and I use a fluffy brush to brush away any dust from sanding. Sand away any rough edges, brush away any dust, and then have a look. Continue sanding until you are happy with it. I try to sand in one direction (usually horizontally). You can use sand paper if you don’t have a sanding block (just don’t use a rough grit of sand paper). Don’t worry about any cracks, as they will disappear later.
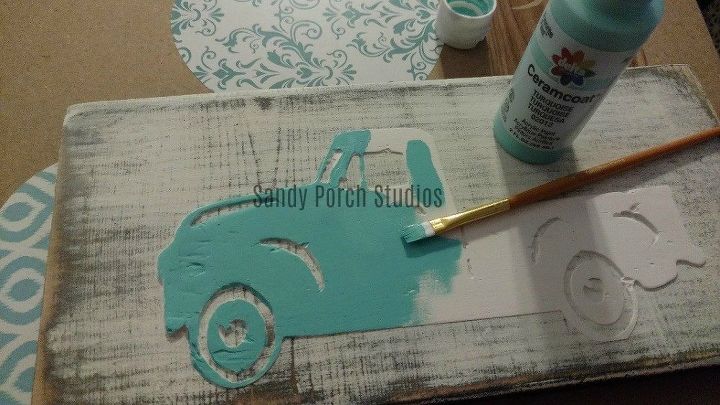
Step 8: Next we need to start applying our base coat of turquoise (or whichever color you prefer to use) acrylic paint. You can use whichever brand of acrylic paint like Rethunk Junk. I applied using a paint brush that I had lying around.
Applying the RUST Paste
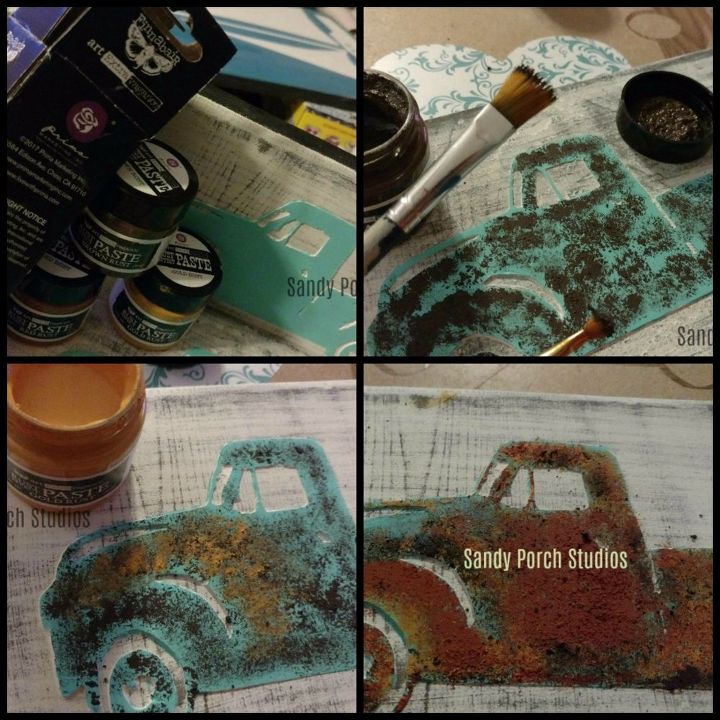
Step 9: Next up we get to begin playing with our RUST PASTE! This stuff is fun to work with and is rather textured (gritty). So be sure to use old brushes that you aren’t afraid to ruin. . I use a small brush to get into the right spaces and then a medium size for the rest. I also use a tooth pick to add the rust in the really small area like the windows and the narrow tire areas. I start with the brown first and just lightly pounce it on leaving the turquoise showing through. Wipe your brush with a paper towel in between colors. Don’t clean with water. You may have to wipe the brush while using the same color as the brush gets really fluffy with grit. Next add in the gold color, adding it in places over the brown. After the gold move on to the red rust color. If you get to much of a color simply go back and add more of another color. Just work until you like the look.
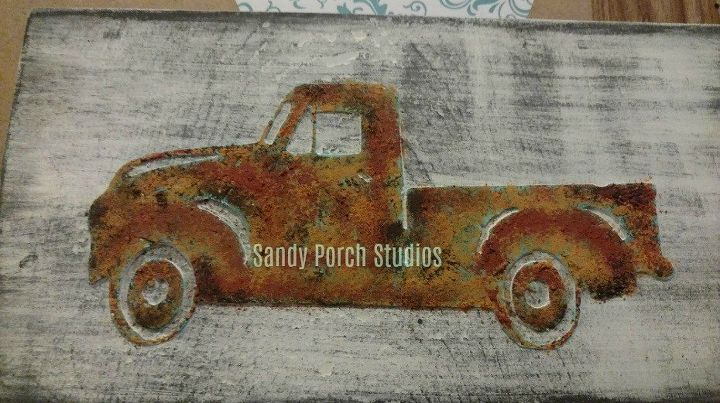
Step 10: Now that all of our RUST PASTE has been added, we can go back with our turquoise paints and add some more color to our truck. Afterwards, you can seal with the Rethunk Junk Gunk! It is WAY better than Mod Podge and is just plain wonderful. See the finished photo below! You can add words or sayings to your signs, or just let the truck speak for itself!
What do you guys think of this project/tutorial? If you loved it, please share with others by pinning it to your favorite board, or sharing with your favorite crafty social media groups! Tell them “Peggy Cole Sent Ya!” While you are at it, be sure to check out more of my textured designs on my facebook page!
***Any of the Supplies Links listed below will take you to where you can purchase these items! There may be affiliate links on this page. That does not mean that it will cost you any extra to use them. It only means we may receive a small percentage for the referral. These funds make it so that we can continue to make awesome tutorials for you!


Frequently asked questions
Have a question about this project?