


Useless Box

by
NerdyKat
$15
22 Hours
Medium
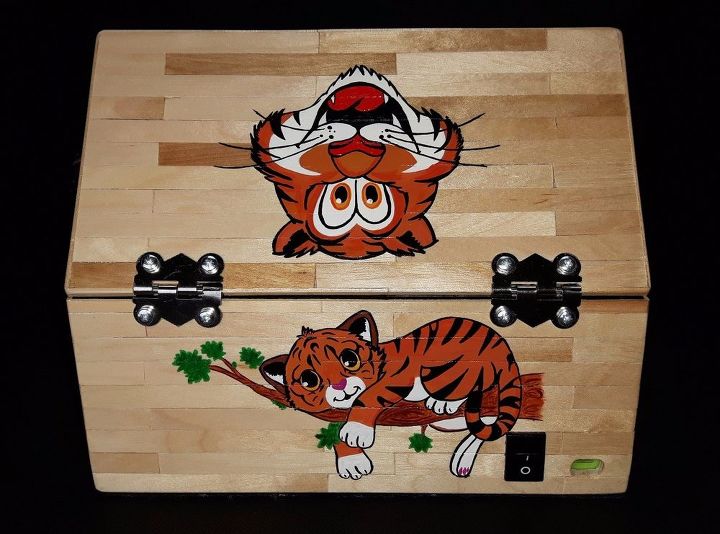
I decided to make this useless machine as a gift for my little nephew. I had a lot of fun making it and he really liked it. It took about 22 hours to make and if you would like to make one too then here goes:
Materials:
- glue stick
- 2 x 3mm MDF (mine were 305mm x 305mm MDF sheets)
- wood glue
- 200-300 lollipop sticks
- 2 hinges
- 8 M3 bolts and nuts
- 2 x Futaba S3003 servos
- hot glue
- toggle switch
- power bank
- ON/OFF switch
- Arduino mini (or wannabe in my case)
- 10K resistor
- wire
- heat shrink
- plush toy
- vlecro
- black felt sheet
- acrylic paint
- spray lacquer
Tools:
- jigsaw (+modelling jigsaw)
- sander
- mitre block + hacksaw
- small chisel
- files
- clamps
- drill
- screwdriver
- hot glue gun
- scissors
needle + thread
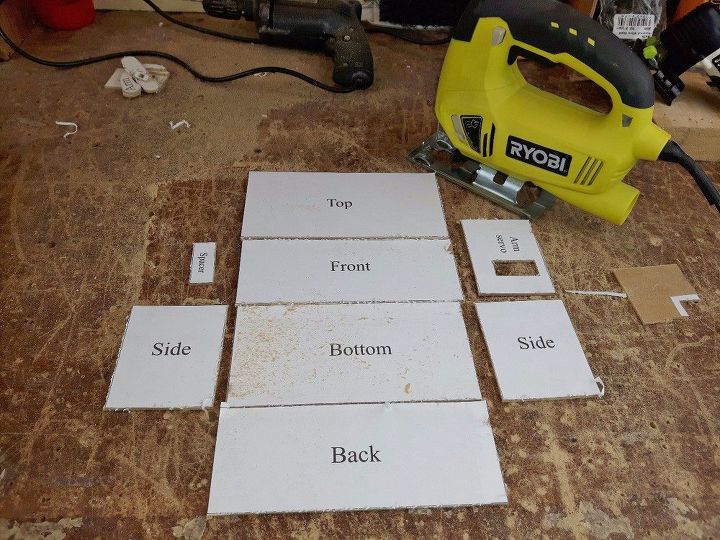
First of all I made a cardboard prototype, just to see how everything would fit together. Following this I proceeded to create a template for the box and arms. Feel free to skip this and just print out the template I provided.
Attach the template to the MDF sheets with a glue stick and cut out the pieces with a jigsaw. Sand the sides of the box and glue it together with wood glue. Sand again once dried.
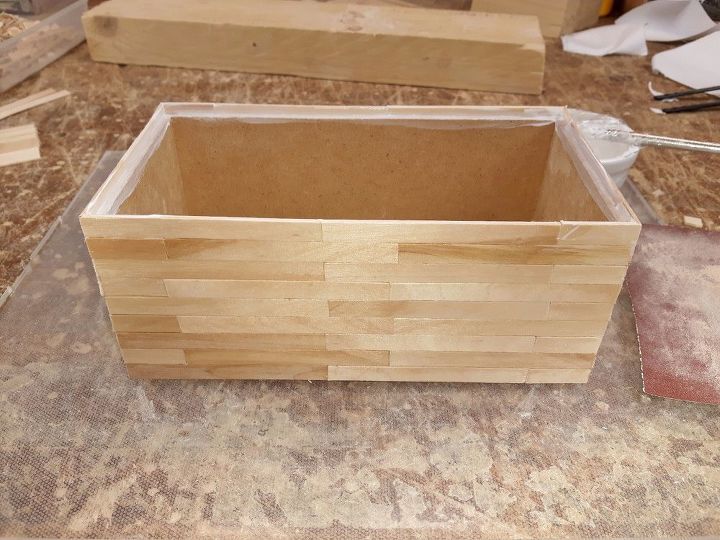
Take a bunch of lollipop sticks, place them into a mitre block and cut off the ends. Apply wood glue to the bottom of the box and start placing the lollipop sticks tightly next to each other, just like you see in the photos. Let it dry. In the meantime you can carry on with the top of the box in a same way. Once fully dry, cut off the edges with a hacksaw.
Cut a bunch of lollipop sticks at an angle in the mitre block for the corners and carry on attaching the sticks around the box. Glue one row of sticks on the sides of the top part of the box. Let it dry.
Once dried remove the excess sides of the sticks with a small chisel and sand the box.
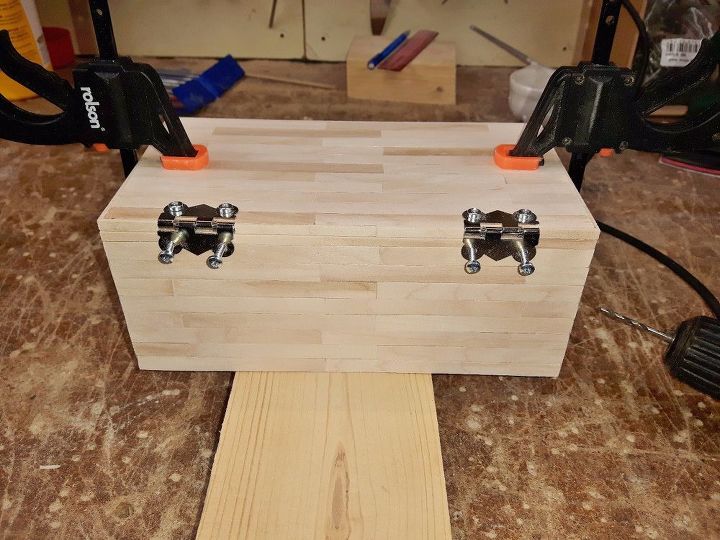
Mark the position of the hinges and cut the gaps with a jigsaw. Close the box and put the hinges in their places. Use clamps to keep the box shut and drill holes for the hinges. Clean the holes.
If your bolts are too long like mine, shorten them with a junior hacksaw and file them afterwards. Place the bolts into the holes and tighten the nuts.
Join the two arm and hand pieces together with wood glue.Once dried sand them over and glue together. Find a central position for the toggle switch, drill a hole and screw the switch in. Sand again all of the pieces including the box with a fine grit sandpaper.
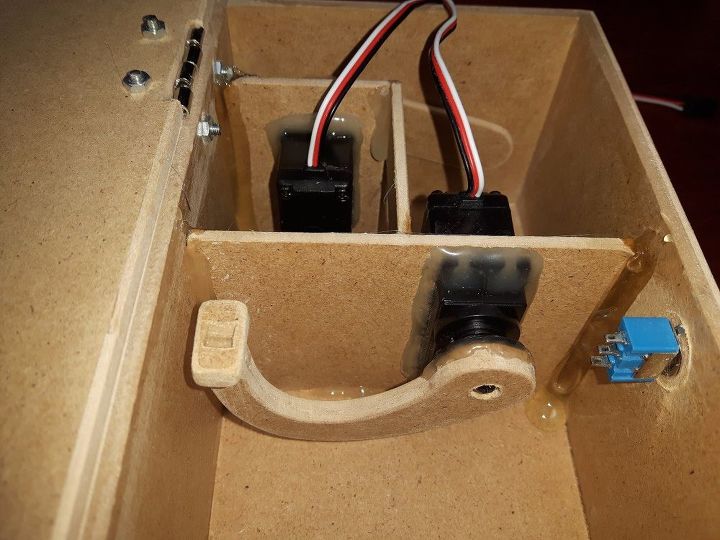
Drill a hole in the arm and door opener and attach the servo disks with hot glue. Place the servos into the MDF holders and glue them in. Glue the holders together with the spacer just like you see in the photos.
Screw the arm and door opener into the servos. Position the whole construction in the box and glue.
Remove the top and insides of the power bank and mark the position for the USB cable hole. Using a ruler transfer the measurements to the outside of the box. Drill a couple of holes in the marked position and file until you can fit the USB cable in comfortably.
Drill and file another hole for the ON/OFF switch.
Upload the code to your Arduino mini using the CH340G USB to Serial adapter.
Solder two wires onto the ON/OFF switch and push it in its place. Apply heatshrink to all of the solder joints as you go. Solder one of the switch wires onto the positive battery line (should be marked on the power bank PCB, if not find out with a multimeter) and the second to the Arduino VCC pin. Solder another wire onto the negative battery line and Arduino GND.
Attach another two wires onto the toggle switch and solder one of them to the Arduino VCC. Join the end of second with a 10K resistor and another wire going to the Arduino pin 2. Attach another wire to the end of the resistor and Arduino GND.
Both servos are powered from the Arduino itself, so strip and solder the positive to the VCC pin and negative to the GND pin. The arm servo signal wire is connected to the pin 10 and door servo to the pin 9 on the Arduino.
Now would be a good time to test everything and make sure the code doesn't need adjusting.
Tidy the wires around the box and glue them in place. I wanted to paint over the Arduino so I placed a piece of transparent sheet over and glued it in.

Take your plush toy and detach the limbs. Remove the stuffing. My plush toy was one of those microwavable toys so I only had to remove the stuffing from the limbs. Join the two arms together into one longer "sausage".
Pull the fluffy cover over the arm and add some stuffing to make it look a little more natural. Stitch the bottom shut. Do the same for the door opener.
Later on I decided to make use of the tale and sewed it over the top of the door opener.
Stitch the limb holes shut. Saw a piece of velcro to the animals head and glue the other piece onto the top part of the box.
Attach the bottom part of the plush toys body to the bottom of the box with hot glue.
Apply a layer of wood glue onto the bottom of the box and attach a sheet of felt. Cut around it.
Cover the animal in cling film to prevent any accidents while painting. Paint the inside of the box with a black acrylic paint.
Find a few easy to paint pictures online, print them out and transfer them onto the box with a carbon paper.
Colour in with acrylic paint. Start with larger areas and finish with small details. Once the paint has dried spray the box with a lacquer.
Something I didn't realise before I started is that the power bank that was originally designed for a mobile phone has an overcharging protection circuit. Meaning when I leave the box for a few minutes switched on without pressing the button it will shut itself down completely. I would then have to press the ON/OFF switch to reset the circuit in order to bring the box back to life. Even though this could be a little annoying for my nephew I quite like it. There will be plenty of times when he won't be playing with it and I doubt anybody will remember to turn it off when not in use.
For more photos, template and code go to https://www.instructables.com/id/Useless-Box-4/
{
"id": "4131743",
"alt": "",
"title": "",
"video_link": "https://www.youtube.com/embed/aSUnev7w89s",
"youtube_video_id": "aSUnev7w89s"
}
{
"width": 634,
"height": 357,
"showRelated": true
}
Comments
Join the conversation
4 of 80 comments
-
I absolutely LOVE this! You are so very talented.
-
Made me laugh
 you are very talented and creative


Frequently asked questions
Have a question about this project?
You are a mad scientist! But one with an unbelievably creative mind!! Did you happen to go to art school perchance?
This is a cute idea, but lollipop sticks are round and made of paper. Don't you mean that you used Popsicle sticks? Actually to me they look like tongue depressors.
Can someone give me the dimensions of the box.