


Branch Out and Stencil a Tree Wallpaper Look (Video Tutorial)

Are you still foraging for wallpaper to decorate a favorite feature wall but can’t seem to find the PERFECT one? Forget the hassle of finding the wallpaper that perfectly fits your style! Branch out and be creative in your decorating by creating your own custom wallpaper look with Wall Stencils. Unlike traditional wallpaper with set designs and set colorways, Wall Stencils allow you to use any color scheme you would like and even add personal finishing touches. We want to show you how we painted the perfect tree wallpaper look using the tree branch wall design from Bonnie Christine Designer Stencils. Of course you can change up the colors and texture for your own unique spin! Click play to watch this DIY stencil tutorial to see how to stencil a custom wallpaper look of your own.
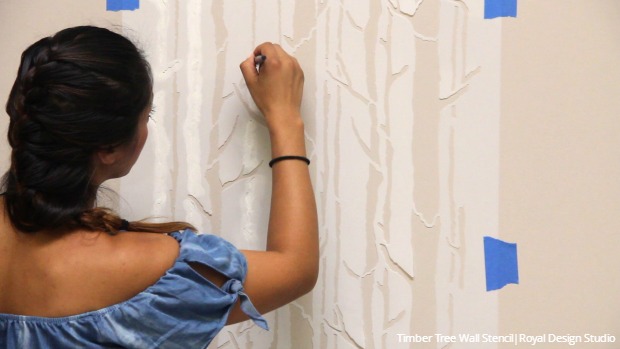
Supplies:Timber Tree Bonnie Christine Wall StencilAnnie Sloan Chalk Paint®: Coco, Old White, Antoinette, Scandinavian PinkRoyal Stencil Brushes: two ½” and one 1”Sea sponge, painter’s tape, paper towels, levelStep 1: Paint your accent wall with a base coat mix of 1 part Coco Chalk Paint® and 1 part Old White Chalk Paint®. Allow to dry.Step 2: Use a level and painter’s tape to place and secure the tree wall stencil to the top center of your accent wall.

Step 3: Load the ½” stencil brush with Old White Chalk Paint® and offload the excess paint onto a paper towel. Stencil every other small tree branch in the stencil pattern repeat.Step 4: Load another ½” stencil brush with Antoinette tinted with a little Scandinavian Pink Chalk Paint® and offload the excess onto a paper towel. Stencil the medium and remaining small tree branch designs.Pro Stencil Tip: Protect the branches you don’t want to paint by masking them off with painter’s tape.Step 5: Load the 1” stencil brush with Coco Chalk Paint® and offload the excess paint onto a paper towel. Stencil the 2 large tree branch motifs in the stencil repeat.Step 6: Remove and reposition the stencil using the registration marks built right onto the stencil. These marks will help you align the stencil perfectly to the next repeat every time.Step 7: Repeat Step 3 through Step 6 until you repeat and stencil the entire accent wall.
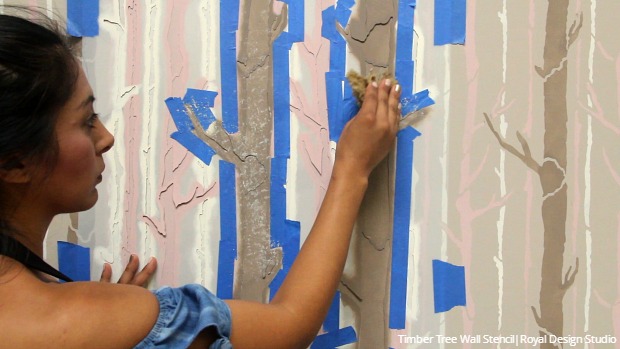
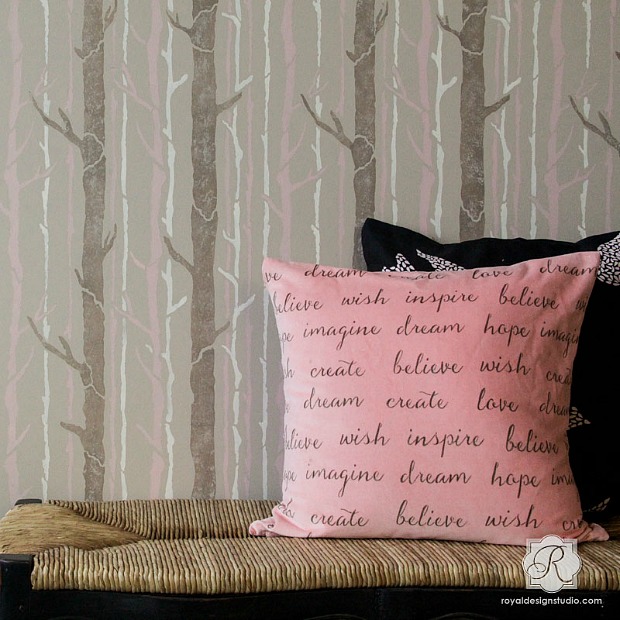
Step 8: Replace the tree wall stencil back onto the very first repeat. Use painter’s tape to mask off the areas around the large tree designs. Load a damp sea sponge with the base coat color and offload the excess paint onto a paper towel. Dab the sea sponge onto the large tree branch designs that you painted with Coco Chalk Paint® earlier. This will add beautiful texture. Repeat this step with the entire wall. Your tree wallpaper design is now finished! Tree-rific!
Comments
Join the conversation
-
Love it! Kudos to the nth degree!
-
Very nice. I really like the outdoors effect and you've done it in a way that you can still hang a few pictures if you wish.


Frequently asked questions
Have a question about this project?
The way your project is posted bere among the ads, I almost missed it, which I believe everyone has, if your number of "wow's" is any indication! I love it! Fabulous work!