


Colors & Wall Mounts: Snowboard Feature Wall - Part 2
$250
2 Days
Easy
Our focus this week is color selection & painting, mounting strips and gear organization layout.
Last week we kicked off our Snowboard Feature Wall project (read Part 1 here nluvstudio.com/2017/08/23/snowboard-feature-wall/) to get our gear some organization! Every week, we get a little closer to winter so now is the time to prepare.
Mount it up!
We ended off with the base wood paint/sealer drying in the studio. It’s important to now look ahead to the finished design and determine the best & safest way to mount on the wall. With all the fence boards, shelves and gear, our feature wall will get heavy! Since the wall is only hardboard, we need to create more strength for our gear organization journey.
I have a pile of salvaged 1 x 3″ strips in the backyard that are perfect for the job. The longest fence board is 72″ so three mounting strips across the wall will be the right amount of stability for our gear organization wall’s final design.
Tools
- Saw
- Wood mounting strips
- Drill bits/Drill
- Screw anchors
- Pencil
- Forstner bits (optional)
- Tape measure
- Hammer
- Level
Mounting Strip Installation
- With the end design in mind, space out the mounting strips to provide maximum support. For our snowboard feature wall, three strips (plus a tiny block at the end) will do the job.
- Measure out all strip lengths needed, careful to NOT make them too long so they stick out or are visible after the fence boards are mounted. Our strips will measure 27″, 69″, 102″, and a little 5″ block for the end.
- Cut all strips on a miter saw or with a hand saw.
- Don’t bother painting as no one will ever see these!
- To keep the mounting strips ‘flat’ so the fence boards can mount flush against them, I chose to inset the screws so the boards are still smooth across.
- Decide how many anchor/screw sets you need across your boards.
- Take a Forstner’s bit and drill holes, 1/4″ deep & the width of your hammer head. This will then allow you to hammer in the anchors below the height of the board face.
- Nail each mounting strip to the wall to hold it in place. Make sure they’re level!
- Drill holes in the center of your Forstner bit circles to fit your anchors. Ensure you drill straight through the wall mounting strip and into the wall behind. The anchor will sit inside both the mounting strip AND wall to create greater strength for a thin wall.
- Hammer in the anchors.
- Screw into the anchors to secure the mounting strips.
- Remove the nails used to hold the strips in place (if you want).
It’s Painting time
With the wall not only base painted but now secure with mounting strips, let’s get on to the fun part… painting! Since the Snowboard Feature Wall is not only functionally but also decorative, we need lots of colors and excitement. Our color palette will comprise five colors: Olive, Blue, Yellow, Red, Dark Brown and Cream.
Plan your palette
A color palette this wide needs some planning to make sure you get the look you really want. A little effort to plan the color layout is well worth it. Let’s do it!
- Take all your paint colors and a few pieces of plain white paper.
- Create paint stripes on the paper and let dry.
- Cut them apart and lay them out across your wall until you love the result. Keep moving around the strips with painter’s tape until it’s perfect.
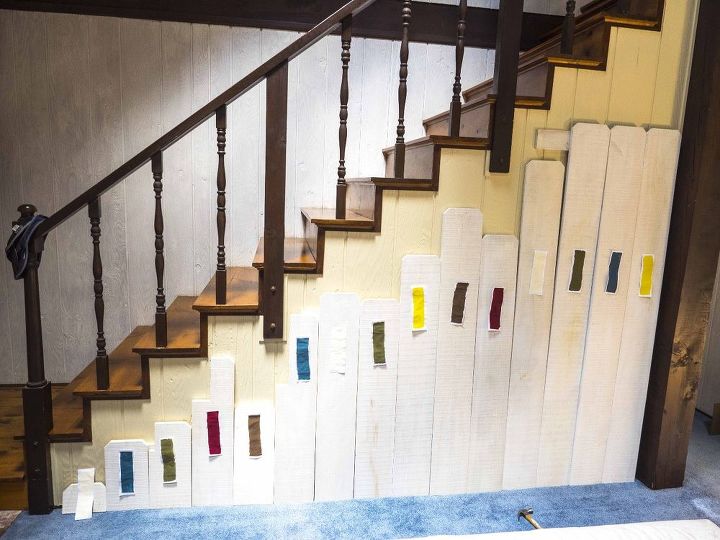
- Take a picture of the layout in case any strips fall off.
- As another precaution, flip over the boards and number them and write the color on the back. That way you won’t forget the order or color of each.
Get painting
Decorative chalk & furniture paints can be thick out of the can but don’t waste a drop by mixing with water. Sometimes I like to work right from the paint can. When you do, have a cup of water next to your paint can and drip your brush into the water and then right into the paint. That way you never waste a drop and can control the brush strokes you want to thin out and others you don’t.
- Each board will get a total of two coats of paint for each color used. If I have any boards that are going to be two colors for multi-level distressing, I will still do two coats for each color.
- Each first coat is a little thicker to get a solid full coverage layer to start things off. Let dry completely.
- For the second coat, I will use the brush dipped into the water and then paint to ensure a smooth final coat & that all the nooks and crannies are filled in.
- Looking at the picture of swatches, my color palette consists of 15 total boards of which 13 are single colors and 2 are 2-layer multi-color.
- With 30 layers of paint to finish, this step takes a while, especially with dry times. Don’t rush it. Let the paint dry between coats!
- Be diligent to clean up your painting space and especially your brushes.
Gear organization layout
With the wall mounts in place and the fence boards drying, the next logical step is to think about overall layout. We know the boards will sit on the right-hand side of the wall as it is the tallest. As the stairs tier down to the left, let’s put some of the reclaimed redwood in the studio to good use! We will build shelves for bins and crates that will hold gear like gloves, goggles, clothes, backcountry equipment, etc. Below it all will be boots and shoes.
The design is taking shape one step at a time. Next week is all about distressing the fence boards, build the shelves and get it all mounted! Stay tuned as we keep on chugging away on our Snowboard Feature Wall for the mountain life! Sign up for The nluv Memos and never miss a project. nluvstudio.com/nluv-memos-blog-jaime-pirozzi/
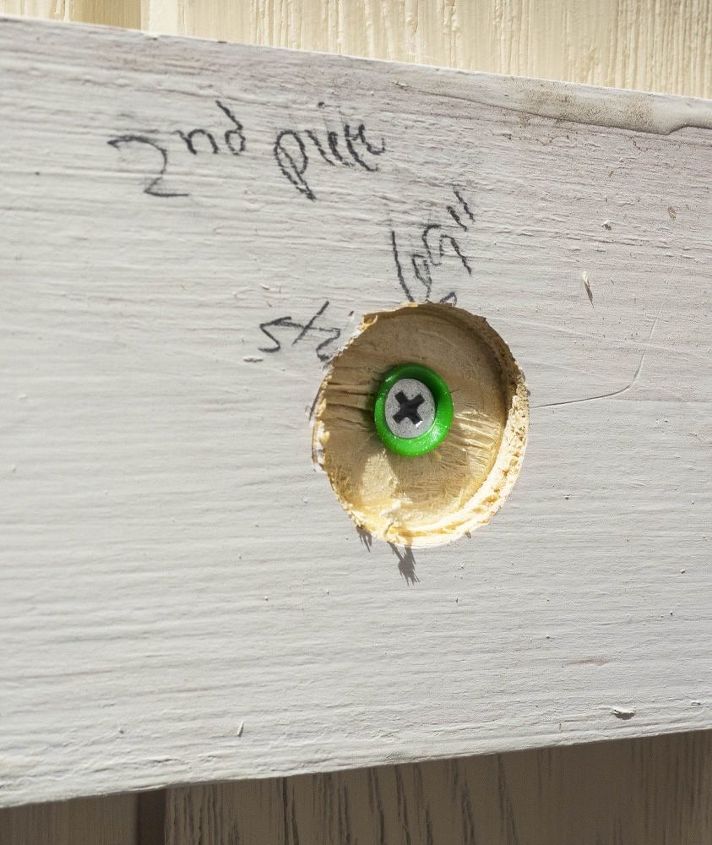
No screws to stick out on the mounting strips.
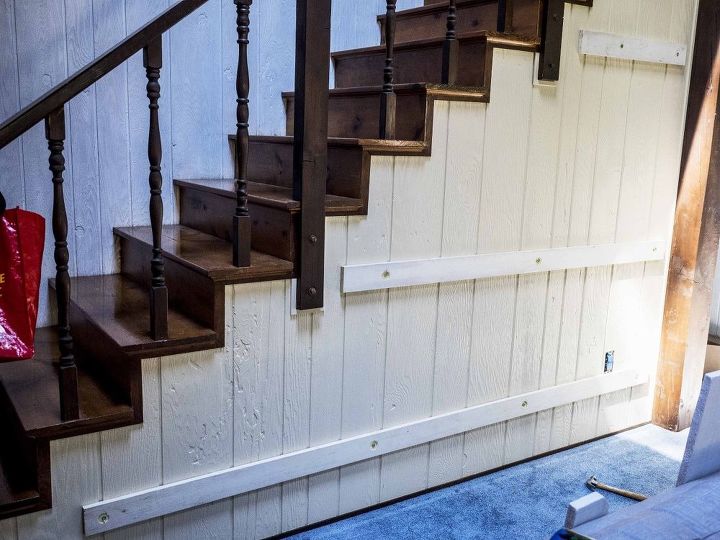
Three strips will secure our feature wall.
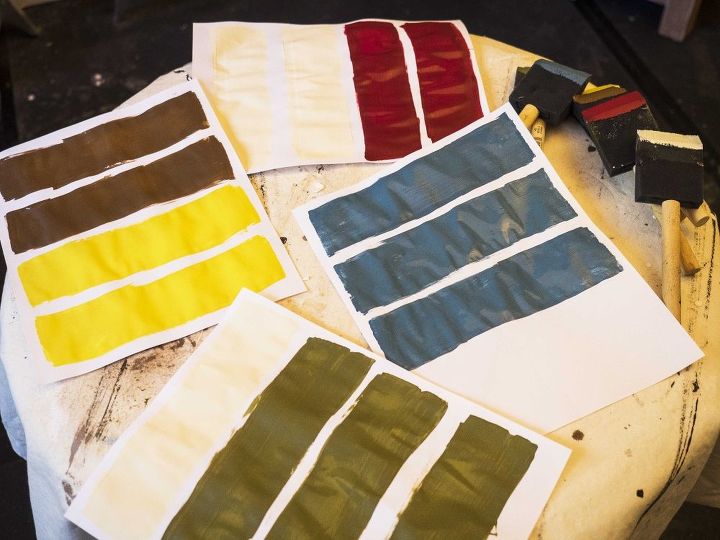
Make your own swatches & plan out the design.
Lay out your swatches to nail down the color spectrum.
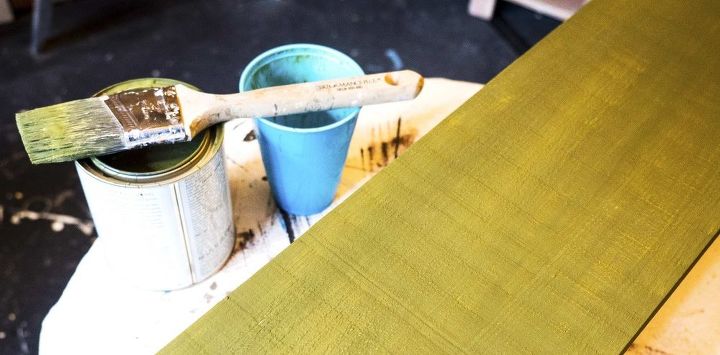
Dip brush in water to thin the paint.
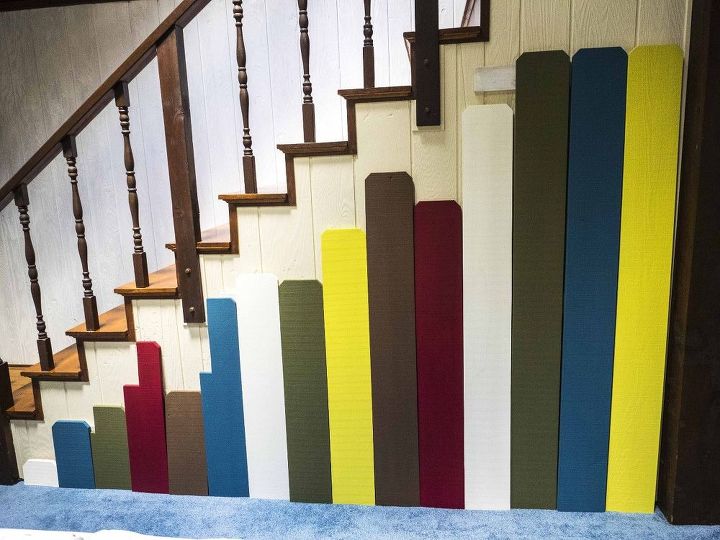
2 coats later and the color is on! Don't be afraid of the bright palette. We will distress & perfectly fit this into the room decor. Stay tuned!

Want more details about this and other DIY projects? Check out my blog post!
Comments
Join the conversation
3 of 12 comments
-
The wall is done everyone! Check it out under my Hometalk projects. So excited and ready for winter fun now.
-
Thank you for including the link to the beginning of this so I could read it and see what you are doing! I'm excited with the way this is coming together!


Frequently asked questions
Have a question about this project?
I like the idea. Curious though about what it looks like coming down the stair. Do you see a gap?
I wasn't able to connect to any of your links so I am a tad confused. Are you planning on stacking your snowboards against the painted part? Will you have pegs sticking out to lean them on? How are you going to protect your carpeting from your boards' (hopefully) sharp edges? I read through your post twice and still have no idea what you are trying to do!
None of the links worked for me ~ could you explain what the snowboards are going to do?