First step is to set up the sewing station/cutting table, find a spot in the room near an outlet for the machine. ...is this a dedicated room for sewing? If so, I would have the cutting table able to be moved to the middle of the room when being used for cutting so that I could walk around it, a table with lockable casters would work. you will want to keep your tools near to hand. A pegboard hung on the wall by the machine is great for this. Shelving placed along a wall is great for holding storage boxes to hold your 'stash'.
Goodness, I feel your pain. My hubby and I are organizing our storage shed. It had become a catch all. It has been a job. First we moved everything out and started piles of what to keep, what to get rid of and another pile of not sure if we will keep or not. Next, we used peg board to hang our garden tools together so we know what we have now in the way of gardening tools. We put items used to wash cars together. We placed ladders and outdoor painting supplies in a group. We organized coolers, gas cans etc. We quickly realized we had too many gas cans, fifteen in all...for real. All boating items were grouped together too. The last part to tackle was his tools. He does not put things back where they go. He will now, since he was apart of the cleanup. LOL good lesson. This all began because I needed a space to put my saws and furniture pieces I build, repair and refinish. We have a large shed/building, but the way we had just thrown any and everything in any open space available made it so junky. Sometimes it was easier to buy what we needed rather than to search for what we needed. Ugh 😑! I can say we are just plum proud of our organized shed. We can get our lawn mowers in and out with going through an obstacle course. We are amazed at the room we have after organizing our vast supplies. Well, with all of that said...my advice on how to organize your sewing room, is to first see what you have. Remove everything from the room. Make three piles, keep, don't keep, May keep/may not keep. Sketch how you want your sewing to look. Where do want you machines? How do you want your work path to be laid out? Then organize items by the ones you use the most, like my gardening tools and car wash ing supplies are where we can get them quickly due to year-round use. Think about which items you use everytime you sew. Place them close by your work station. If possible, put up peg board to help you see your tools at a glance. Organize your fabric in see-through tubs with labels. Use labels you can either erase or peel off easily, since your contents will change as you use them. Organize ribbon on spindles for easy access, place buttons in glass jars ( this can also be a decor accessdory) and so on and so on. If your sewing is like our shed, you will feel very accomplished when you finish. You can do this!
Use small, well labelled, visible to the eye immediately clear boxes. I have just redone my workshop with tons of small parts. I use ice cream tubs and jars as they become available through use to store things. I started with small, medium, large and also long matchboxes which was great but they soon filled.
I was always irritated because I was forever looking for bits I needed and just giving up.
Now, I've put everything by types into glass jars with their own labels removed and my own fitted. Jar 1 for Rawlplugs, Jar 2 for Dowel Rods, Jar 3 for Picture Hooks....you get the idea. Just make the number on the label very big and clear so it is easily seen and also state the contents on it. Label the jar side and the top. Keep a simple but effective master list such as J1 = Rawlplugs etc
I store my jars in number order alongside (ideal) or behind each other and keep jars in one place and tubs in another. As jars become full simply transfer over into a tub.
Tubs can be on your list as Tub A = Nuts and Bolts, Tub B = Washers etc to help avoid mixup with numbering.
And remember to update/amend your list as you uptub.
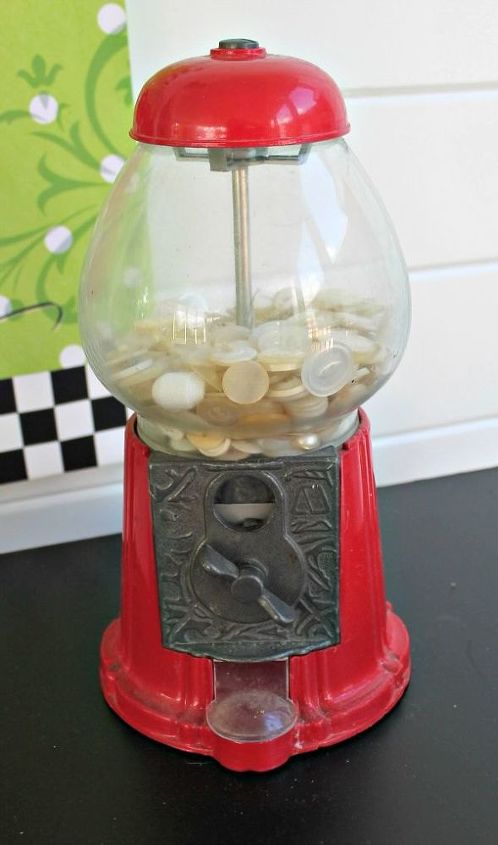
I had this red gum ball machine in my storage building and decided to pull it out and use it for something. What am I filling it with? BUTTONS - All white of course!
I recently acquired a ka-zillion rolls of fabric ribbon - assorted sizes. Aside from straight pins or tape (which is useless), has anyone found a way to control the c...
See more
I've seen ideas for storing quilting fabrics (fat quarters) but my fabric stash is all multi-yard pieces, anywhere from 1 to 5+ yards. I am in the process of setting...
See more
Lots of wonderful storage/craft room ideas for small ribbon rolls. But, I have over 100 large rolls of Costco ribbon that I am looking for a storage option that keeps...
See more

which areas specifically do you need advice? How to setup the layout of the room or how to organize items like needles and threads?
http://www.hometalk.com/categories/organizing/craft-room/sewing-materials
I have a sewing room also, what do have basically to organize.? If you have a small area, let us know what shelves or furniture is available. EJL
First step is to set up the sewing station/cutting table, find a spot in the room near an outlet for the machine. ...is this a dedicated room for sewing? If so, I would have the cutting table able to be moved to the middle of the room when being used for cutting so that I could walk around it, a table with lockable casters would work. you will want to keep your tools near to hand. A pegboard hung on the wall by the machine is great for this. Shelving placed along a wall is great for holding storage boxes to hold your 'stash'.
Goodness, I feel your pain. My hubby and I are organizing our storage shed. It had become a catch all. It has been a job. First we moved everything out and started piles of what to keep, what to get rid of and another pile of not sure if we will keep or not. Next, we used peg board to hang our garden tools together so we know what we have now in the way of gardening tools. We put items used to wash cars together. We placed ladders and outdoor painting supplies in a group. We organized coolers, gas cans etc. We quickly realized we had too many gas cans, fifteen in all...for real. All boating items were grouped together too. The last part to tackle was his tools. He does not put things back where they go. He will now, since he was apart of the cleanup. LOL good lesson. This all began because I needed a space to put my saws and furniture pieces I build, repair and refinish. We have a large shed/building, but the way we had just thrown any and everything in any open space available made it so junky. Sometimes it was easier to buy what we needed rather than to search for what we needed. Ugh 😑! I can say we are just plum proud of our organized shed. We can get our lawn mowers in and out with going through an obstacle course. We are amazed at the room we have after organizing our vast supplies. Well, with all of that said...my advice on how to organize your sewing room, is to first see what you have. Remove everything from the room. Make three piles, keep, don't keep, May keep/may not keep. Sketch how you want your sewing to look. Where do want you machines? How do you want your work path to be laid out? Then organize items by the ones you use the most, like my gardening tools and car wash ing supplies are where we can get them quickly due to year-round use. Think about which items you use everytime you sew. Place them close by your work station. If possible, put up peg board to help you see your tools at a glance. Organize your fabric in see-through tubs with labels. Use labels you can either erase or peel off easily, since your contents will change as you use them. Organize ribbon on spindles for easy access, place buttons in glass jars ( this can also be a decor accessdory) and so on and so on. If your sewing is like our shed, you will feel very accomplished when you finish. You can do this!
Use small, well labelled, visible to the eye immediately clear boxes. I have just redone my workshop with tons of small parts. I use ice cream tubs and jars as they become available through use to store things. I started with small, medium, large and also long matchboxes which was great but they soon filled.
I was always irritated because I was forever looking for bits I needed and just giving up.
Now, I've put everything by types into glass jars with their own labels removed and my own fitted. Jar 1 for Rawlplugs, Jar 2 for Dowel Rods, Jar 3 for Picture Hooks....you get the idea. Just make the number on the label very big and clear so it is easily seen and also state the contents on it. Label the jar side and the top. Keep a simple but effective master list such as J1 = Rawlplugs etc
I store my jars in number order alongside (ideal) or behind each other and keep jars in one place and tubs in another. As jars become full simply transfer over into a tub.
Tubs can be on your list as Tub A = Nuts and Bolts, Tub B = Washers etc to help avoid mixup with numbering.
And remember to update/amend your list as you uptub.
It works for me! Good luck.