


My Kitchen Makeover

18 Materials
$730
1 Month
Medium
Hello from sunny Malaysia! I keep trying to change my location on my profile to Malaysia but it seems to just wanna stick to Somers, IA. Ahhh well :)
Anyways, I am here to share another project I did to my home a couple of months back. For those of you who have read my Bathroom Makeover, this project precedes the bathroom makeover. In fact this is the first major DIY thing I did, which got me DIY bug-bitten. I call this my Half Kitchen Makeover. Half because I madeover just the bottom half of the cabinets and kept the top cabinets untouched. Although it was just the bottom half I did, but I can say that it was as intensive, because I not only got new cabinets, I also poured my own concrete slabs for countertops, made a chalkboard backsplash, a feature rustic wood panel and plumb the new sink.
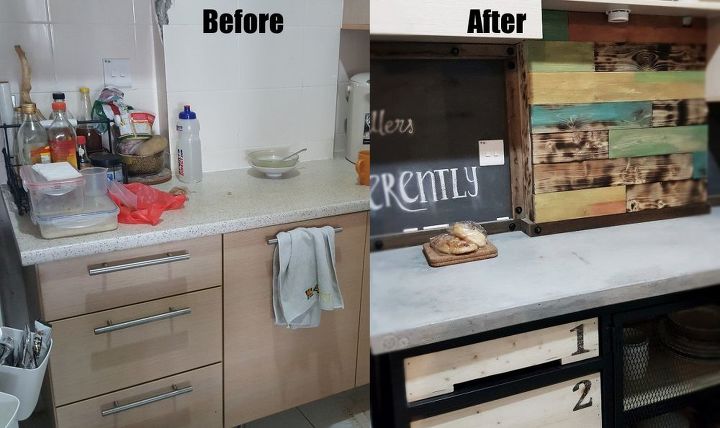
It all began when I discovered that my 12 year old particle board countertop was rotting around my sink area. And mold started to form around the sink which made it very unhealthy to prepare food especially for kids. Initially I just wanted to get a makeshift sink unit from Ikea just to replace the old sink and the rotting cabinet under it, as I didn't want to spend too much on a major overhaul. A new kitchen would probably cost me about RM15k (about USD3.5K) to replace. I spoke to the hubby about it and one thing lead to another. I was joking about a more "industrial" sink unit, and my hubby said, it wouldn't go with the rest of the cabinets we had. So in the end we decided that we would change the entire bottom units (which just consisted of 3 cabinet units) leaving the top cabinets untouched. To be fair, the top cabinets were still in pristine shape after 12 years!
So I decided that I would take up this challenge of doing up our kitchen. After all it's just half of it. Little did I know what I got myself into!
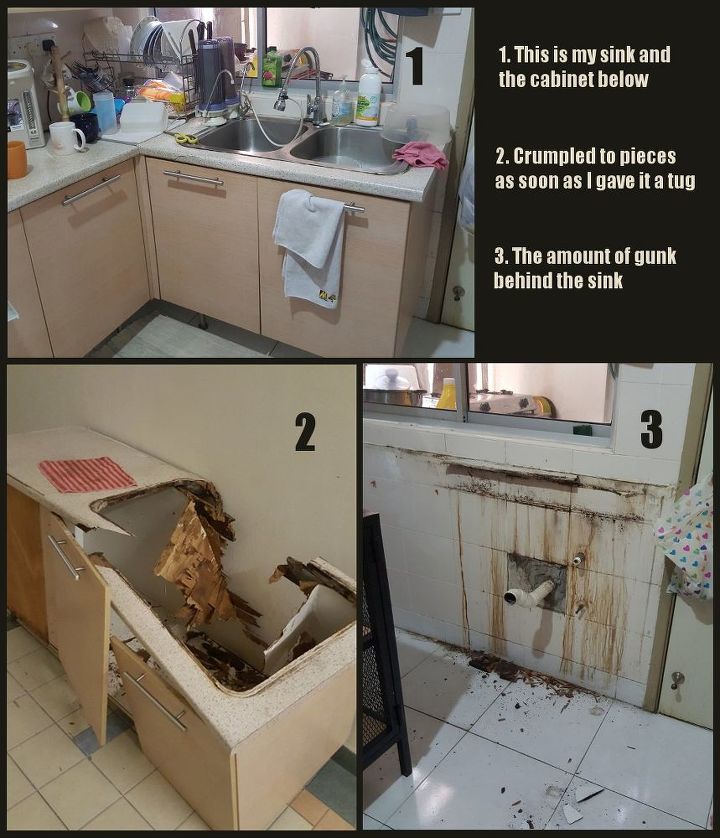
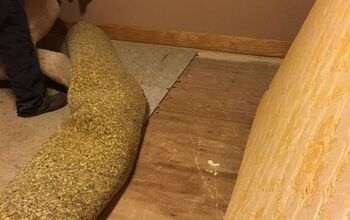
First thing I did was to rip off the old units. It was full of gunk ... I was shocked how bad it was. It literally just crumbled when I pulled it out from the wall. And the mold that was behind the cabinet was horrendous.
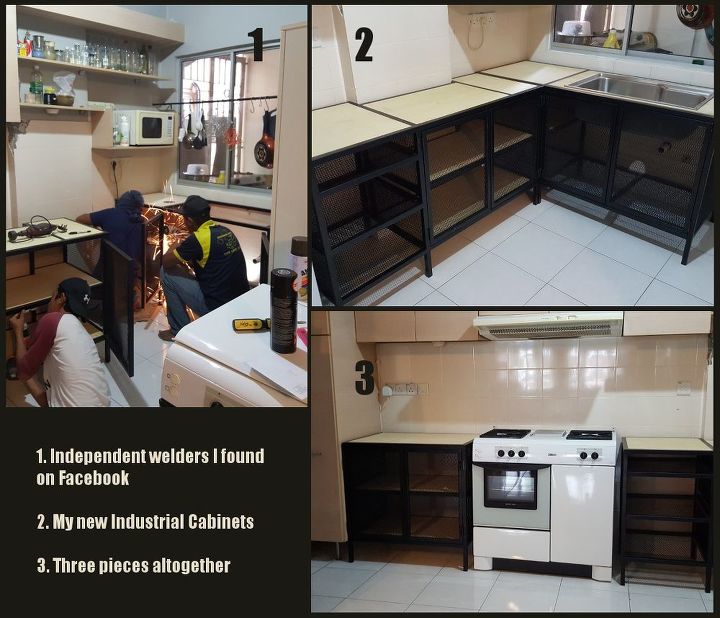
I then drew up some designs of the Industrial cabinets (3 pieces) I wanted and started searching for independent welders who could realize my design. I found them on Facebook and I was utterly happy with their work! These are made with 1 inch metal frames and wire mesh, powder coated in matte black. I asked for extra thick plywood (1 inch) to be placed inside and on top of the cabinets so that the cabinets would be sturdy enough to take a concrete countertop. I also checked with the management of the apartment to make sure the floors can take the extra weight of the concrete countertops.
I sealed the plywood with 2 coats of waterproof sealer to get them ready for the countertop.

I added my own touch to the industrial units by making 3 crate-inspired drawers with pine and then image transferring a simple number to each of them to go with the feel of the cabinets, introducing a bit of rustic-retro element to the mix.
Yes, I'm a bit crazy sometimes :)
Next was making the countertops. And this might be one of the hardest things I've DIYed so far.
To make sure I knew how to pour concrete even while asleep, I devoured over 50 Youtube videos on the many ways to DIY a concrete countertop. I could have just bought a butcher block countertop from Ikea and be done with it, but me being me, I like a challenge. I was set to make my own concrete countertop. From the extensive research, I discovered a few things.
1. Malaysia did not carry any concrete premixes like Quikrete.
2. We also did not carry concrete pigments, plasticizers nor reinfored glass fibers (in GFRC).
3. What we do have here are cement, sand and gravel. YAY!
So, I had to mix my own concrete the way my grandfather did. And I had to do this on the 8th floor (my apartment is on the 8th floor) by hand in small batches. Good thing I found a wonderful online hardware store which agreed to deliver the 50kg bags of cement, sand and gravel to my doorstep and would help me cut up Y10 rebars to the size I wanted.
And so begins my adventure with concrete.
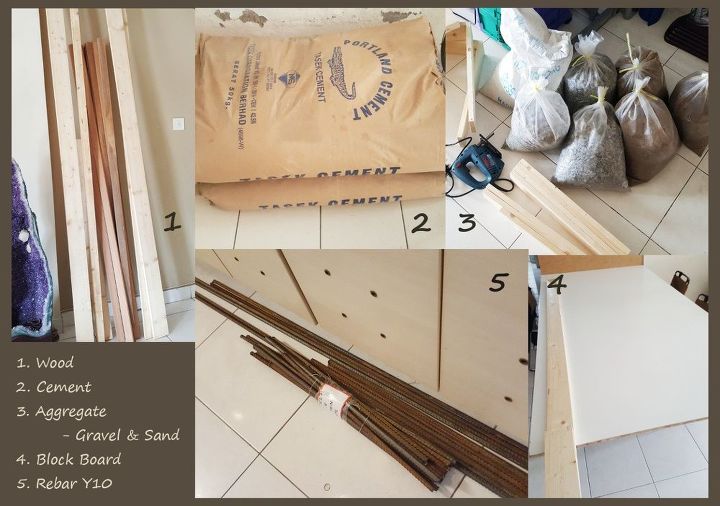
So basically the photo above shows you what I needed to cast my own concrete countertops for the 3 metal cabinets. Cement, Sand & Gravel for the mix. Rebars for the reinforcement in the countertop. And I also bought Block board so that I can cast my countertops on top of the smooth board to give it a smooth finish. I bought some extra wood planks 1 and 3/4" thick for the sides of my countertop molds.
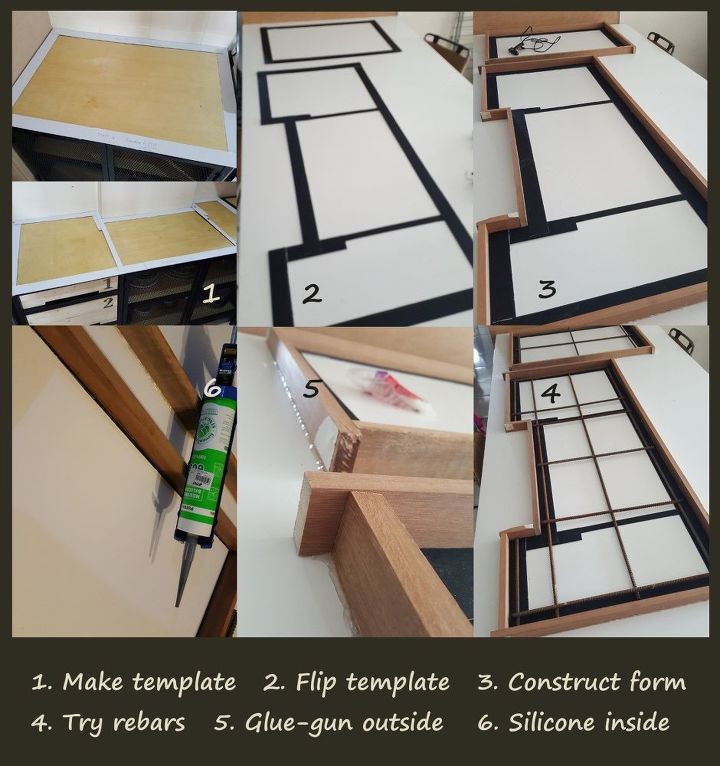
The 6 main steps I did to cast the concrete slabs are :
1. I took an accurate measurement of the countertop area and made a template of the area out of cardboard strips
2. I flip the template so that the surface of the countertop will end up at the base. The smooth surface of the Block Board will ensure that my concrete surface will cure smooth.
3. I constructed the mold with the 1 and 3/4 inch wood planks. Normally people would also construct the sides with the same smooth block board, but I didn't have the correct tool to saw the strips so I used planks as alternatives. It would not give me a smooth edge but I was cool with a bit of rustic-ness.
4. I tried the rebars (as this was cut by the shop) to make sure they fitted!
5. Then I glue-guned the outside of the mold to the block board securely.
6. And siliconed the inside of the mold to curve out the edges a little.
I made sure there was no debris or dust left on the inside by vacuuming and wiping several times before I added a coat of expired coconut oil I had so that the concrete will be easy to demold when cure.
*block board - similar to melamine board, only not so shiny. I used block board because I couldn't find melamine board.

And so the mixing began. I researched on the ratio for concrete and found that basic ratio 1 cement : 3 sand : 3 gravel was too dry for my countertop. I ended up using between 1:1:2 and 1:1:1.5 ratios. And this ratio served me well. I packed the mold thoroughly especially the edges and about halfway up, I added the rebars for reinforcement. Then I filled the rest of the mold with more concrete mix. I had to mix many times as I only had a small space in my yard to work with. (This is very tiring) After filling the mold, I scree the top to make sure everything is leveled. And then made little taps with my rubber mallet all around the mold to let out as much air bubbles as I could. Air bubbles will create little bugholes on the countertop, so you want the less of that the better. (Mine still ended up with bugholes and I had to fill them with a cement slurry) Finally, I covered the wet concrete with a plastic sheet to keep the moisture in. I also constantly sprayed water on the concrete to keep it wet for the next 2 days while it cures.
*Water is an important catalyst for the crystalization of the concrete mixture. This bonds all the aggregate and the cement together to make a strong and solid slab when cured.
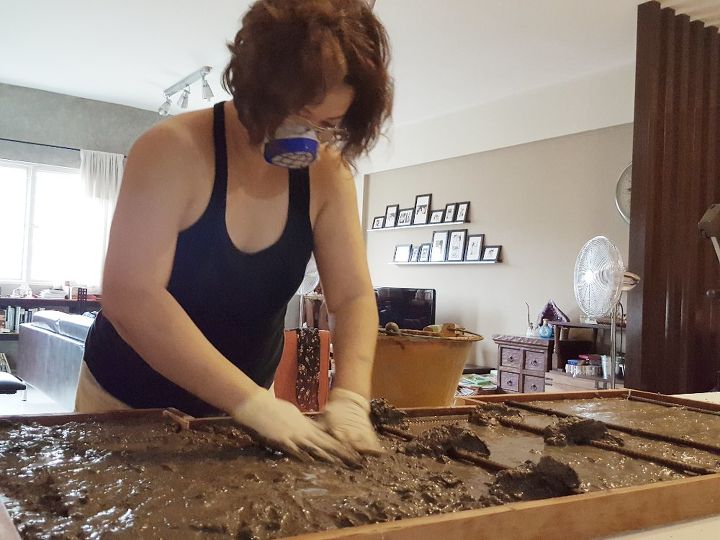
*Don't forget to wear a mask when mixing the concrete because cement is acidic and would irritate the respiratory system.
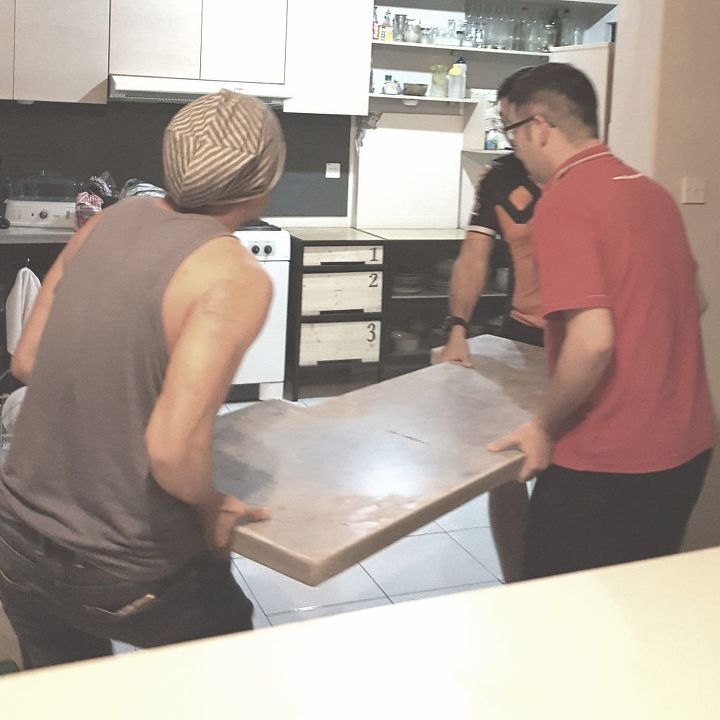
Because I have limited space to cast my countertops (I did them on my dining table!) I had to cast the 3 pieces separately. Every piece took 5 days to cure. I usually poured the mold on a Monday and on the Friday night my husband and my 2 brothers would help me turn the slab over and place it on each cabinet.
So this whole countertop business took me a good 3 weeks!
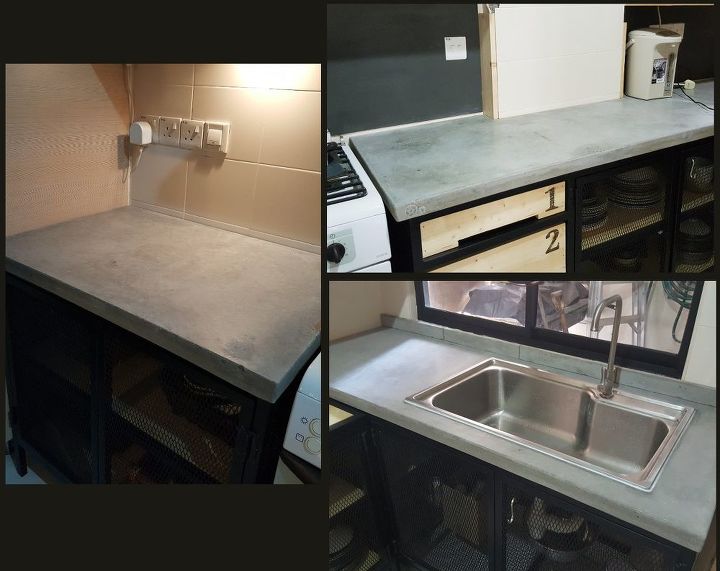
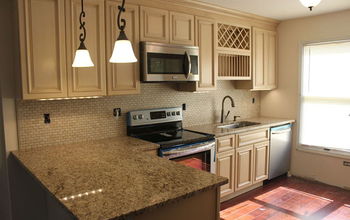
Here are the 3 slabs. My favourite has to be the one with the new sink in it. That was my scariest pour because I was so afraid that the narrow edges around the sink wouldn't hold when it comes to flipping it around and carrying it to the cabinet. But in the end all was good!
I did have bugholes on the surfaces. To fill them up I made a slurry from the cement and filled the holes. The surface turned out pretty smooth so I didn't have to sand or polish it. It would have been a hassle if I had to. Imagine the dust in my apartment!!
I bought a food grade penetrating sealer to seal the concrete. If you are not making food on this, I suggest a stronger surface sealer. The penetrating sealer just doesn't last long enough. After using the countertops for a few months, I have bits of stains on it. But I guess that all comes in the package :)
I installed the sink (my first plumbing endeavour) and was glad that it worked! I had nightmares that I would wake up in the morning to a flooded house several times! Thank goodness that didn't happen!
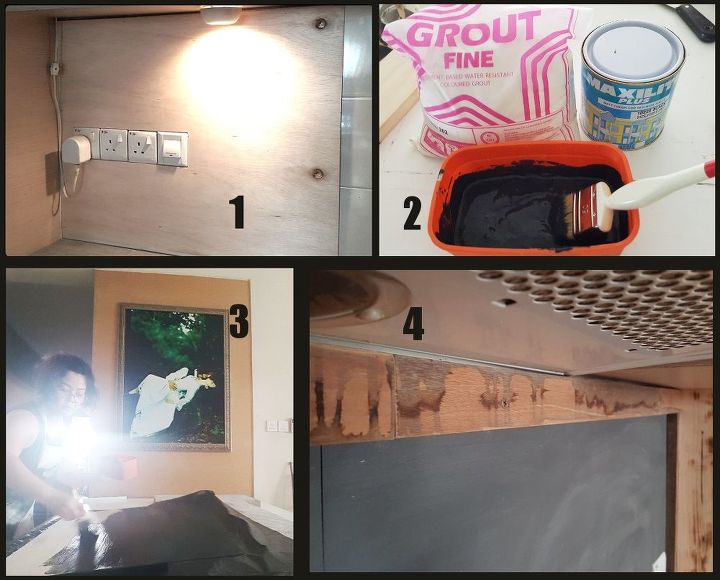
Now that the difficult bit is over, I turned to the backsplash. The kitchen came with a plain beige tile.
1. What I did was just to cover the tile with some plywood boards and make it into a chalk board. Simple and effective.
2. I got a simple formula off the internet for chalkboard paint of 1:3 ratio of Unsanded Grout to Latex paint of your choice
3. I painted the boards
4. And framed it with the planks I used for the sides of the molds, even showing off the drip marks made by the wet cement.
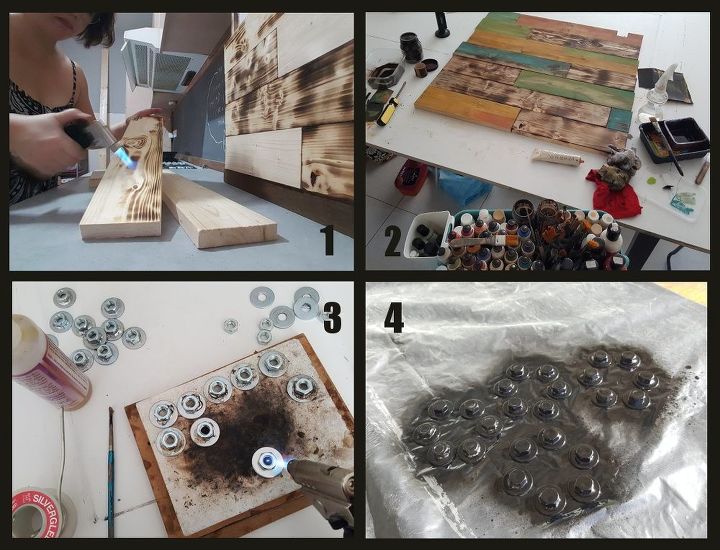
Finally, I added a small feature wall to inject some color to the otherwise grey and black kitchen by first torching some pine wood with my creme brulee torch to bring out the grain, and then adding some acrylic to parts of it (1 and 2).
I also soldered nuts and washers together to create faux bolts and sprayed them a matte black (3 and 4). These I will place randomly on the frame which surrounds the chalkboard.
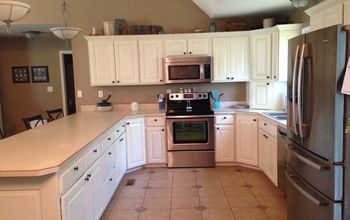
Here are some of my favourite photos of the kitchen.
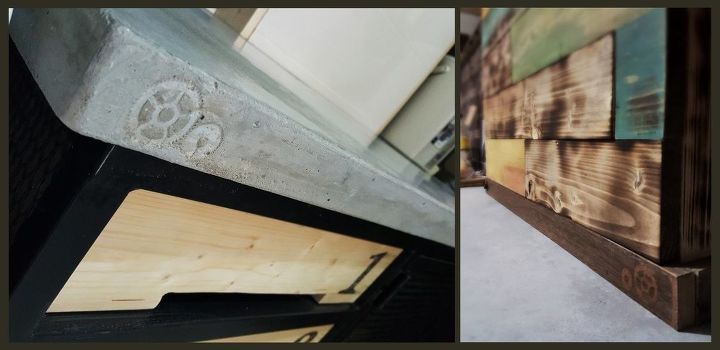
The gear imprint which I added to the concrete when I poured it. Same gear marks on the recycle wood frame where the gears were placed to make the imprints.

A quote by Jacob Nordby which I modified to represent the colors of my family :)
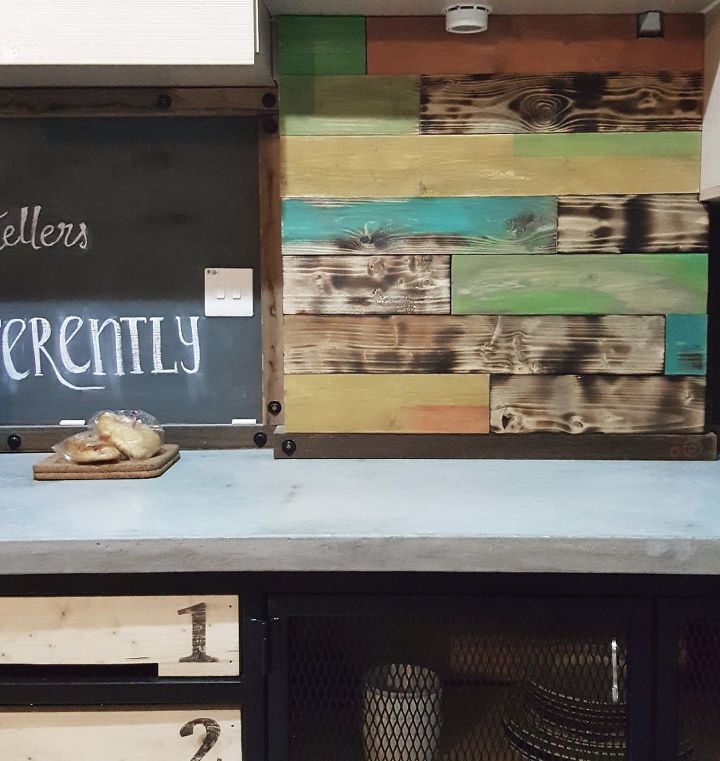
My favourite photo of the kitchen.
I wish I could show you more photos, unfortunately we are only allowed 15. But I think I have already cheated a lot by posting collages :)
Hope you enjoyed this. If you want to see more photos, please visit my blog. I have a 2 part write up there on this project.
Part 1 : Kitchen Makeover
http://www.alteredalchemy.com/2017/07/project-kitchen-part-1.html
Part 2 : Kitchen Makeover
http://www.alteredalchemy.com/2017/08/kitchen-makeover-project-kitchen-pt-2.html
Thank you for reading :)
Comments
Join the conversation
5 of 94 comments
-
I also am inspired by this and your deck redo. I think that you could do your management and a lot of other people a GREAT favor, as their sinks, bathtubs and showers are likely in the same, if not worse condition than yours were. Think of all the children, especially, sickened by that mold‼️Wanda
-
Again, I've fallen in love with your project, and your way of explaining. I am not alone in wishing you were here, available for hire


Frequently asked questions
Have a question about this project?
Are you the gal who transformed a bathroom months back?
Confused you said apartment mangement was asked about weight limit for cement installation shouldn't apartment mangement have taken care of your problems for you
I'd like to use black board paint to cover the ugly tiles which were here when I moved in, using the same method as you did. Could the plywood be attached using a strong glue? also how did you "paint" on the grout and latex mix, wasn't it too thick for a brush? Lastly I'm probably stating the obvious but was grout+latex used so as to be waterproof rather than using black board paint.. I picked up a tin of black and haven't used it yet. Thanks