


How to Replace Shower Faucet Diverters Without Soldering Copper Pipes!

3 Materials
$600
3 Hours
Medium
In today’s tutorial you’ll learn how to replace shower faucet diverters using all PEX and Hansgrohe’s iBox.
This is one of the best ways to install a new shower faucet.
Here’s why:
There’s no soldering or sweating copper pipes!!
You’ll be surprised at how easy replacing a shower faucet can be using this method.
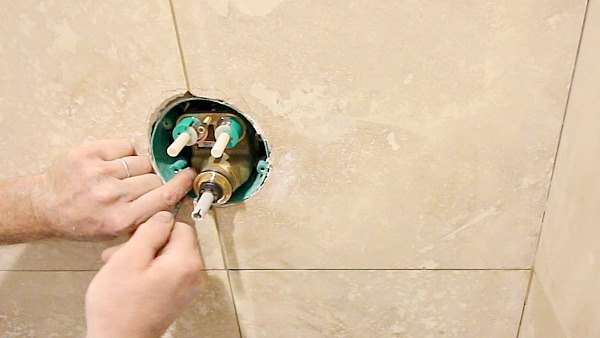
The first step for replacing a shower faucet diverter is cutting out the old system.
How’s this done without flooding the house!
It begins with shutting off the water to the house and draining the water at the lowest point, e.g. laundry tub.
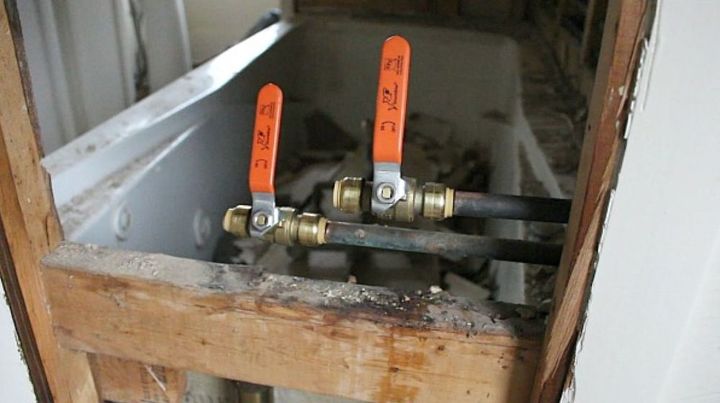
Cut out the old faucet and attach shutoff valves to the existing pipes.
PEX shutoff valves can be installed if there’s PEX throughout the house.
By the same token, SharkBites can be used with copper, PVC, or PEX pipes.
They’re a great option if the shower has an access panel.

What’s the worst part of learning how to replace shower faucet diverters?
It’s reading the directions. Seriously, who rights the directions?
Fortunately we break it down for you and make it easy to follow along. Hansgrohe’s iBox is the shower faucet diverter we used in today’s tutorial.
The iBox makes shower faucet replacement simple and straight forward…even for beginner DIYers.
Plus, there’s no need to solder or sweat copper pipe!
Position the iBox in the stud wall and ensure the ‘Min Max’ line is at the right depth.
This is important:
Take the time to set the depth of the iBox.
Otherwise, you could be in for a bad surprise when it come times to install the trim.
In this shower we used 1/2″ wedi panels and 1/2″ travertine tile. Our video shows how to use 1/2″ scrap pieces of OSB to achieve the right iBox depth.
Add teflon tape to the 3/4″ male adapters and hand tighten them into the iBox.
Then use Channellock pliers to tighten them further. These adapters will connect the 1/2″ PEX to the house plumbing.
Dry fit the iBox in the stud wall again to determine it’s preferred location in relation to the shower.
Here’s the deal:
For bathtubs, center the iBox on the shower drain and position it about 18 inches above the tub deck. This height makes it easy to operate the iBox while taking a bath or shower.
Some people forget this when they replace shower faucet diverters.
Don’t be that person!
Okay, back to the installation. Install all the PEX fittings outside the tub wall. This makes it easy to crimp the fittings together rather than trying to force the crimper into a tight space.
In addition, PEX crimp rings should reveal about 1/16″ of the PEX. Also, the iBox has a ‘Top’ and ‘Bottom’.
Keep that in mind when adding the PEX.
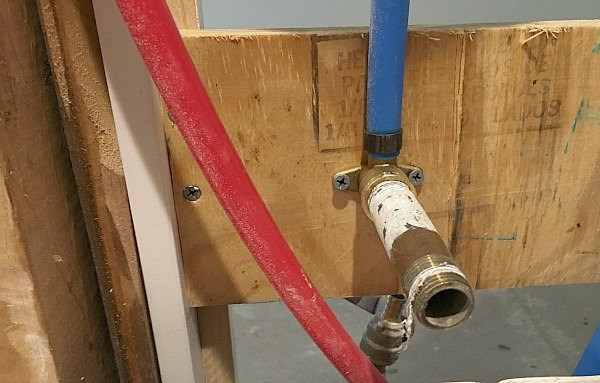
In our example, the red PEX is on the left and the blue PEX is on the right. Red indicates the hot water line and blue indicates the cold water line.
Center the iBox on the tub, in this case 16″. Then double check that it’s level, and secure it to the wood using four galvanized screws.
Our HUGE Pro Tip:
Get the iBox as level as humanly possible. This goes for any shower faucet diverter.
And the reason is simple: if the diverter isn’t level the trim will look horrible. Small tip but huge consequences if done incorrectly.
We get a lot of questions about the tub spout and shower head height.
Let’s answer those questions right now.
In this shower we made the tub spout 4″ off the tub deck and the shower head at 84″ off the tub.
But you’re probably wondering:
What about plumbing code?
And you’re right to ask that question. Check local plumbing codes to ensure proper spout and shower head locations. One can never be too safe learning the ins and outs of plumbing.
Two female drop elbows were used for the tub spout and shower head connections.
PEX for the tub spout and shower head was purposely installed a bit longer than necessary.
This makes adapter installation easier.
In the video, Steve measures 4″ up from the tub deck, cuts the PEX, and adds a 1/2″ female adapter.
But don’t forget:
This adapter should be centered on the tub drain.
That way the tub spout will also be centered.
Secure the female adapter to the wood blocking with galvanized screws.
The same procedure is done for the shower head, only the 1/2″ female adapter is centered on the tub at 84″. Again, wood blocking should be behind the adapter.
Then pressurize the system by adding plugs to the female adapters and turning the water on at the shutoff valves.
But here’s the kicker:
Check all the PEX connections for any leaks…
…this is critical.
Because once the backer board goes up you have no opportunity to fix the plumbing.
Once this is done, flush the system before moving on.
Flushing prevents debris from clogging the tub spout and shower head – make sure you do it!
Certain materials make bathroom remodeling a lot easier.
For instance, we used wedi backer boards instead of cement board. They make waterproofing shower walls a breeze.
Our detailed wedi tutorial shares how we waterproofed the shower walls in just a few hours instead of two days!
The combination of our wedi and travertine tile fell within the iBox ‘Min Max’ line.
It’s important to double check this before setting tile.
Otherwise you run the risk of the iBox being too deep or too far out from the stud wall.
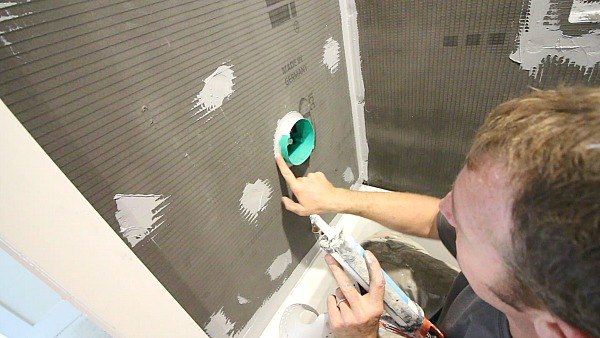
Apply a bead of wedi joint sealant to the iBox where it meets the wedi. Then smooth out this joint to create a watertight seal.
This seal is one of the best reasons to use both the iBox and wedi.
On the other hand, the iBox gasket can be used during the tile setting if another type of backer board is used. Embed the iBox gasket onto the backer board using thin-set mortar. Next, smooth out the mortar using a trowel or 3” putty knife.
Here’s a BONUS tiling tip:
Cut large holes in tile using an angle grinder and diamond blade.
Some people aren’t sure how to cut holes in the middle of tile. So we thought this tip might help. But be safe and do the cutting outside if possible.
Moreover, keep in mind that the gap between the tile and iBox should be about 1/16” to ⅛”. This is important because the trim will cover the gap between the iBox and tile.
A lot of tub spout adapters require soldering. This is risky business for DIYers working with an acrylic tub.
Think about it,
One slip up with the torch and your tub will melt faster than Darth Vader on Mustafar…not a pleasant thought. Apparently Hansgrohe figured this out and made tub spout installation painless.
Apply 6-7 revolutions of teflon tape to both sides of the brass nipple and hand tighten it to the tub spout adapter.
But don’t make this MISTAKE:
We used a wrench to tighten the nipple ¼ to ½ turn…
…instead, use a hex wrench to avoid damaging the o-ring and tub spout adapter.
It would stink to make it this far in your project and then damage the adapter!! Plus, why make life hard by not following the directions.
Next, hand tighten the nipple/tub spout adapter to the female adapter in the wall and use the hex wrench to complete the installation.
Furthermore, flush the iBox again by turning the flushing block 90 degrees and tightening the set screw.
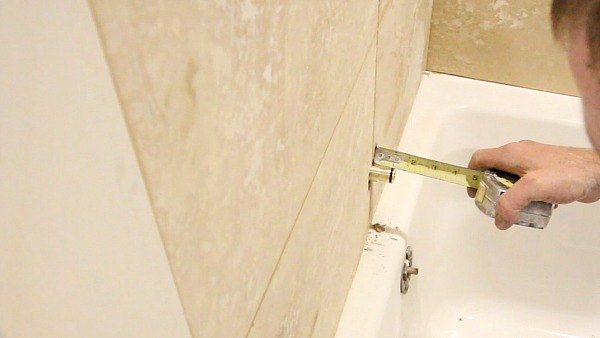
The port for the tub spout should be 1 ⅛” to 1 ⅜” from the tile. Double check this before moving on.
And apply 100% silicone around the port, add the tub spout escutcheon (which has a rubber seal), then add the tub spout and tighten it with the set screw.
Keep this in mind:
The odds of a water getting behind the wedi are slim at this point. The silicone at the tub spout port and rubber seal on the Hansgrohe escutcheon are awesome ways to prevent water infiltration. Pretty darn slick!
Hansgrohe’s iBox needs the function block to work properly.
It’s the heart of the ShowerSelect trim kit.
Cut the iBox plaster shield with a utility knife so that it extends 1/16” to ⅛” outside the surface of the tile wall.
Remove the flush insert and add the function block using 4 metal screws.
But we did one important thing:
We modified the directions at this point and recommend adding the nuts to the shutoff stems.
These are crucial for the operation of the ShowerSelect buttons. And if you mess up cutting the shutoff stems it’s super hard to thread the nuts onto them.
Hence our slight modification!
Place the fitting aid over the shutoff stems. Cut the shutoff stems so they’re flush with the front of the fitting aid (we used the Fein Multimaster). Then file the shutoff stems so they’re straight and even. Thread the nuts on the shutoff valve stems. They should be flush with the front of the stems.
Measure the distance between the outside edge of the iBox’s plaster shield and bolt plate. Then add 7/16” to this measurement and cut the retainer plate screws to size.
The total measurement was 1 3/16” and our video shows this in detail at the 7:59 mark.
Next, seal the gap between the tile and plaster shield using 100% silicone. Again, this is additional waterproofing but doesn’t hurt…you can never use enough silicone in a shower!!
Install the retainer plate using the plastic screws and apply small dabs of silicone at the grout joints.
Finally, remove the green safety guards from the shutoff valves and you’re ready for the ShowerSelect trim.

Almost every shower trim kit has some type of lever.
However, very few are as cool as the ShowerSelect:
It has push buttons that operate the tub and shower.
Also, these buttons can be used simultaneously to operate the tub and shower at the same time.
Sweet!
Install the thermostatic mixer sleeve, escutcheon (which suctions to the retainer plate), then add the shutoff buttons.
Again, in this case we have two buttons, one for the tub spout and one for the shower head.
Add 6-7 revolutions of teflon tape to the shower arm and thread it onto the ½” PEX adapter in the wall.
Here’s a Gold nugget:
Hansgrohe shower heads don’t require teflon tape. They can be screwed to the shower arm by hand. This is a small benefit. But there’s nothing worse than teflon tape showing between the shower arm and shower head.
The water flow was fantastic. But if you’re concerned about water pressure or have have an elaborate shower system, consider upgrading to ¾” PEX.
Remember, our video has all the step-by-step tips for replacing a shower faucet with the iBox and PEX plumbing. And our supply list over on Home Repair Tutor has links to all the materials we used.
Thanks for reading and watching. Let us know if you have any questions, we'd be happy to help.
Jeff
Resources for this project:


Any price and availability information displayed on [relevant Amazon Site(s), as applicable] at the time of purchase will apply to the purchase of this product.
Hometalk may collect a small share of sales from the links on this page.More info
Comments
Join the conversation
2 comments
-
Thanks for sharing this detailed tutorial! Replacing shower faucet diverters without soldering copper pipes sounds like a game-changer, especially for DIY enthusiasts like myself.
-
The step-by-step instructions make it seem much more manageable, even for someone with limited plumbing experience. Plus, using PEX and Hansgrohe's iBox seems like a smart solution for simplifying the process. And I totally agree about the importance of getting the iBox level – it's those little details that can make all the difference in the final outcome. If you're into DIY projects like this, you might want to look into wholesale valves for future plumbing endeavors. They can be a cost-effective option for stocking up on essential supplies.


Frequently asked questions
Have a question about this project?