Tin Ceiling Tiles for a Backsplash? Or Artwork?

by
Nikki
+10
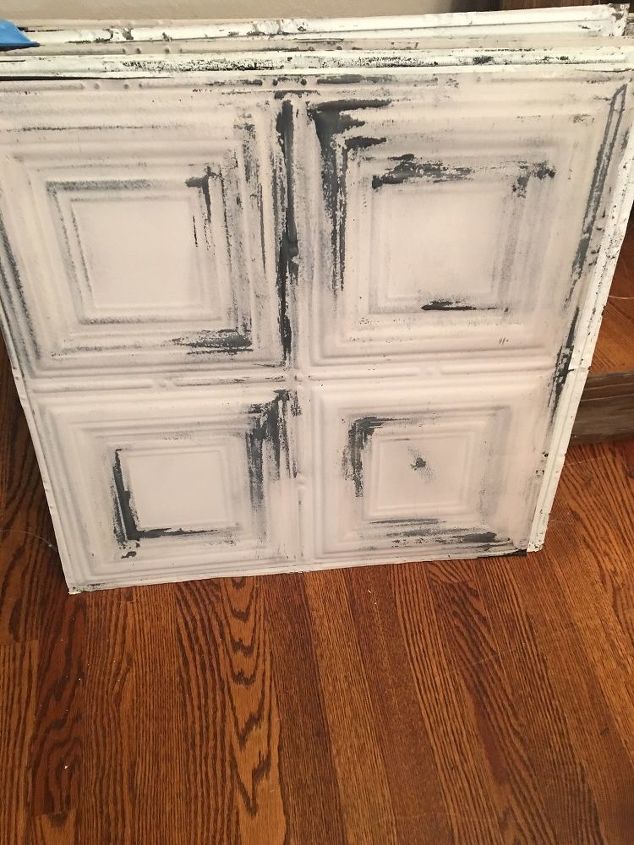
I just bought these tin ceiling tiles yesterday from marketplace and I loved them and got them so cheap, I originally wanted to try and use these for my backsplash but I’m not sure how you cut th and if there is a better way to start to get all of the squares to line up the best? These are the 24” tin tiles so they will have to be cut around 13.5“ to fit the majority under the cabinets, Or if you have any better ideas to use them for? I also thought a big artwork framed in my dining room possibly? Thank you all in advance for any ideas or tips you may have 😊


If you have enough, these would be amazing on a laundry room ceiling!
Cutting them will not be hard... usually with tin snips. A metal blade in a sabre saw or skill saw will work too... You will want the cut edge up under the cabinets... or you might want to center the square and use trim or molding above and below. Seal them with several coats of a clear washable sealer.. so you can wipe them clean with out effecting the patina.
Would make a cool back splash! Here is how to cut them.
https://www.doityourself.com/stry/how-to-cut-tin-backsplash-tiles
https://youtu.be/BVcsBrZCVLk
https://youtu.be/YPMt42wYfdY
http://homeguides.sfgate.com/tips-cutting-installing-metal-tile-backsplash-61823.html
That could be outstanding. Instead of thinking how you can cut the tiles to fit the space, think about where they would be best cut for artistic purposes, then think of what filler material you can use to "frame" them, maybe top and bottom. For example, you said they are about 24 inches and you need 13.5 inches. But it looks like a good cutting place would be 12 inches, between two squares. That leaves 1.5 inches of space you need filled. Matt black might be a great color for this filler space. Door molding could be just right, maybe with a bit of architectural interest in it. Or maybe just a very narrow strip of half round. Something plastic, like tubing (oh wait, it would be a real pain to cut in half lengthwise. Go to the craft store and look for braids or trims that you could paint then glue on when dry. (A word of warning: try not to use anything too stiff for this unless you're sure your walls are very flat. If they have a bow in them, you'll find it really hard to make anything too inflexible stay in place with just glue. We ended up having to tack the molding as well, but tiny nails really aren't very visible anyway.) Here's some pics of the way we put our peel-n-stick stainless mosaic tile with a narrow black molding and teal walls.
I would love to get ahold of some of those and use them for a headboard.
Frame several of them 24x24 and put them in an entryway.