


The Ultimate Craft Closet Makeover
Please take a minute to click here to sign up for the Mother Daughter Projects weekly newsletter. You'll get notification about our new projects and what is up and coming.
There is nothing more frustrating when crafting or making than knowing you have what you need, but you can’t find it! I read a quote once that stated “if you can’t find it, you don’t own it!” I think of that often when I can’t find something and have to buy again in order to start or finish a project.
This is a great way to store all your crafting supplies so you always know where everything is!
We are making over a closet that is 86" wide x 96" tall x 23" deep. A pretty standard size for a bedroom closet.
We are calling this a semi-DIY because we are not actually building anything. With the exception of cutting a few pieces of closet rod, all the other components are ready to be installed and come with all their parts to get the install done quickly.
Take a few minutes to watch the video to see how the closet install came together!
Want to see our latest projects? Sign-up for our weekly newsletter here!
Here's what we used:
Materials:
- (2) Stanton 29 in. White 8-Drawer Double Wide Storage Cart (These are no longer available. Consider a rolling tool box that is 18" deep. This closet is 23" deep so something like this would fit.)
- (6) Everbilt 1-3/8 in. White Plastic Closet Pole Sockets ( Home Depot)
- (2) Everbilt 96 in. x 1-1/4 in. White Closet Pole ( Home Depot)
- Wall Control 32 in. x 48 in. Metal Pegboard Standard Tool Storage Kit with White Pegboard and White Peg Accessories ( Home Depot)
- Wall Control 32 in. x 32 in. Overall Size White Metal Pegboard Pack with Two 32 in. x 16 in. Pegboards ( Home Depot)
- Wall Control 1 in. Vertical White Slotted Metal Pegboard Workstation Accessory Kit ( Home Depot)
- (3) Rubbermaid 25 in. Twin Track Upright ( Home Depot)
- (6) Rubbermaid 11-1/2 in. White Twin Track Shelf Bracket ( Home Depot)
- (3) Rubbermaid Zinc Twin Track Universal Hardware Pack ( Home Depot)
- (2) Rubbermaid 11.8 in. x 71.8 in. White Laminate Decorative Shelf ( Home Depot)
- (2) Crates and Pallet 18 in. x 12.5 in. x 9.5 in. Large Wood Crate ( Home Depot)
- 11.75 in. x 9.5 in. x 4.75 in. Small Wood Crate ( Home Depot)
For your convenience, there are links to the products we use in our projects from Amazon as well as The Home Depot, Wall Control. (Mother Daughter Projects is a participant in the Amazon Services LLC Associates Program, an affiliate advertising program designed to provide a means for sites to earn advertising fees by advertising and links to Amazon.)
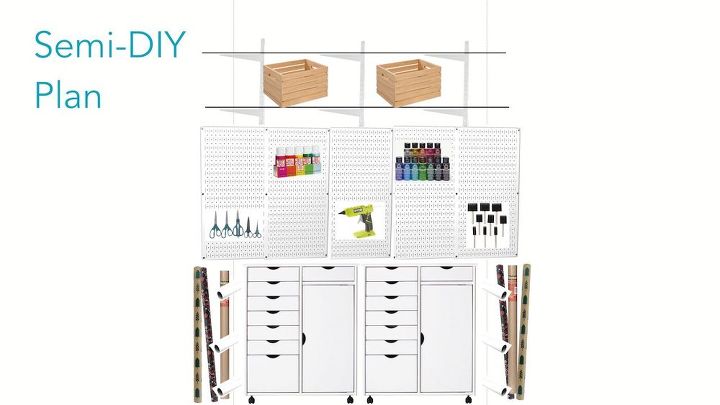
We started by digitally trying out various components in the closet space to determine exactly what we wanted and what would fit. This is the final rough plan of the design. We ordered all the components online from The Home Depot which were delivered to the store with free shipping.
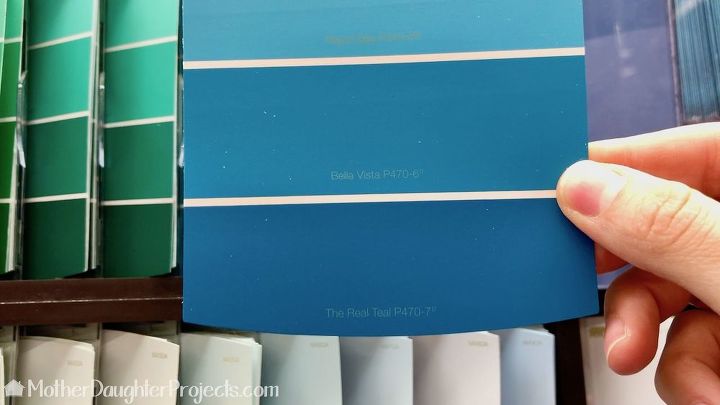
Color! Since we were using all white components, we wanted a color that would really stand out. 'The Real Teal' by Behr paint was the perfect choice. Notice in the after pictures how vibrant it looks in the green room. Closets are a great place to add a pop of color that you might not want on a full wall.
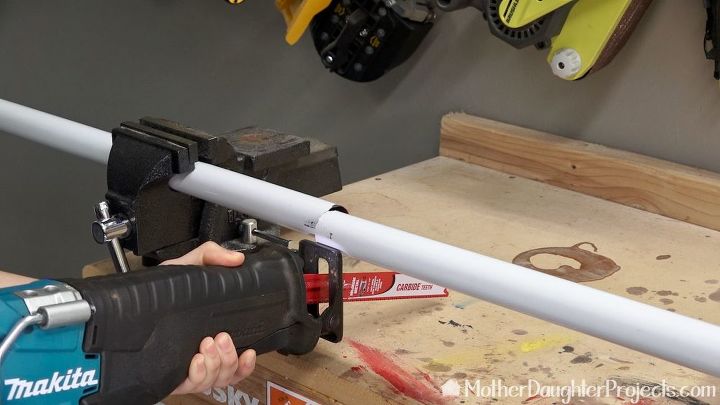
Six short sections of metal closet pole were cut to the depth of the closet. We Installed three sections on each side to store wrapping paper and other tall items. The pole sections fit into standard closet pole sockets and simply screw into place. In this picture were are using a reciprocating saw with metal cutting blade to cut the pipe. This can be done in many ways including manually with a hacksaw. Takes a little more effort but it can get the job done!
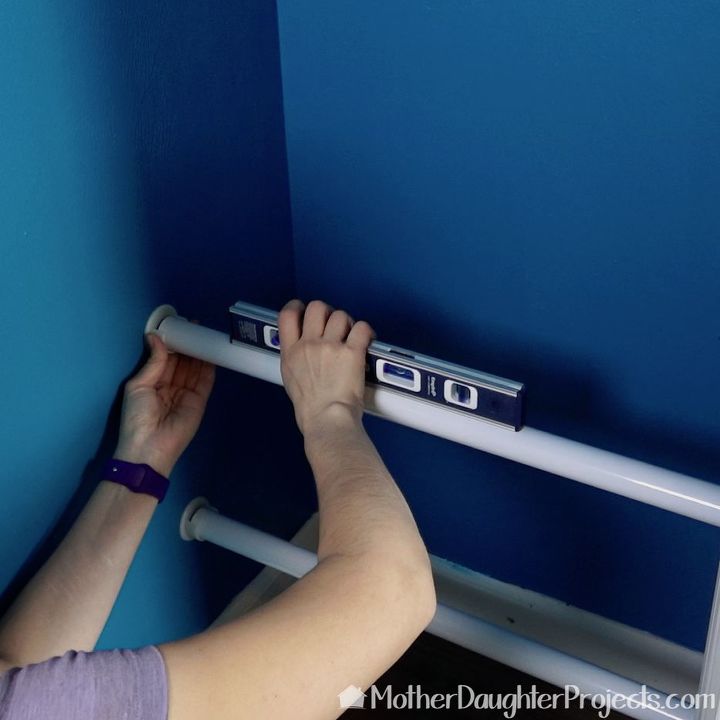
The three metal pole sections were placed in the sides of the closet. The level was to be sure everything was perfectly straight before attaching the pole sockets.
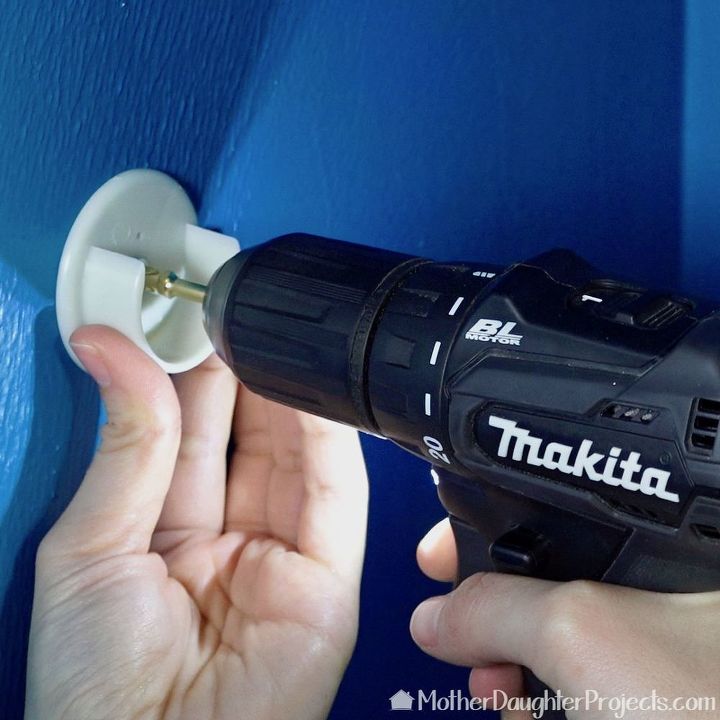
This is a close up of one side of the closet socket. This side is partially open so the pole can easily be taken out.

The craft organizers we chose came fully assembled so all we had to do was put the wheels on. Everything you need is included with the unit.
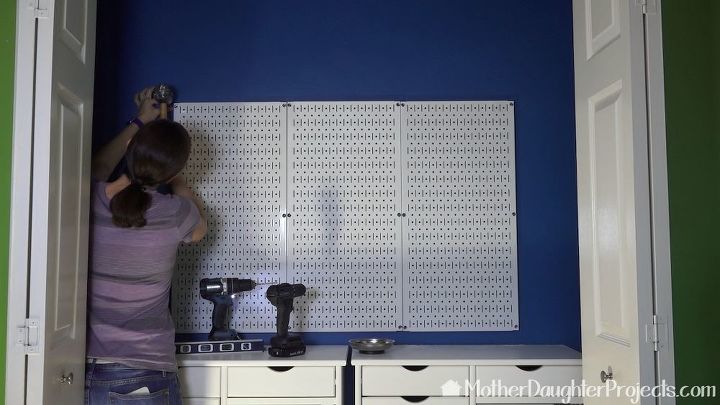
After the craft organizers were rolled into place we were able to determine the bottom placement of the pegboard. This is a unique metal pegboard made by Wall Control. It was amazing how quick this part was to install. Each panel got six screws and anchors. We installed the one in the middle first and worked our way out towards the sides. We don't like to say something is quick and easy, but this part really was!
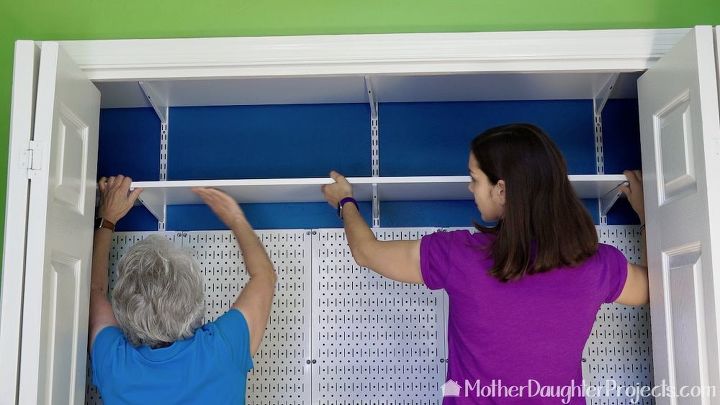
Next we marked the placement for the rails that would hold the two shelves. These were screwed into place. The brackets were put into place and then the shelves. We also took the time to secure the shelves to the brackets with the screws from the Rubbermaid hardware packs we purchased.
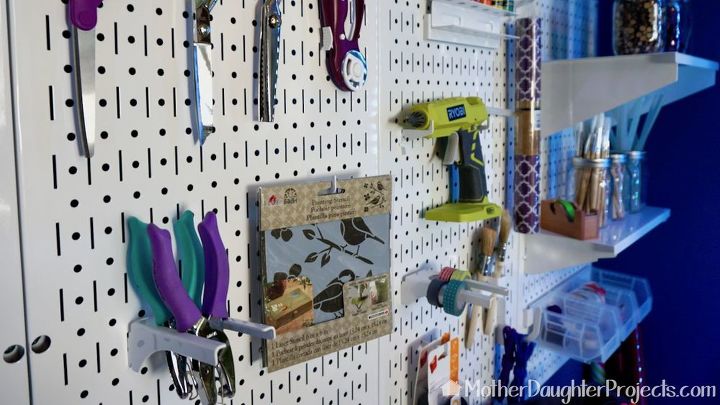
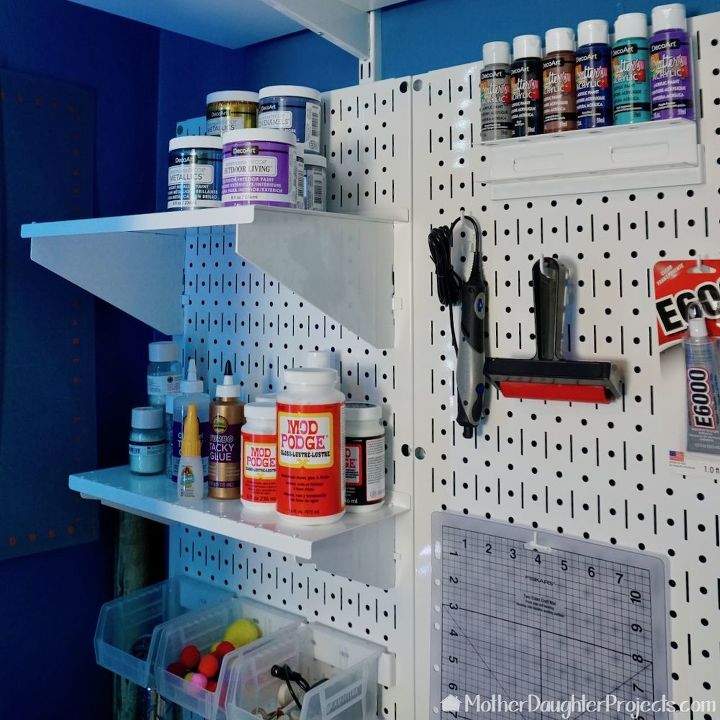
Lastly, we positioned all the pegs to hold our craft supplies. Wall Control has a wide variety of pegs which include shelves for all your tool or crafting stuff.

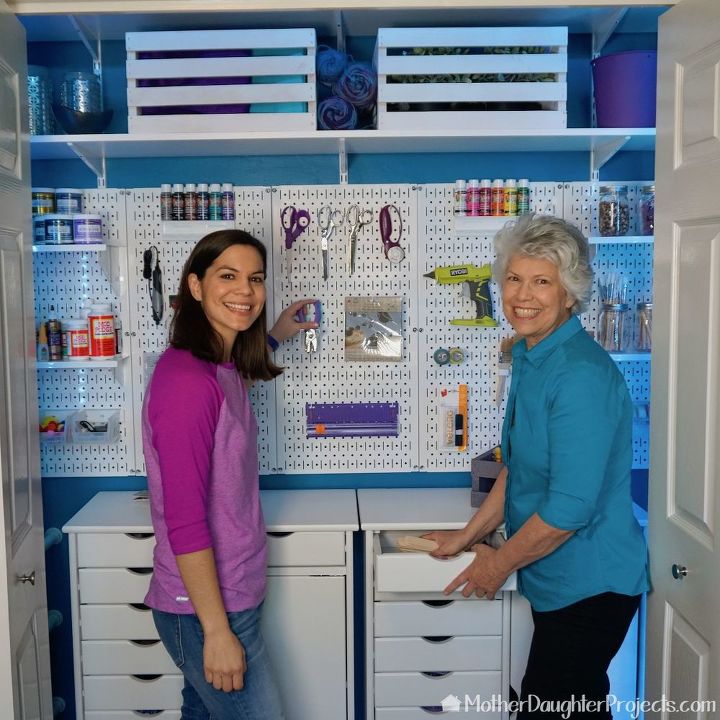
So nice! Now everything has a place!
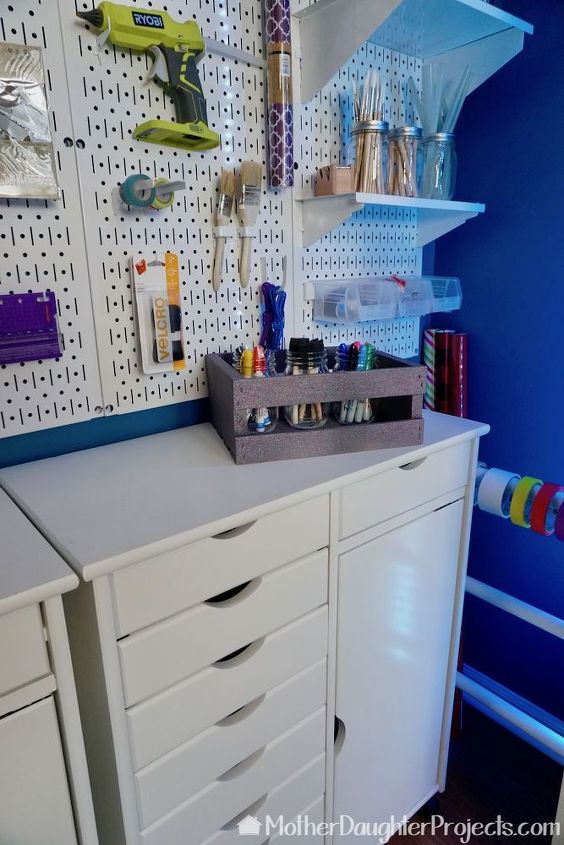
We spray painted that little crate with purple glitter paint. Those are large rolls of tape being stored on the closet pole. You could also hang gift bags from these.
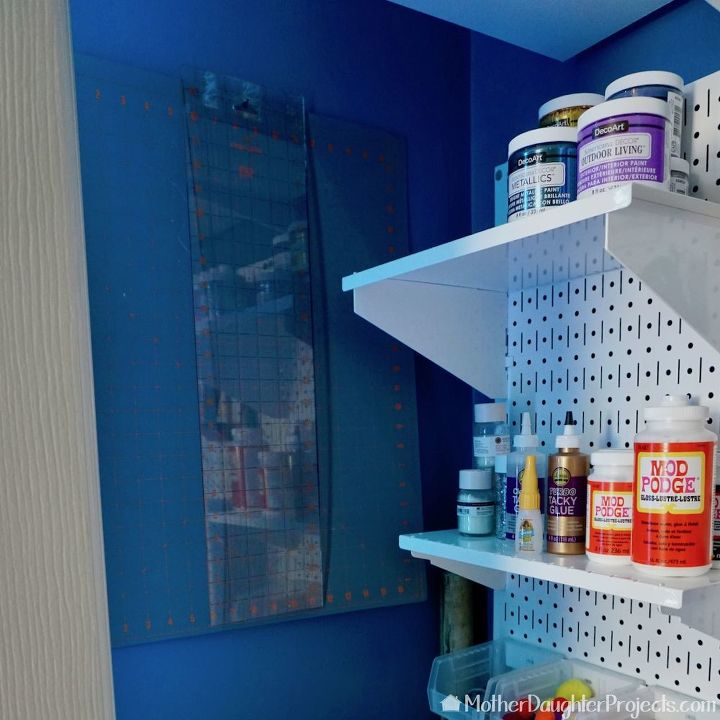
We utilized this area to hang our cutting mat and large ruler. These two things are always so awkward to store.
A closer look at the shelves and bin organizers (lower left).
The Wall Control panels are also designed to use common pegs. The drawers of the craft organizer come out fully so you can take your supplies where you need them.
Note: the cost of this came in just under $1000 not counting craft supplies. The biggest expense were the two organizational units. To save money, you could use a table or build something to fit the space. Head to our blog post to see a complete list of materials with links to the items we used. It's hard to give a time estimate for this project. The install probably only took a couple of hours, the painting took longer. If you're not painting you could have it done very quickly.
Resources for this project:
See all materials


Comments
Join the conversation
-
A great way of keeping craft items contained in one area. This definitely has tons of space and plenty of areas to keep all your craft supplies. Great job.
-
OMG it's a DIYers dream!!! Love it!


Frequently asked questions
Have a question about this project?
YOU GOT A CREDIT CARD???,HAHAHA.LOL
BEST CLOSET I EVER SEEN, I AM JEALOUSE
What a great idea! I’m looking for the actual rolling drawer cabinet you used with the panel side door, but can’t find it in the link. Who is the manufacturer?
Gosh I just saw your video. Love how the closet turned out. I too was looking for the cabinet you used. Cant find it at Home Depot. Then I saw the post that it was discontinued. Could you recommend a cabinet that would be similar?