


My Mid-Century Modern Inspired Entertainment Unit Build

by
Zac Builds
8 Materials
$290
2 Days
Advanced
I've been wanting to build an entertainment unit/TV stand for a while now. After months of crawling pinterest and looking for inspiration I finally settled on this design. The horizontal shelves are made of solid 8/4 walnut (my poor wallet) while the vertical "legs" are made of solid 4/4 maple.
It's got a simple look and I used a few tricks a long the way to help cleanup my whole living room and decrease clutter.
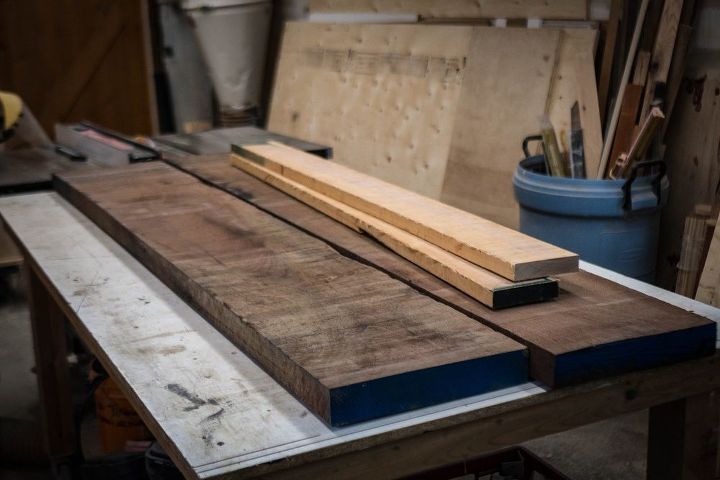
Here's where it all started. I got the 8/4 Walnut and 4/4 maple from a local mill. Each piece of walnut must have weighed close to 40lbs before I milled it all down.
All told it cost me ~$290 CAD. This was far from my cheapest project, but to buy something of similar quality in a store probably would've cost me many multiples of $290. So in someways I got a real bargain haha. Come to think of it, I don't even know where I could find something comparable. All of the retailers near me are only selling particle board based furniture.
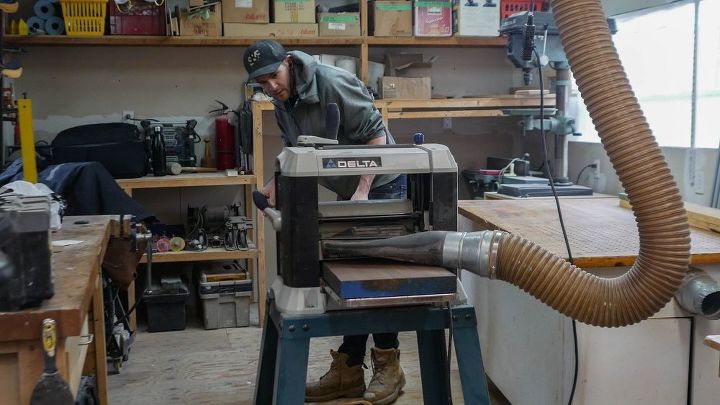
Step 1. Plane that walnut. The planer removes a thin layer of material from the surface of the wood, removing high spots and leaving you with a nice smooth finish. Which is important because the walnut I bought was quite rough and uneven.
I got lucky here, my planer is only 13" wide and one of my pieces of walnut was 12 1/2" wide. Talk about pushing it to the limit.
Oh, I also planed the maple too, but I thought 2 pictures would be a bit redundant, so you'll just have to use your imagination.
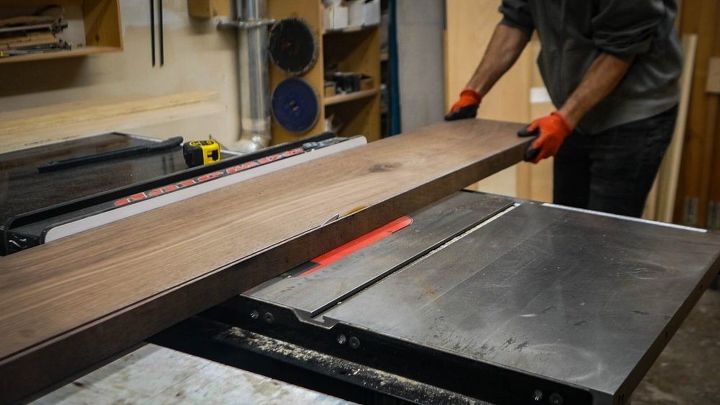
After planing the wood down, I ran it through the table saw to remove it's rough sides and make sure all my lumber was the same width.
Because I buy semi-rough lumber it isn't all the same width. The difference between my two pieces of walnut was about 3/4".
Meaning I had to remove 3/4" from the wider of the two pieces. In the end I cut the walnut down to 11 1/2" wide and the maple to 3 1/2".
Again, because it's semi-rough lumber, all of my pieces were different lengths and the ends are a little bit uneven. Mitre saw to to the rescue! I squared up the ends and cut my walnut to 72" long.
It'd be remiss of me not to use my mitre saw for a couple of mitred cuts as well. This is how I achieved the angles in my u-shaped legs.
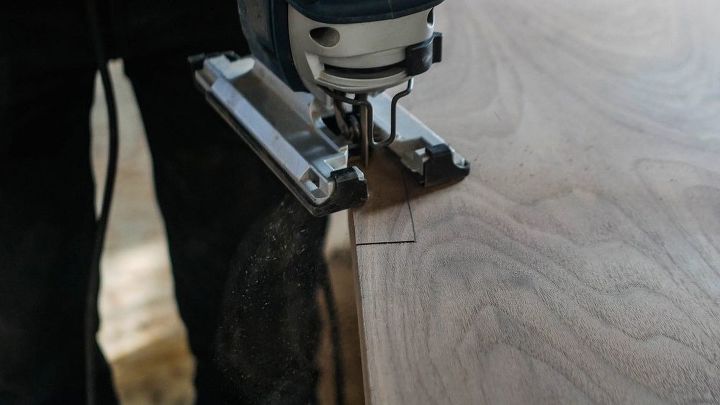
Because I wanted the legs to sit flush inside of the TV stand I had to make some cutouts in my walnut slabs. 12" in from the ends of the walnut I traced the outline of my maple legs.
I'm not one of these fancy carpenters that does everything with super sharp hand tools. I used a normal off the shelf jig saw with a blade that was probably a bit too dull.
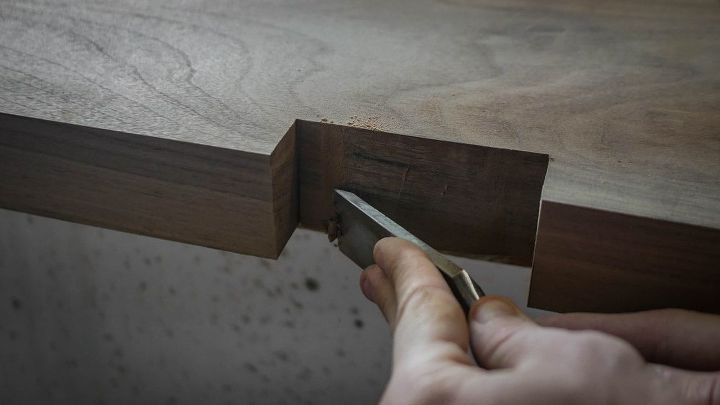
Ok so my jig saw method didn't give PERFECT results, I don't see how anyone could've seen that coming! I had to clean things up a bit with a chisel and some sand paper afterwards :) This was actually a pretty time consuming process. Seems easy when it's just two photos in a gallery, but I spent hours making sure these cutouts were as clean and tight as possible.
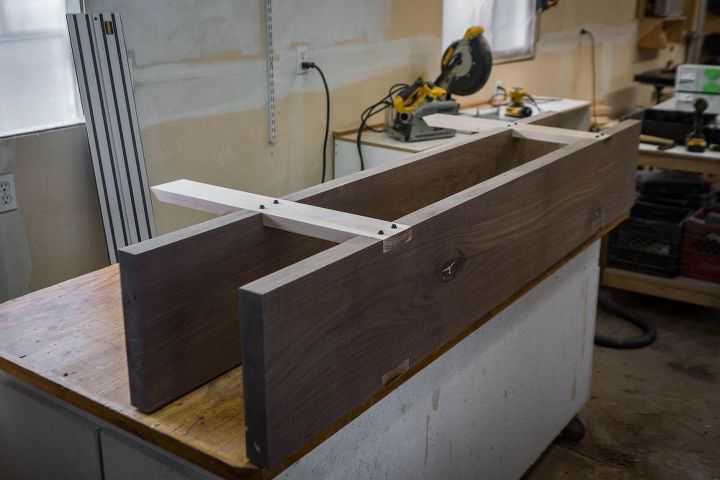
To secure the maple to the walnut I pre-drilled some holes in the front of the maple and then used big black lag screws to fasten it in place.
It was at about this point when I realized just how heavy this thing was going to be. I had to flip it over a couple of times and immediately felt bad about my upper body strength. Oh well, no need to go to the gym if you just make super heavy furniture all day long. Almost done, only a couple more steps!
Weight wasn't really a concern when I was picking my materials, but after lifting this a few times maybe it should have been! It's got to weigh close to 80lbs and that's before I added electronics to it!
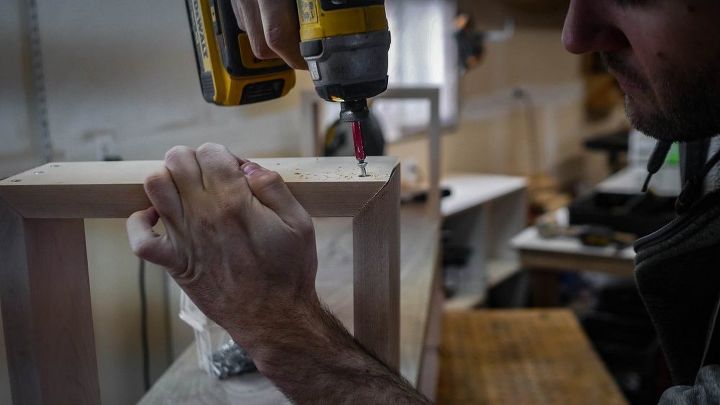
Because the bottom of the legs will never be seen it was the perfect place to hide some screws! Not sure why I thought it was important to hide these screws considering I didn't hide any others. Best not to probe too deep into my decision making process, lest I accidentally do some honest self reflection...
I screwed into the end grain of the maple, which isn't the best, but then again it's not exactly a high stress joint either. Just to be safe I used 3 screws per leg and pre-drill every hole.
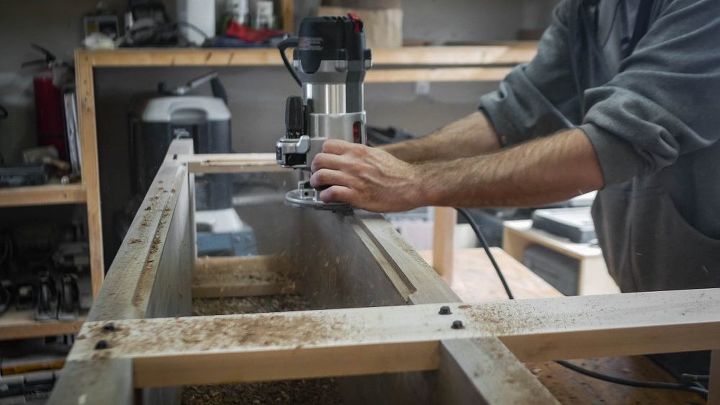
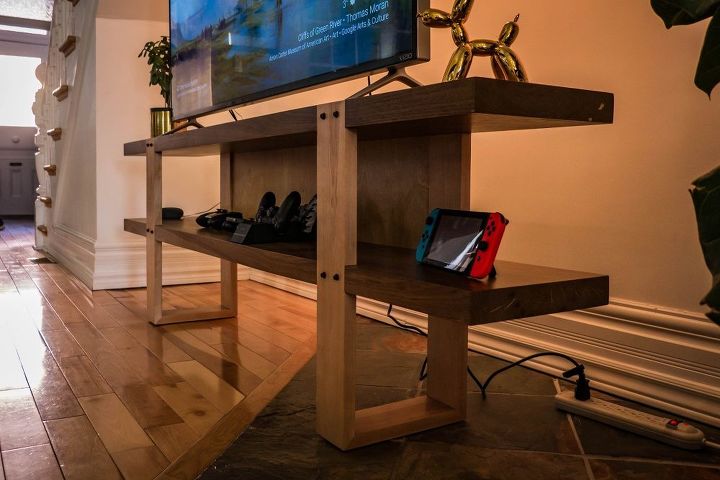
As you saw in my finished shots the middle section of the TV stand has a solid back. A solid back that allows me to hide a lot of wires and ugliness. I had plywood left over from a job I did for a client so I put it to use. Using my track saw I cut a piece that was 10 1/2" by 42 1/2".
Then I used a router to rabbet out a channel in the back of the TV stand. The rabbet was 1/2" wide and 3/4" deep (same as the thickness of the plywood I had just cut). In order to avoid burning out the motor in my router I had to do this step in multiple passes, taking out approximately 1/4" of material with each pass. This allowed the plywood to sit flat in the back of the TV stand, but I wasn't quite ready to install it yet.
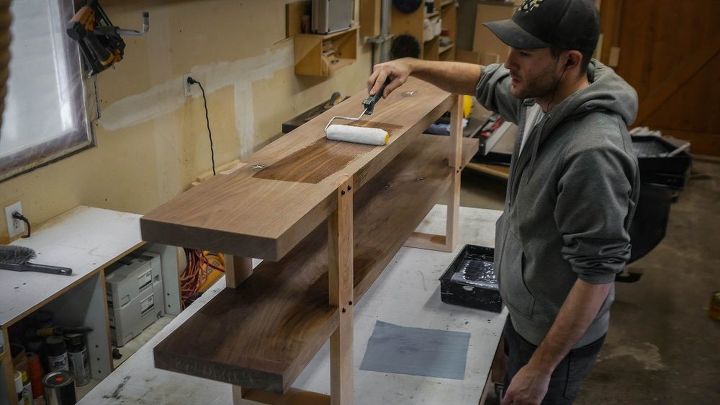
I vacuumed the whole entertainment unit and got ready to give it a coat of varnish. Once all of the dust was removed I used a water based satin floor varnish by Saman to coat my TV stand.
I chose that particular varnish for a few reasons.
1) It's tough. It's a floor varnish, so it's meant to take a beating.
2) It's really easy to work with. After 2 coats of this stuff you'd be hard pressed to find any brush marks or imperfections.
3) I already had it left over from another job. Can't beat free!
I started by cutting in all my corners with a paint brush. Then after I had cut everything in with the brush I rolled the remainder with a mini low nap roller. I tried to work as fast as possible here. Because it's water based it dries quick, and if you try and roll over something that's half dry you'll muck it all up. If you see an imperfection or a spot you missed just wait and you can pick it up in the next coat.
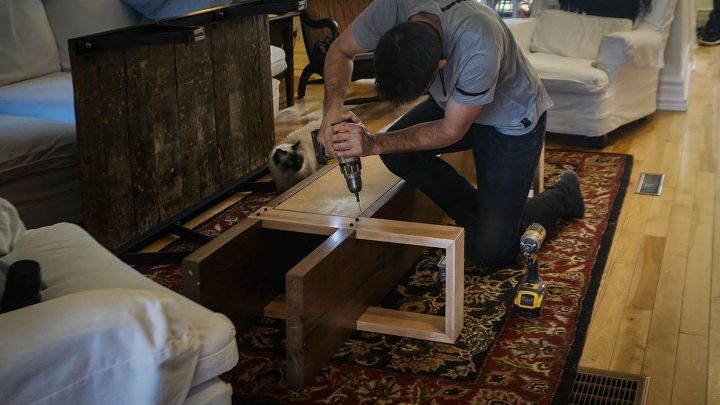
So I got a little sleepy after finishing the varnishing process and decided I'd finish up at home. I packed up a few tools, took everything home and got started the next morning. I piloted out some holes in the back of the plywood and screwed it to the main TV stand. Now it's time to setup my TV and all of the accessories!
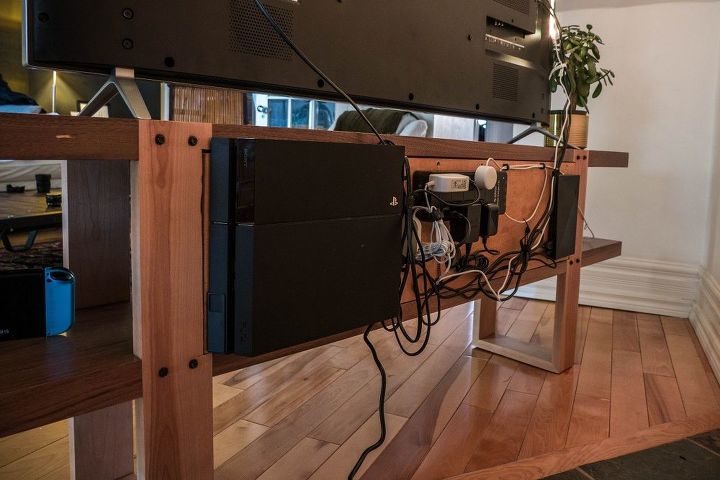
So here's the real reason I wanted that piece of plywood on the back of the TV stand. It gave me somewhere to mount all of the unsightly crap I don't like looking at. I mounted my PS4, a power bar (with USB charging ports built into it), Nvidia Shield and all of their cables back there. It took a lot of cable ties and double sided tape but I got it done. Both the Nvidia Shield and the PS4 seem function just fine without any line of sight to their respective controllers.
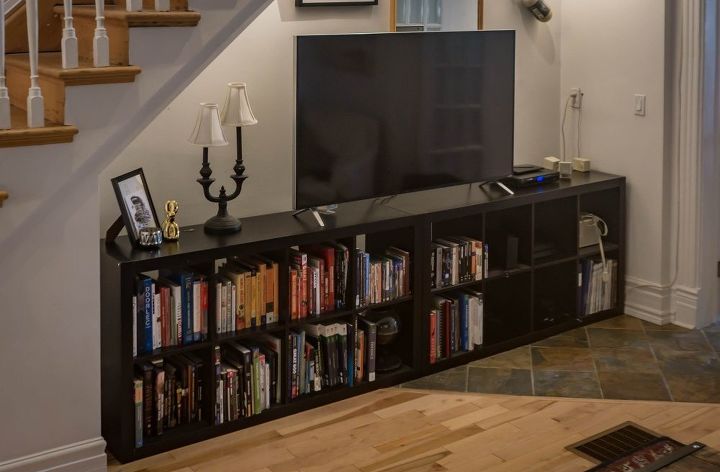
Here's what my home theater setup looked like before I started this process. Yikes! what a mess.
Far too busy for my taste. I think I'm going to have to build a new bookcase to create a home for all of those displaced textbooks :( Sorry textbooks.
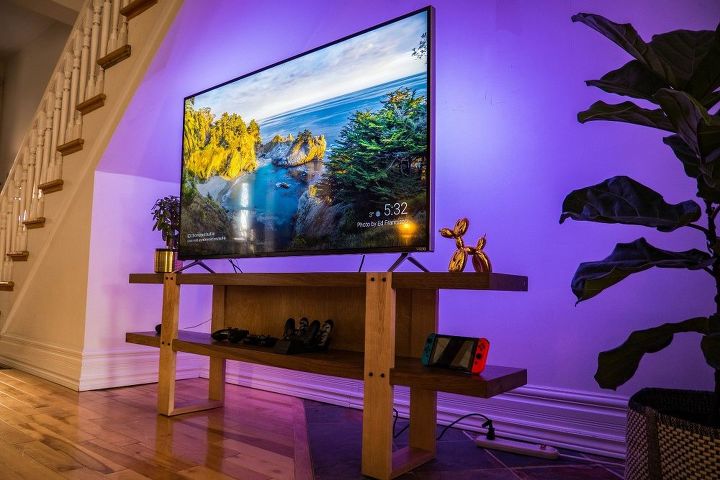
Here's the finish product and what my home theater looks like now! Much cleaner and better organized. I'm really happy with how this project turned out.
Thanks for checking out my build and congrats on making it this far! That's it!
If you want more detail on this build checkout my blog below. There's more photos and a few steps I had to skip because of size constraints.
As always leave any question or comments you may have below! Always love feedback.
Resources for this project:
See all materials


Any price and availability information displayed on [relevant Amazon Site(s), as applicable] at the time of purchase will apply to the purchase of this product.
Hometalk may collect a small share of sales from the links on this page.More info
Want more details about this and other DIY projects? Check out my blog post!
Comments
Join the conversation
3 comments
-
bcz
-
Awesome! I like how your TV is in the nook under your stairs too.


Frequently asked questions
Have a question about this project?
came out gorgeous ! You are quite the woodworker ! Mine looks like your before pix :) How did you get the purple???
I have two cats that LOVE cords! How would you hide cords without making it look like you're hiding cords?
Looks great what a cool idea with the purple led, what exactly did you use for the lighting. Thanks